Husky A300 DE
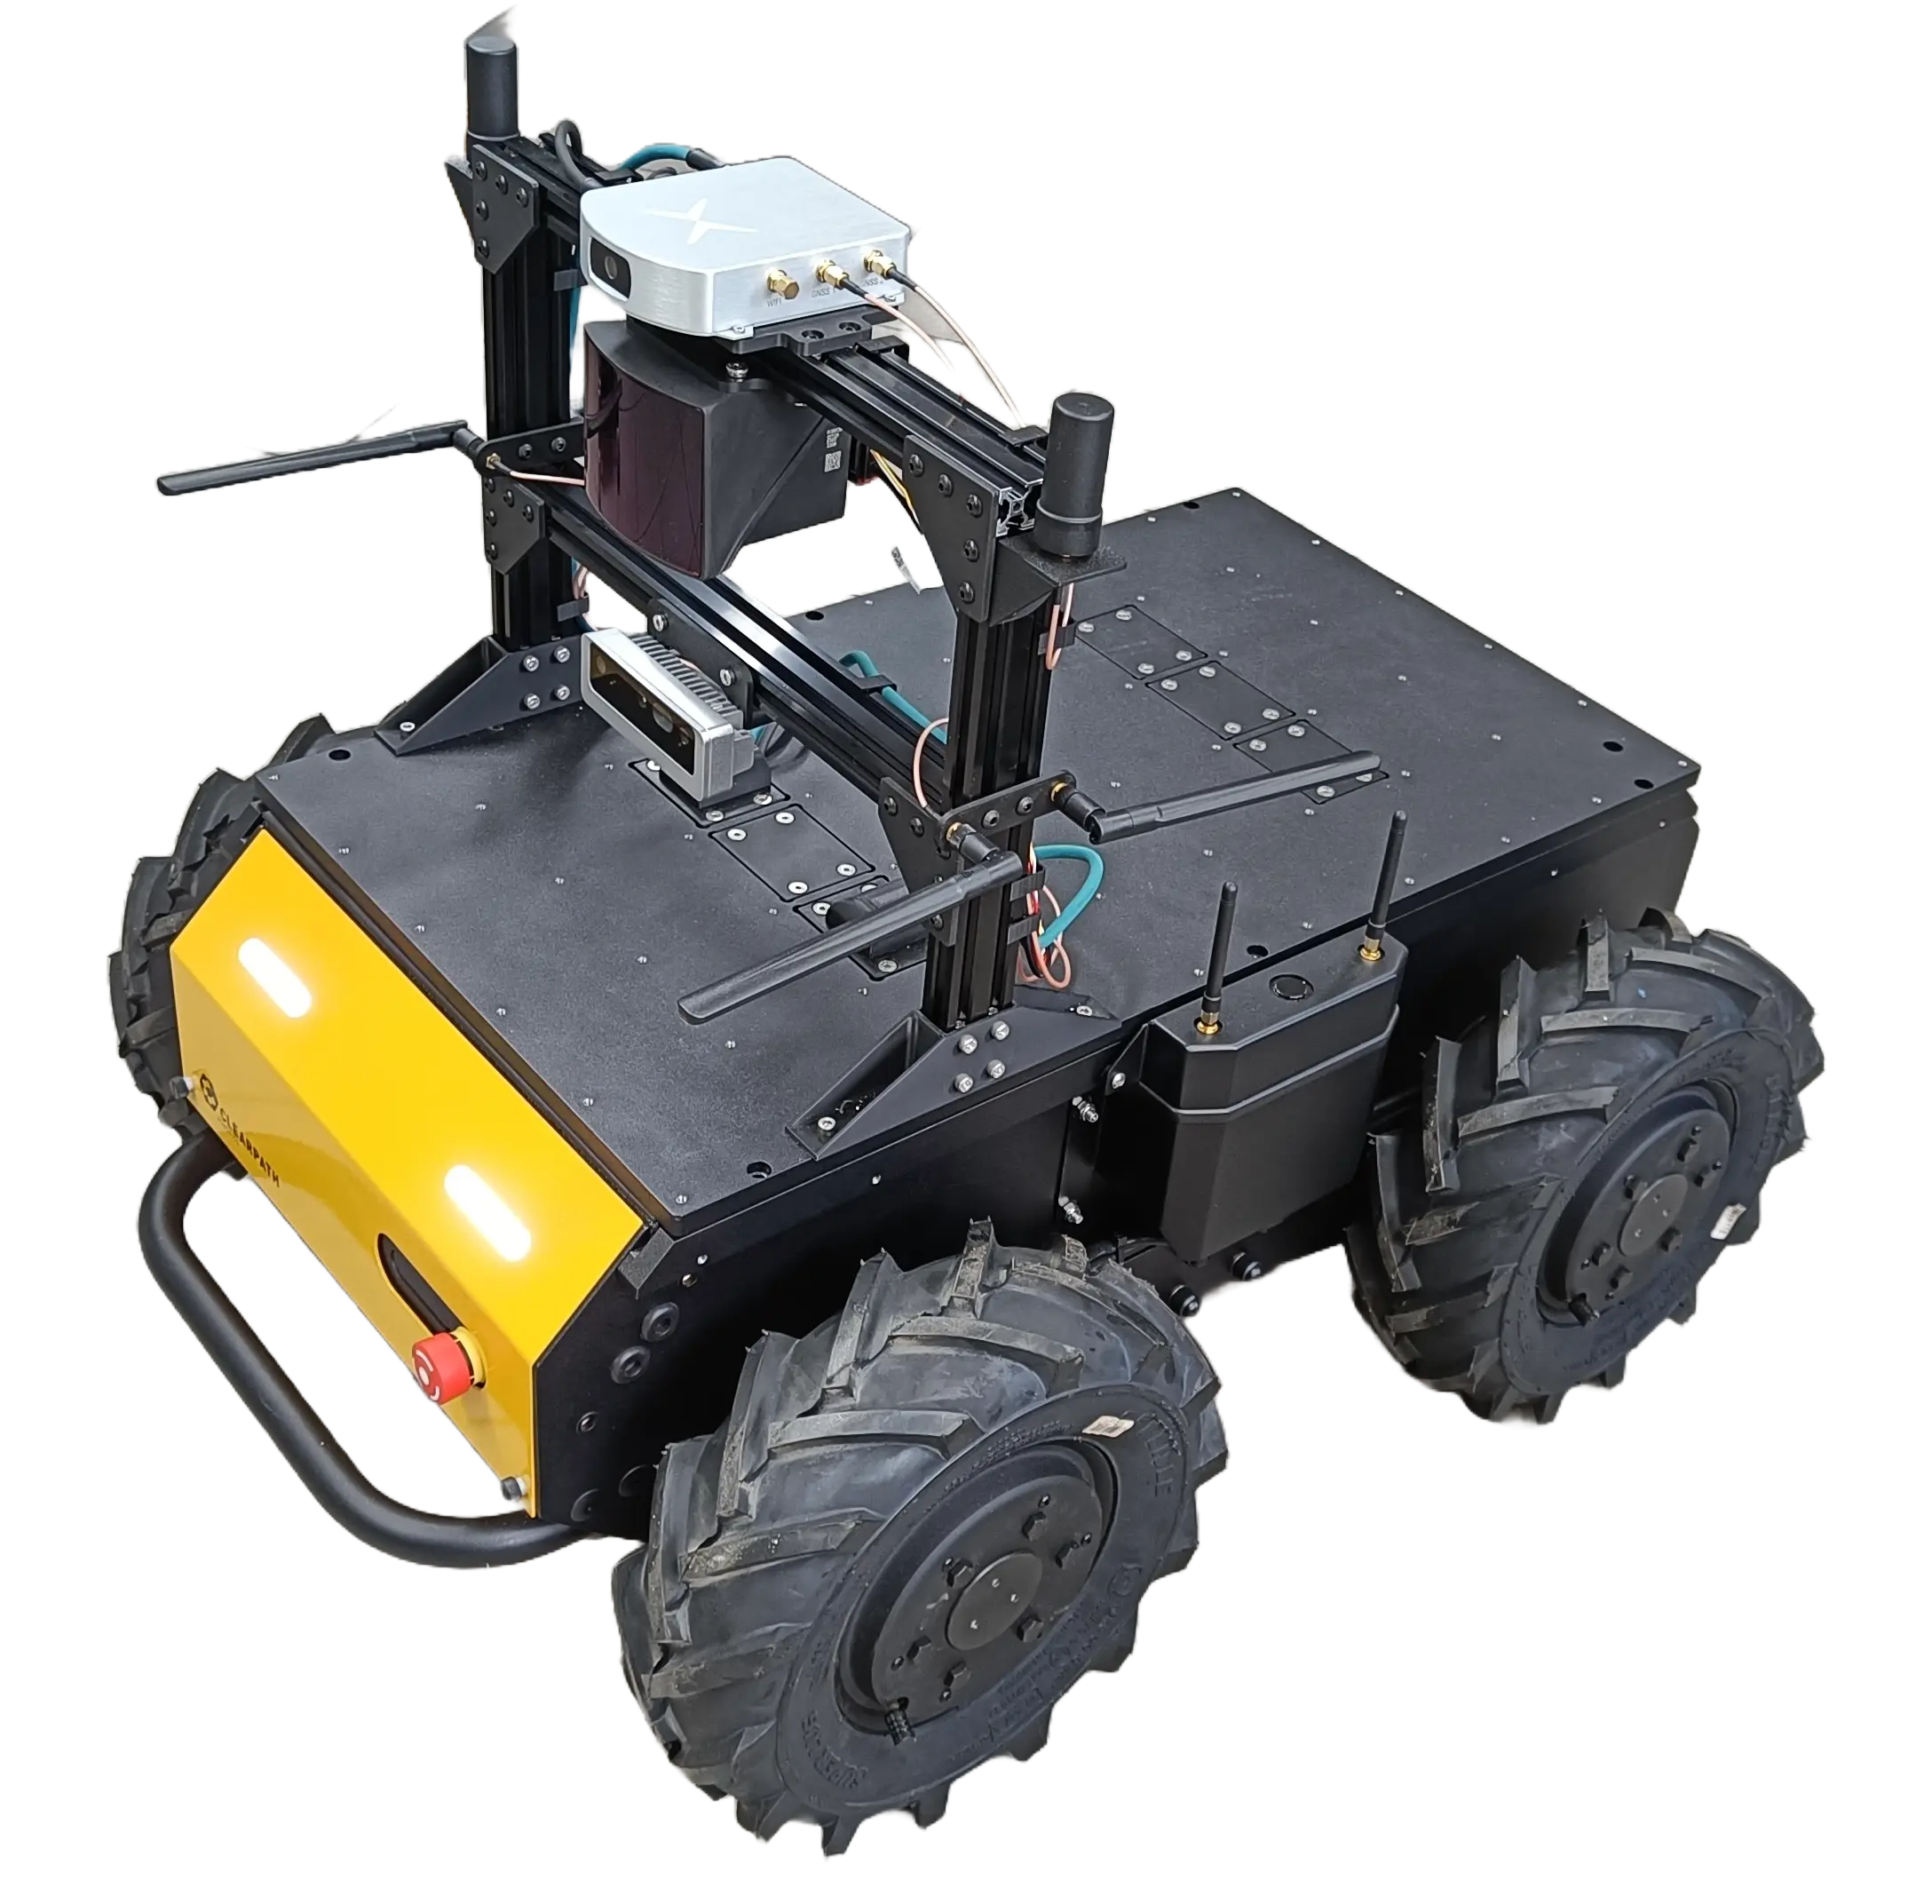
A300 Custom Integration
1 Attention
Read this document carefully. In case of doubt, it is essential to consult specialists, experts, or manufacturers of the assemblies used. The robot must not be put into operation before clarification.
Do not allow persons who are not familiar with robotics or these instructions to operate the robot. Robots are dangerous in the hands of untrained users.
2 Disclaimer
The provided robot, sold by MYBOTSHOP GmbH, is an R&D device and does not have CE Marking and/or Certificate of Incorporation. Basic ROS understanding is required. If you are not familiar with ROS, we recommend checking the ROS2 Wiki first.
The quoted robot is considered a partly completed machine under the Machinery Directive 2006/42/EC and does not carry a CE marking.
Any information or materials provided by MYBOTSHOP GmbH are for R&D purposes only and are provided “AS IS” without any representation or warranty of any kind, express or implied, including but not limited to merchantability, fitness for a particular purpose, or non-infringement.
MYBOTSHOP GmbH shall not be liable for any damages, including but not limited to direct, indirect, special, incidental, or consequential damages, arising out of or in connection with the use or inability to use the information or materials provided, regardless of the form of action.
3 Quick-Start
Important: This manual is for the R&D kit and contains additional information about the Husky A300 robot. For powering on and usage of the Husky A300, refer to the Husky A300 manual provided via QR code in the Clearpath documentation.
3.1 Webserver

Husky A300 Webserver
This module comes pre-installed for heavy integration projects. It should be accessible directly at:
http://192.168.131.1:9000/
or via the Wi-Fi IP to which the robot is connected.
The Husky A300 webserver can be configured via the config file in the ROS 2 package:
/opt/mybotshop/src/mybotshop/husky_webserver/config/robot_webserver.yaml
3.1.1 Login
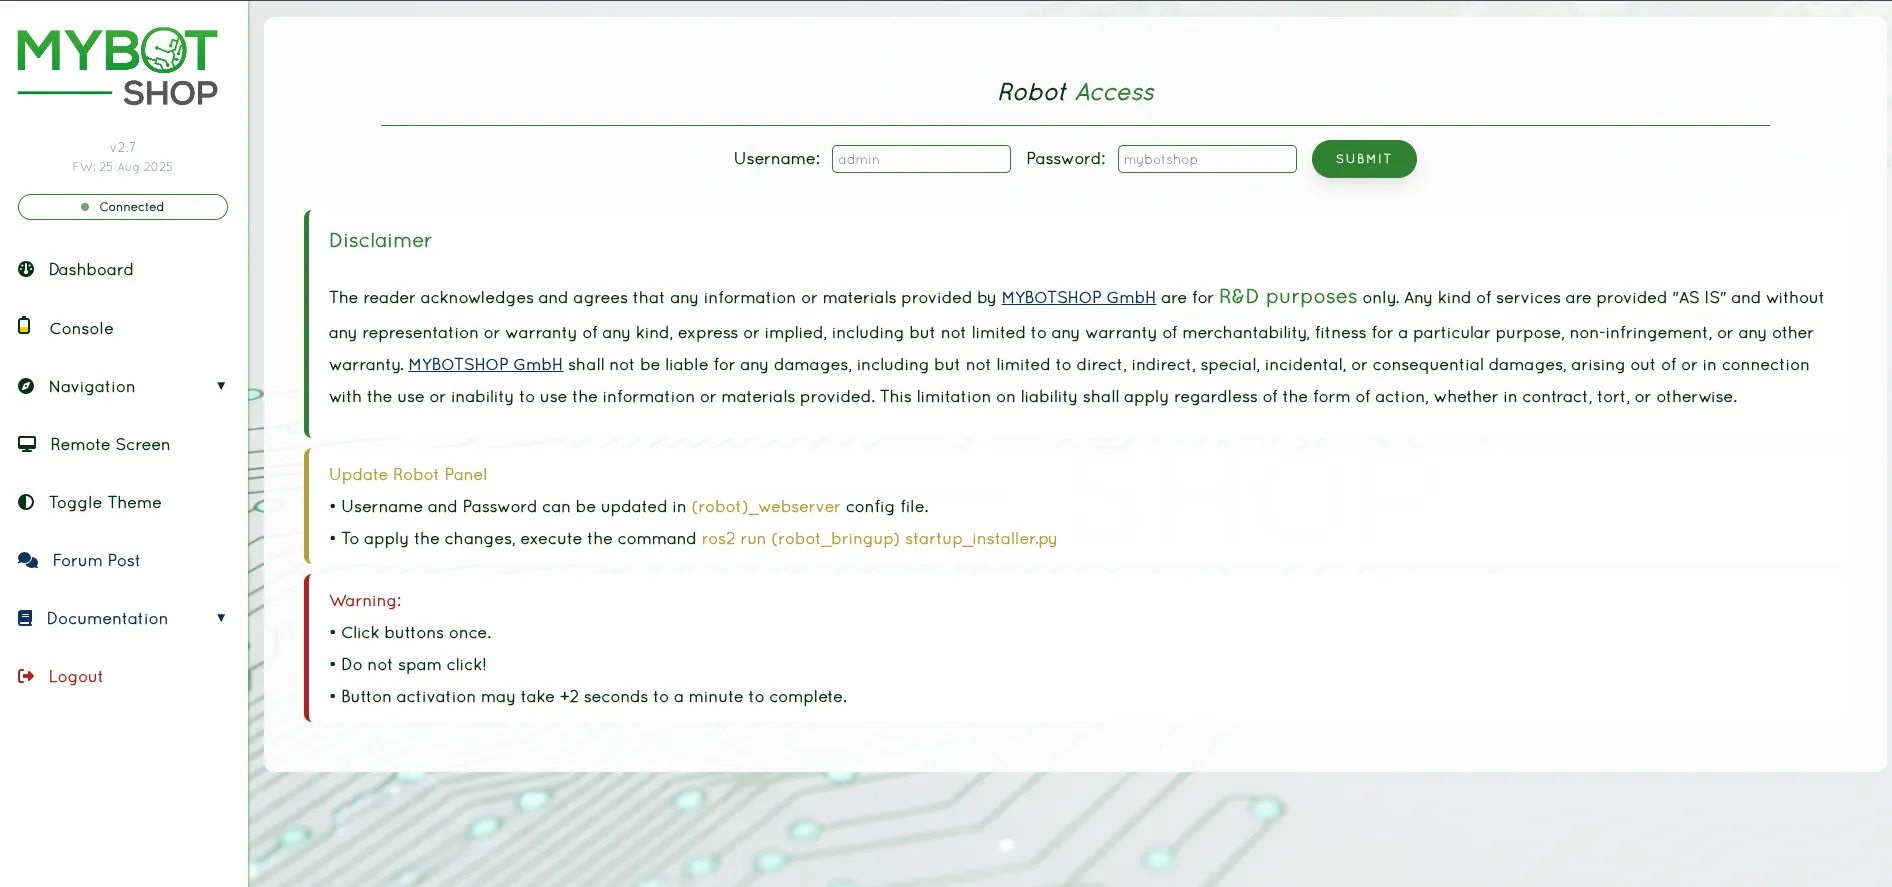
Webserver Login
Username:
adminPassword:
mybotshop
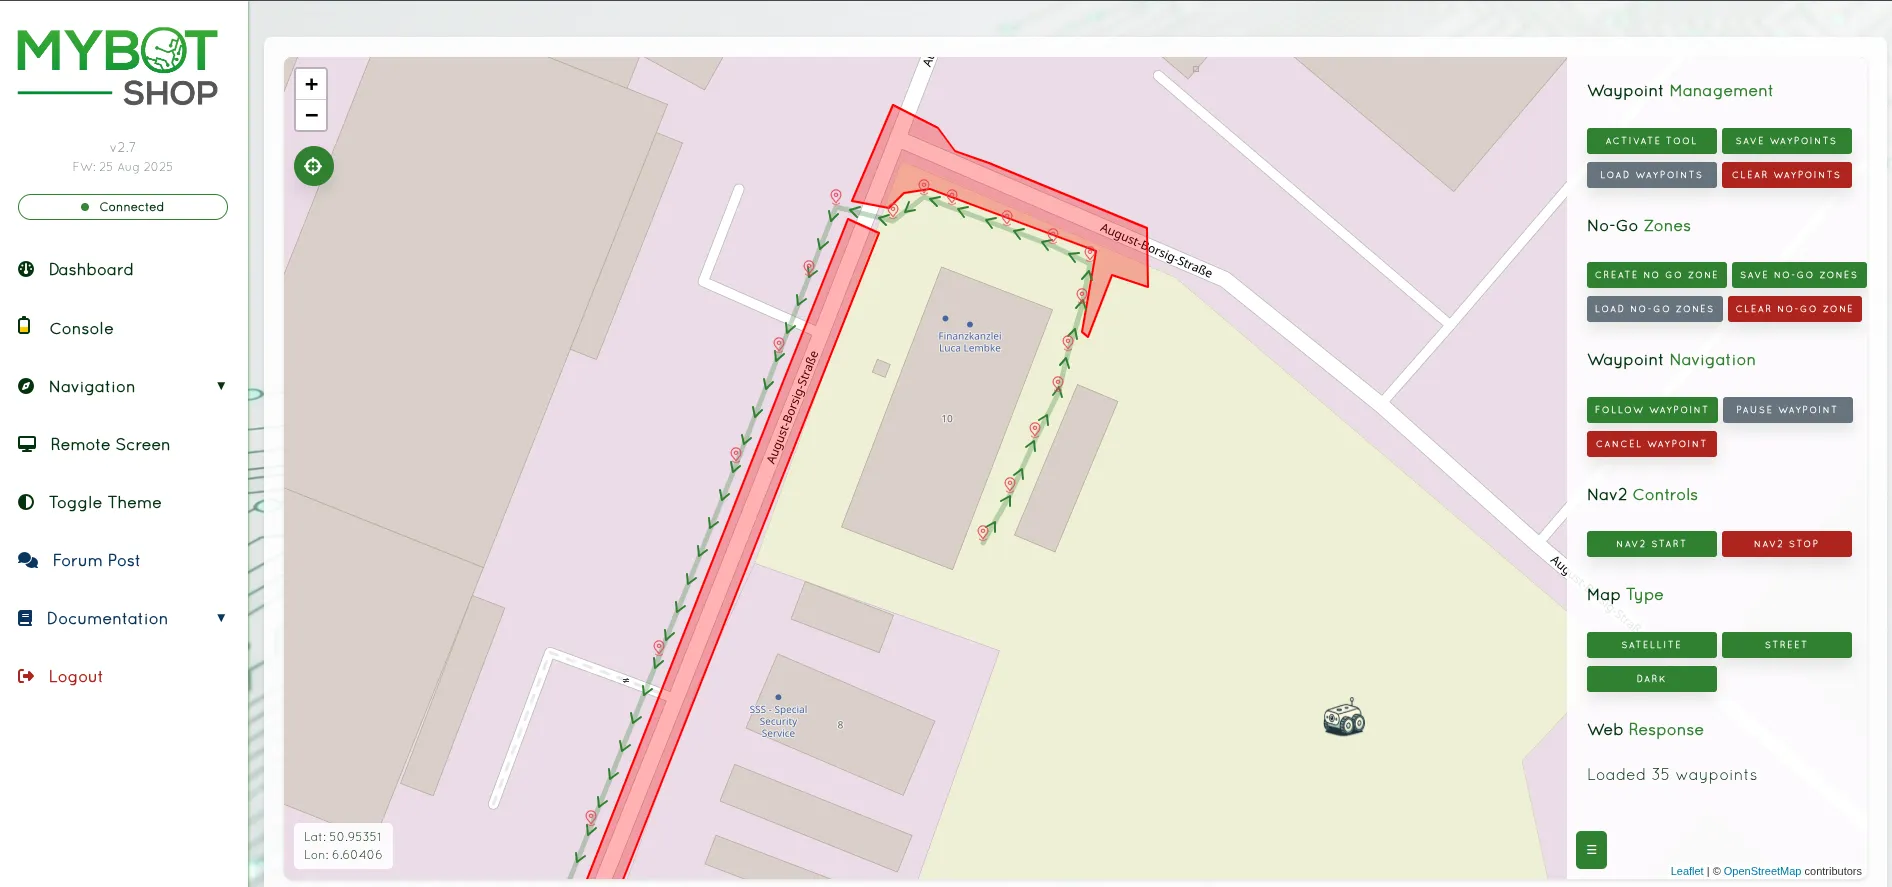
3.1.2 Dashboard
Webserver Dashboard
View IP Address of the Husky A300.
View system load.
3.1.3 Console
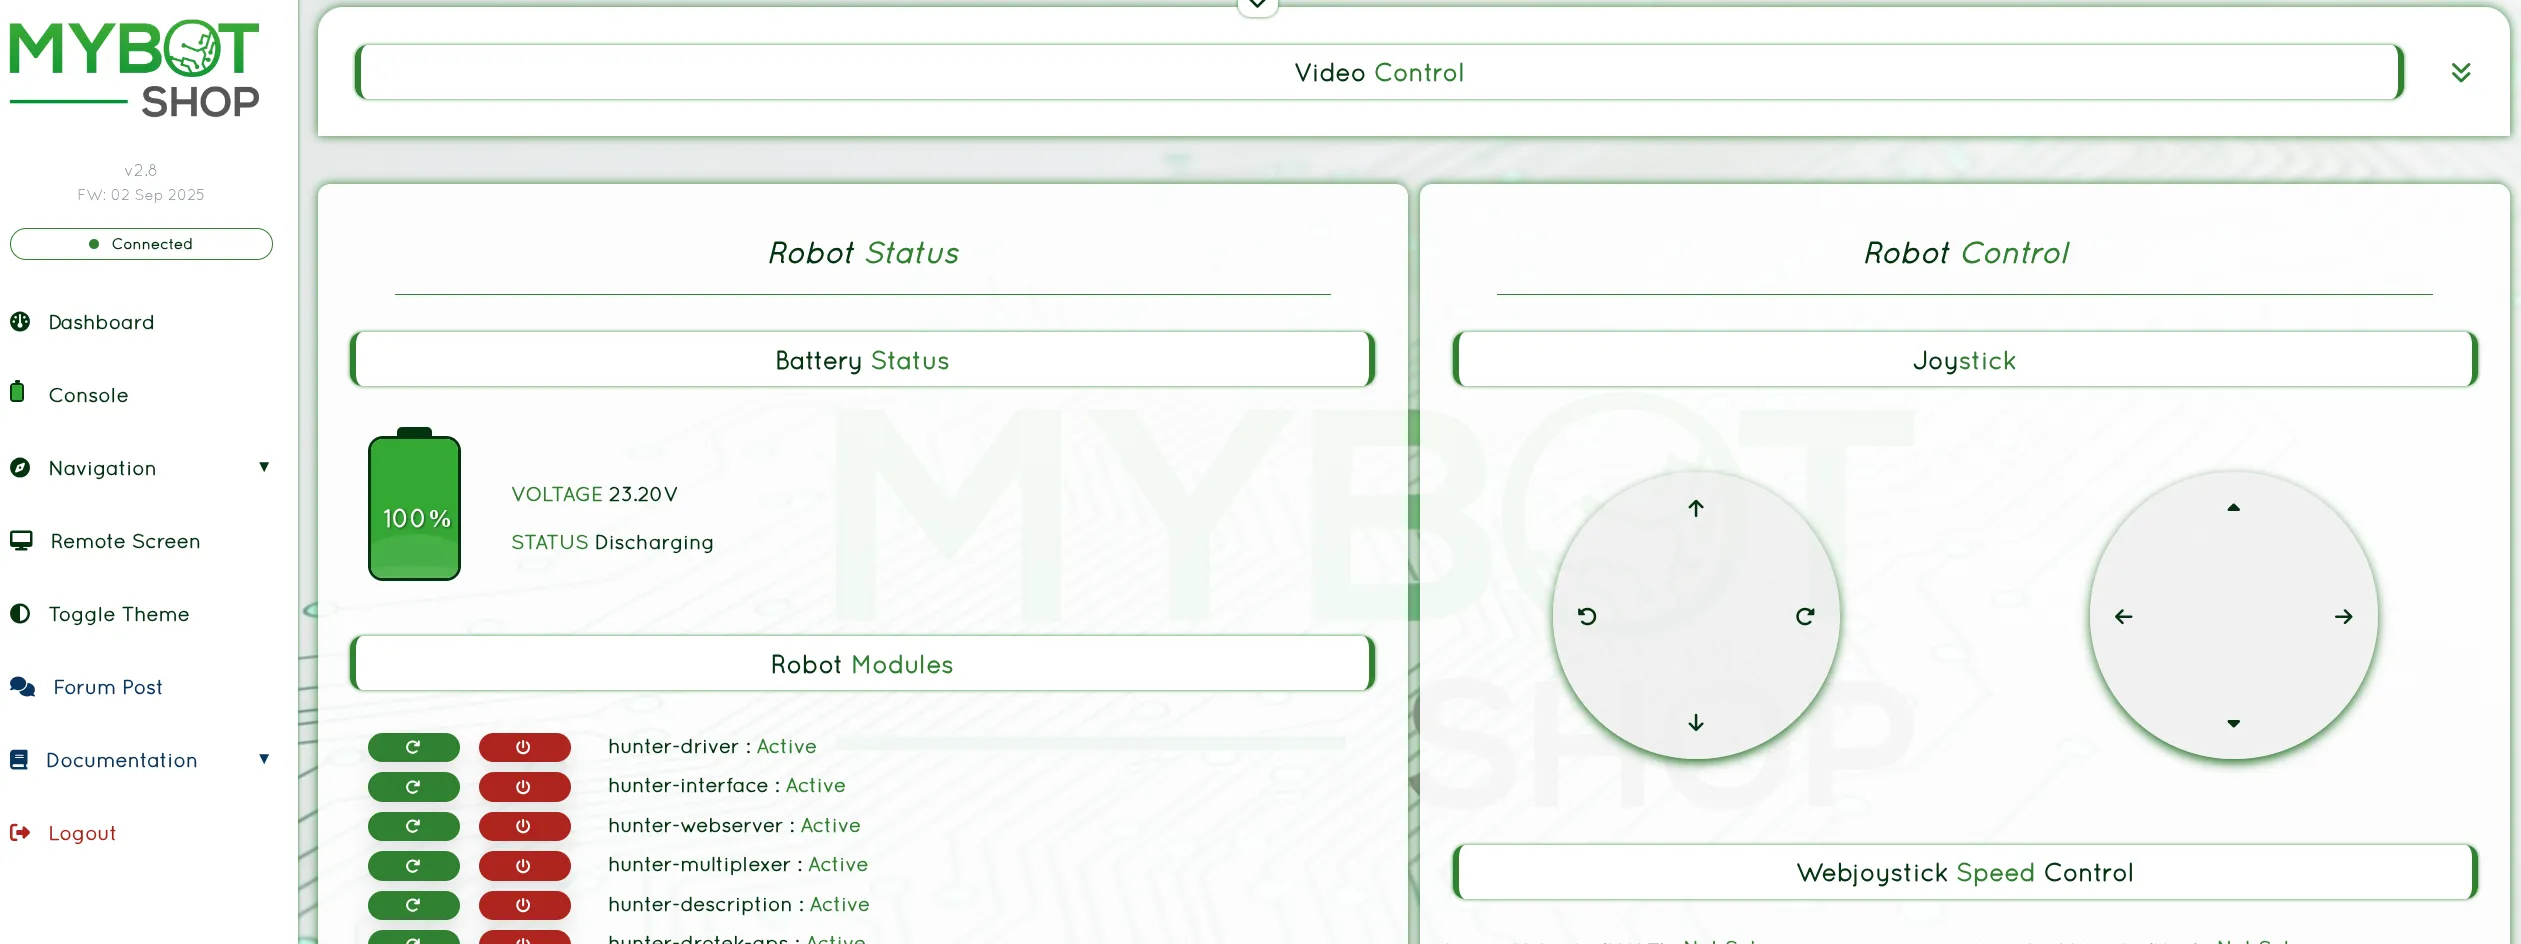
Webserver Console
From the Console you can:
Enable the Husky A300 ROS 2 services.
Disable the Husky A300 ROS 2 services.
Record system Husky A300 logs.
Monitor battery status.
Use pre-configured action buttons (adaptable to new ROS 2 services).
Use the web joystick.
View online image streams.
(Optionally) STT → AI → TTS (disabled by default).
3.1.4 Remote Desktop
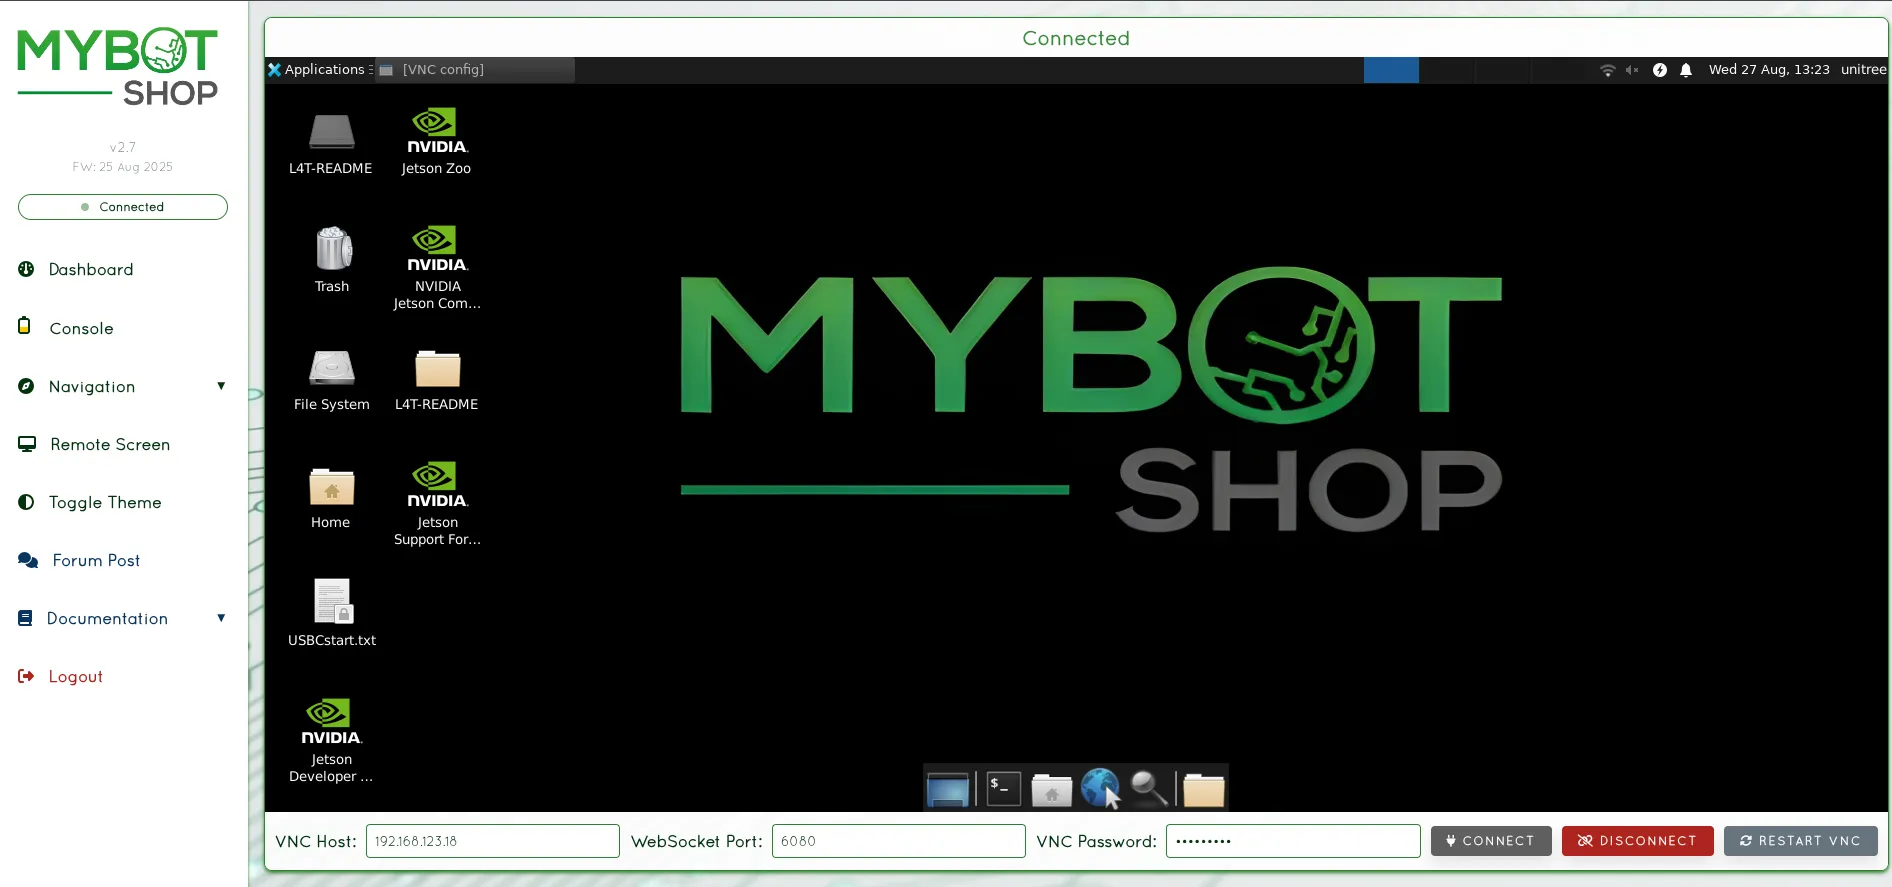
Husky A300 Remote Desktop
Provides access to the on-board screen of the Husky A300’s computer.
3.1.5 Navi Indoor
Indoor Navigation (Disabled)
Currently disabled.
3.1.6 Navi Outdoor
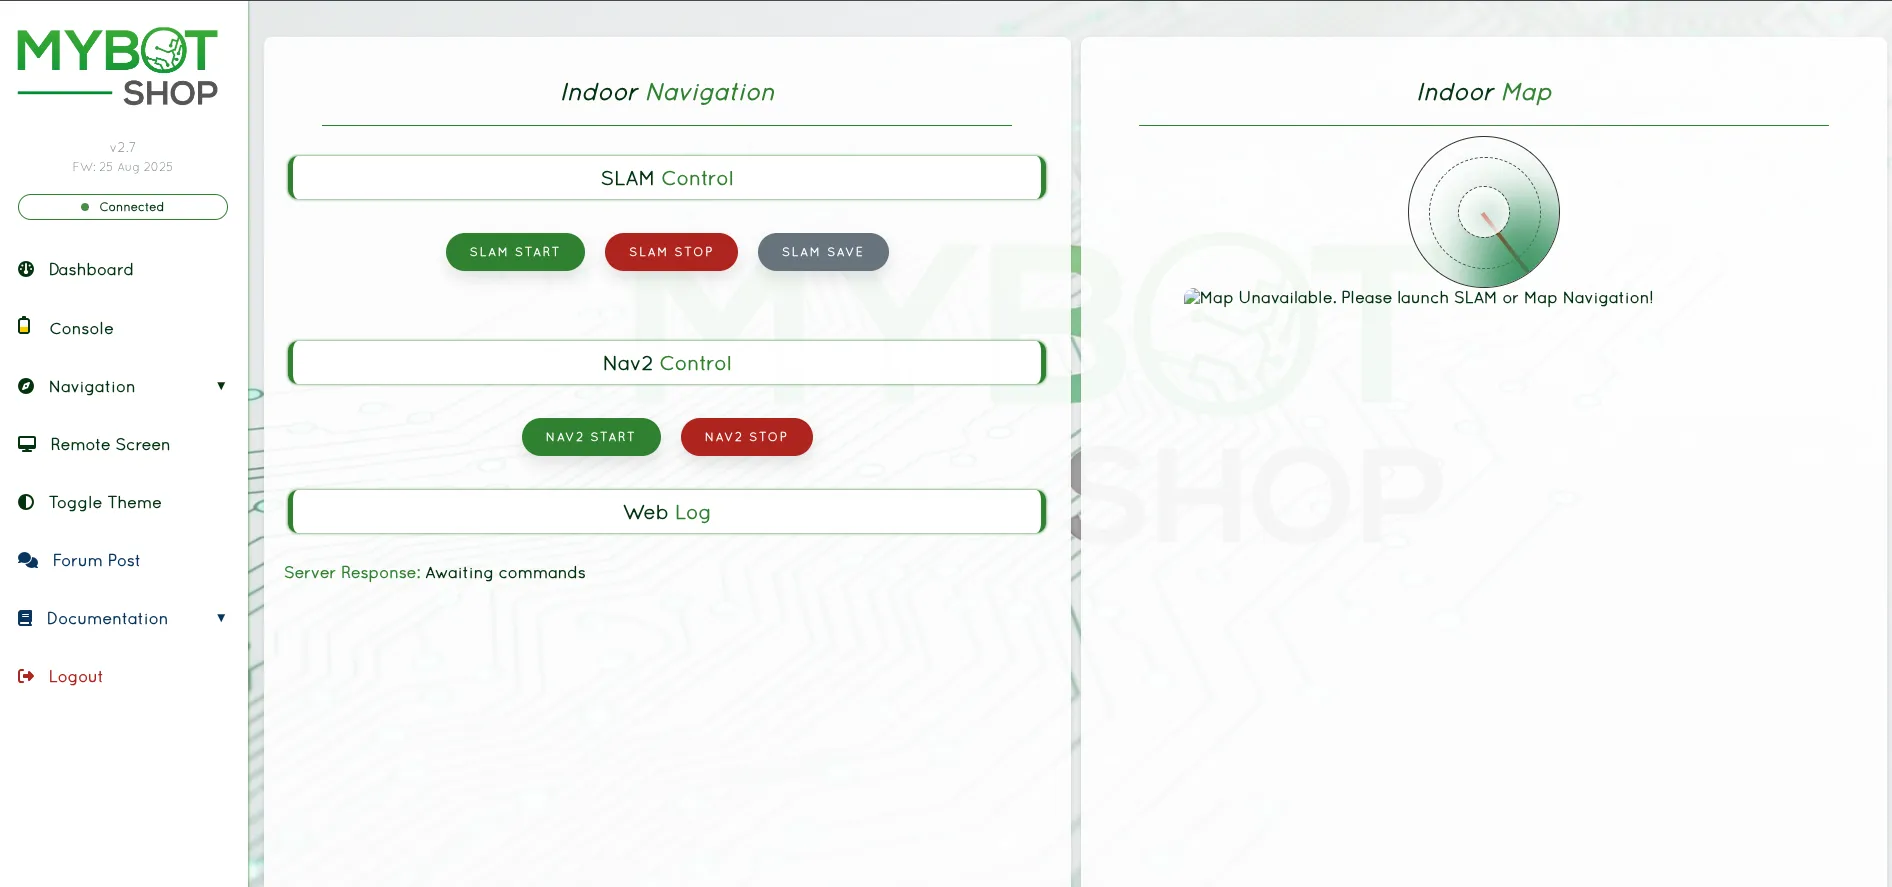
Outdoor Navigation (Disabled)
Currently disabled.
3.1.7 LLM Interface
Currently disabled.
3.2 Robot Interface
Instructions for interfacing with the robot using Ubuntu 24.04 and ROS 2 Jazzy.
3.2.1 Static Network Connection
For the first configuration, connect either via Wi-Fi or LAN cable to the robot’s network.
On the host PC (Ubuntu):
Open Settings → Network.
Add a new wired connection.
In IPv4 settings, select Manual.
Set:
Address:
192.168.131.51Netmask:
24
Save and restart the network.
Then:
Check host IP:
ifconfigPing the robot:
ping 192.168.131.1Access the robot via SSH:
ssh -X robot@192.168.131.1Default password:
clearpath
3.2.2 Husky A300 IP Addresses
Example IP configuration:
Device |
IP Address |
Username |
Password |
|---|---|---|---|
Husky A300 MCU |
192.168.131.1 |
robotistrator |
123 |
Husky A300 MCU Web |
192.168.131.1:9000 |
admin |
mybotshop |
Seyond Robin W Muster |
192.168.131.20 |
||
Oak D Pro |
192.168.131.21 |
||
Fixposition |
192.168.131.22 |
||
Router SSID |
192.168.131.100 |
Husky A300XXXXX -5G |
mybotshop |
Router Web |
192.168.131.100 |
admin |
Admin123 |
Note: Other active networks can interfere with connecting to the Husky A300. Disable unused connections when connecting to the robot.
3.2.3 Interfacing
Connect to the Husky A300 as described in the network section.
Open several SSH sessions:
ssh -X robot@192.168.131.1Verify that the robot is processing information:
ros2 topic listIf topics are displayed, the drivers are running.
3.3 Visualization
View the Husky A300’s current state:
ros2 launch husky_a300_viz view_robot.launch.py
3.4 Tele-operation
To teleoperate the Husky A300 (update namespace/environment variables as required):
ros2 run teleop_twist_keyboard teleop_twist_keyboard \
  --ros-args --remap cmd_vel:=/$HSKY_NS/cmd_vel \
  --ros-args -p stamped:=true
4.1 SLAM (Simultaneous Localization and Mapping)
To create a map for map-based navigation:
Launch SLAM:
ros2 launch hsky_navigation slam.launch.pyUse teleoperation (e.g., 0.2 m/s via keyboard or Logitech controller) to explore the environment.
Save the map (example paths):
ros2 run nav2_map_server map_saver_cli -f \
  /opt/mybotshop/src/mybotshop/husky_a300_nav2/maps/custom_map \
  --ros-args --remap map:=/husky_a300_0001/map

ros2 run nav2_map_server map_saver_cli -f \
  /opt/mybotshop/src/mybotshop/husky_a300_nav2/maps/custom_map_2 \
  --ros-args --remap map:=/husky_a300_0001/map
Rebuild so the new maps are found (required if map name is not
map):cd /opt/mybotshop/ && colcon build --symlink-install source /opt/mybotshop/install/setup.bash
5 Core Packages
5.1 Auto Drivers Startup
To verify the robot system from the terminal:
Many drivers are off by default except the webserver and can be activated via the webserver or:
sudo service clearpath-platform start
The list of all drivers is in
hsky_autostart/startup_installer.py.
Check services:
sudo service hsky-webserver status
sudo service clearpath-platform status
The Husky A300 launches the hsky_autostart system.launch.py on startup
(if configured). Verify startup:
sudo service clearpath-platform status
If you see “Unit ros2.service could not be found”, startup is not installed.
Service markers:
Red – startup job failed.
Green – running correctly.
Grey – service not started.
Restart service if needed:
sudo service clearpath-platform restart
To modify the startup job, update system.launch.py in
hsky_autostart and then:
ros2 run hsky_autostart startup_installer.py
5.2 Visualization
Ensure drivers are activated via web GUI or system services, then:
ros2 launch hsky_viz view_robot.launch.py
5.3 Robot Description
The description package contains URDFs and meshes for the Husky A300. Additional sensors can be added as needed.
View the model:
ros2 launch hsky_description view_robot.launch.py
5.4 Lidar – Seyond Robin
Seyond is a 3D lidar providing point clouds. The ROS 2 package is modified for A300 and time synchronization.
It is turned on by default via auto services. If auto service is disabled, manually start:
ros2 launch hsky_lidars seyond.launch.py
5.5 Depth Camera – Oak-D Pro-POE
Oak-D Pro is a stereo depth camera providing 3D point clouds.
Normally enabled via auto services. If needed, start manually:
ros2 launch hsky_depth_cameras oakd.launch.py
5.6 GPS – Fixposition
Fixposition provides high-accuracy GPS and odometry. It requires
pre-configuration via the Fixposition interface at 192.168.131.22.
Reference: Fixposition RTK streaming
Normally enabled automatically. To launch manually:
ros2 launch hsky_gps fixposition.launch.py
5.7 Web Interface
Connect your PC to the Fixposition Wi-Fi (SSID starting with
fp-). Password:1234567890.Open a browser and navigate to
10.0.1.1to access the Fixposition dashboard.
5.8 Software Upgrade
To update the Vision-RTK 2 software:
In the web interface, go to System → Update.
Upload the
.swufile via the upload area or drag and drop.
5.9 Configuration
Configuration is available in the Configuration tab.
5.9.1 Fusion Configuration
Key options:
Autostart – start Fusion engine automatically on boot.
Housing –
Prototype(3D-printed) orStandard(aluminum).Tuning Mode – platform dynamics; for this setup use Slow robot.
GNSS Extrinsics – GNSS antenna positions relative to the Vision-RTK 2 sensor frame (meters, preferably millimeter accuracy).
5.9.2 GNSS Configuration
Configure the correction data source to receive GNSS correction data as required.
5.9.3 Network Configuration
Options:
Wi-Fi Client – network the device will connect to.
Wi-Fi Access Point – SSID and password of the Fixposition AP.
Ethernet – custom IP address for wired access.
5.9.4 I/O Configuration
In the Output Messages table, select TCP0 for all items except those highlighted in orange when TCP0 is selected.
5.10 Status
After configuration, start Fusion with Start.
Monitor:
IMU Status – should show converging.
Baseline Status – should be green.
6 Simulator
6.1 Launch Gazebo – Onboard Computer
Run on the onboard computer:
ros2 launch clearpath_gz simulation.launch.py \
  setup_path:=/opt/mybotshop/src/mybotshop/hsky_gazebo/clearpath/
6.2 Launch Gazebo – External Computer
On an external machine:
ros2 launch clearpath_gz simulation.launch.py \
  setup_path:=/home/$USER/ros2/src/mybotshop/hsky_gazebo/clearpath/
Ensure setup_path points to the local location of hsky_gazebo.
6.3 Teleoperate Robot
Example teleoperation commands in simulation:
export HSKY_NS=a300_00045
ros2 run teleop_twist_keyboard teleop_twist_keyboard \
  --ros-args --remap cmd_vel:=/$HSKY_NS/cmd_vel \
  --ros-args -p stamped:=true
7 Installation
7.1 Robot Computer Setup
Note: The repository should already be available and built on the Husky A300’s computer if configured by MYBOTSHOP.
Create directory:
cd /opt/
sudo mkdir mybotshop
sudo chown -R administrator:administrator /opt/mybotshop
Sync repository from robot (example):
rsync -avP -t --delete -e ssh src \
  robot@192.168.131.1://opt/mybotshop
Clone/copy repository and install dependencies:
cd /opt/mybotshop/src/mybotshop/ && ./ros2_dependencies.sh
cd /opt/mybotshop/src/mybotshop/hsky_webserver
sudo chmod +x webserver_installer.sh
./webserver_installer.sh
Build ROS 2 workspace:
cd /opt/mybotshop && colcon build --symlink-install
source install/setup.bash
Add sources to
~/.bashrc:# Mybotshop Additions source /opt/ros/jazzy/setup.bash source /opt/mybotshop/install/setup.bashUpgrade Clearpath Husky firmware via Clearpath docs.
Add Clearpath repo and user:
sudo adduser robot
sudo usermod -aG sudo robot
cd /opt/mybotshop/src/mybotshop/hsky_bringup/scripts/
./clearpath_install.sh
Reload services:
sudo systemctl daemon-reload
sudo systemctl start clearpath-robot.service
Build ROS 2 workspace in Release:
cd /opt/mybotshop
colcon build --symlink-install --cmake-args -DCMAKE_BUILD_TYPE=Release
source install/setup.bash
Edit
/etc/clearpath/robot.yamland replace withhsky_autostart/config/a300.yaml.Restart services:
sudo systemctl daemon-reload && \
sudo systemctl start clearpath-robot.service
Replace
dev: '/dev/input/ps4'withdevice name: "PS4 Controller"in:/opt/ros/jazzy/share/clearpath_control/config/a300/teleop_ps4.yamlReinstall startup:
ros2 run hsky_autostart startup_installer.py
8 Robotic Manipulator Safety Guidelines
When deploying robotic manipulators, prioritize safety to mitigate risks and ensure secure operations.
8.1 Work Area Safety
Maintain a clean, well-organized, and well-lit work area.
Avoid hazardous environments (corrosive substances, extreme temperatures, sharp objects).
Restrict the work area to authorized personnel during operation.
8.2 Electrical Safety
Ensure power systems meet electrical safety standards.
Protect equipment from moisture and extreme temperatures.
Inspect cables and connections regularly and replace damaged parts.
8.3 Manipulation Safety
Implement collision detection systems.
Define and enforce safety zones.
Regularly calibrate and test sensors and systems.
8.4 Emergency Response
Install an emergency stop mechanism.
Clearly mark emergency stop locations.
Conduct regular emergency response drills.
8.5 Data Security and Privacy
Apply cybersecurity best practices.
Ensure compliance with privacy regulations for captured data.
8.6 Human Interaction Safety
Integrate sensors to detect humans in the work area.
Communicate operational status via visual and audible signals.
Establish protocols for safe human-robot collaboration.
8.7 Residual Risks
Residual risks may include:
Sensor impairment.
Collisions during complex tasks.
Cybersecurity vulnerabilities.
Unintended human interactions.
Robotic manipulators require correct use to avoid accidents and maintain a secure environment.
9 Autonomous Mobile Robot Safety Guidelines
When deploying autonomous mobile robots, follow these guidelines to ensure safe operation.
9.1 Work Area Safety
Keep the area clean and well-lit.
Avoid explosive atmospheres (flammable liquids, gases, dust).
Keep bystanders and unauthorized personnel at a safe distance.
9.2 Electrical Safety
Ensure power systems meet electrical standards.
Protect from rain and wet environments.
Inspect cables/connectors frequently and replace damaged parts.
9.4 Emergency Response
Install emergency stop mechanisms.
Clearly mark emergency stop locations.
Conduct regular emergency drills.
9.5 Data Security and Privacy
Implement robust cybersecurity to protect control systems and data.
Ensure privacy compliance for sensor data.
9.6 Human Interaction Safety
Integrate sensors and communication systems to detect humans.
Communicate operational status and intentions clearly.
Establish collaboration protocols in shared workspaces.
9.7 Residual Risks
Residual risks include:
Sensor impairment.
Collisions in crowded/dynamic environments.
Cybersecurity vulnerabilities.
Unintended human interactions.
AMRs require correct usage and adherence to procedures to ensure safety.