Pre-requisites
Safety Guidelines Robotic Manipulator Safety.
Power On Power On.
Network Interface Network Interface.
Installation Robot Installation.
Autostart
Autostart Configuration
The Dingo-D ROS drivers are automatically launched during the robot’s startup process.
Startup Job Installation
To install or update the startup job:
Give root permission to the installation script:
sudo chmod +x startup_installer.py
Run the script from the terminal:
./startup_installer.py
Provide the workspace name as
ros_wsand the directory as/home/administrator
Note
If the Dingo-D’s PC username is not administrator, manual changes will have to be made in the startup job.
ROS Environment Setup
Add a setup.bash file in /etc/ros if it’s not there already:
cd
sudo touch /etc/ros/setup.bash
Edit the file and add the configuration:
source /home/administrator/ros_ws/devel/setup.bash

export ROBOT_SETUP=/etc/ros/setup.bash
export DINGO_OMNI=0
export DINGO_JOY_DEV=/dev/input/js0
Base Driver Installation
Source and install the Dingo-D base driver:
source /etc/ros/setup.bash
roscd mmp_bringup/scripts
./can-udp-bridge.sh
./install
Autostart Configuration
Configure the Dingo ROS 2 nodes to start automatically on boot.
MYBOTSHOP Platform Service
If using the MYBOTSHOP configuration, services are managed via systemd:
Start Platform Service:
sudo service dingo-platform start
Check Service Status:
sudo service dingo-webserver status
sudo service dingo-platform status
Service Status Indicators:
Green: Service is running correctly
Red: Service has failed - restart needed
Grey: Service has not started yet
Restart Service:
sudo service dingo-platform restart
Update Startup Job:
After modifying launch files, update the startup job:
ros2 run dingo_bringup startup_installer.py
Note
If the service is green, do not launch dingo_bringup manually as it’s already running in the background.
Manual Launch
Launch the Dingo ROS driver manually:
ros2 launch dingo_bringup system.launch.py
Custom systemd Service
Create a custom service file:
sudo nano /etc/systemd/system/dingo-ros2.service
Add the following content:
[Unit]
Description=Dingo ROS 2 Base Driver
After=network.target

[Service]
Type=simple
User=robot
Environment="ROS_DOMAIN_ID=0"
ExecStart=/bin/bash -c "source /opt/ros/jazzy/setup.bash && source /opt/mybotshop/install/setup.bash && ros2 launch dingo_bringup system.launch.py"
Restart=on-failure
RestartSec=5

[Install]
WantedBy=multi-user.target
Enable Service:
sudo systemctl daemon-reload
sudo systemctl enable dingo-ros2.service
sudo systemctl start dingo-ros2.service
Check Status:
sudo systemctl status dingo-ros2.service
View Logs:
journalctl -u dingo-ros2.service -f
Webserver
Web Interface
The Noetic version does not include a web-based control interface.
For remote operation, use SSH and ROS command-line tools:
ssh -X administrator@192.168.131.1
Launch visualization remotely:
roslaunch mmp_viz view_robot.launch
Robot Webserver
The Dingo D100 features a web-based control interface built with Flask.
Access: http://192.168.131.1:9000
Default Credentials:
Username:
adminPassword:
mybotshop
Login
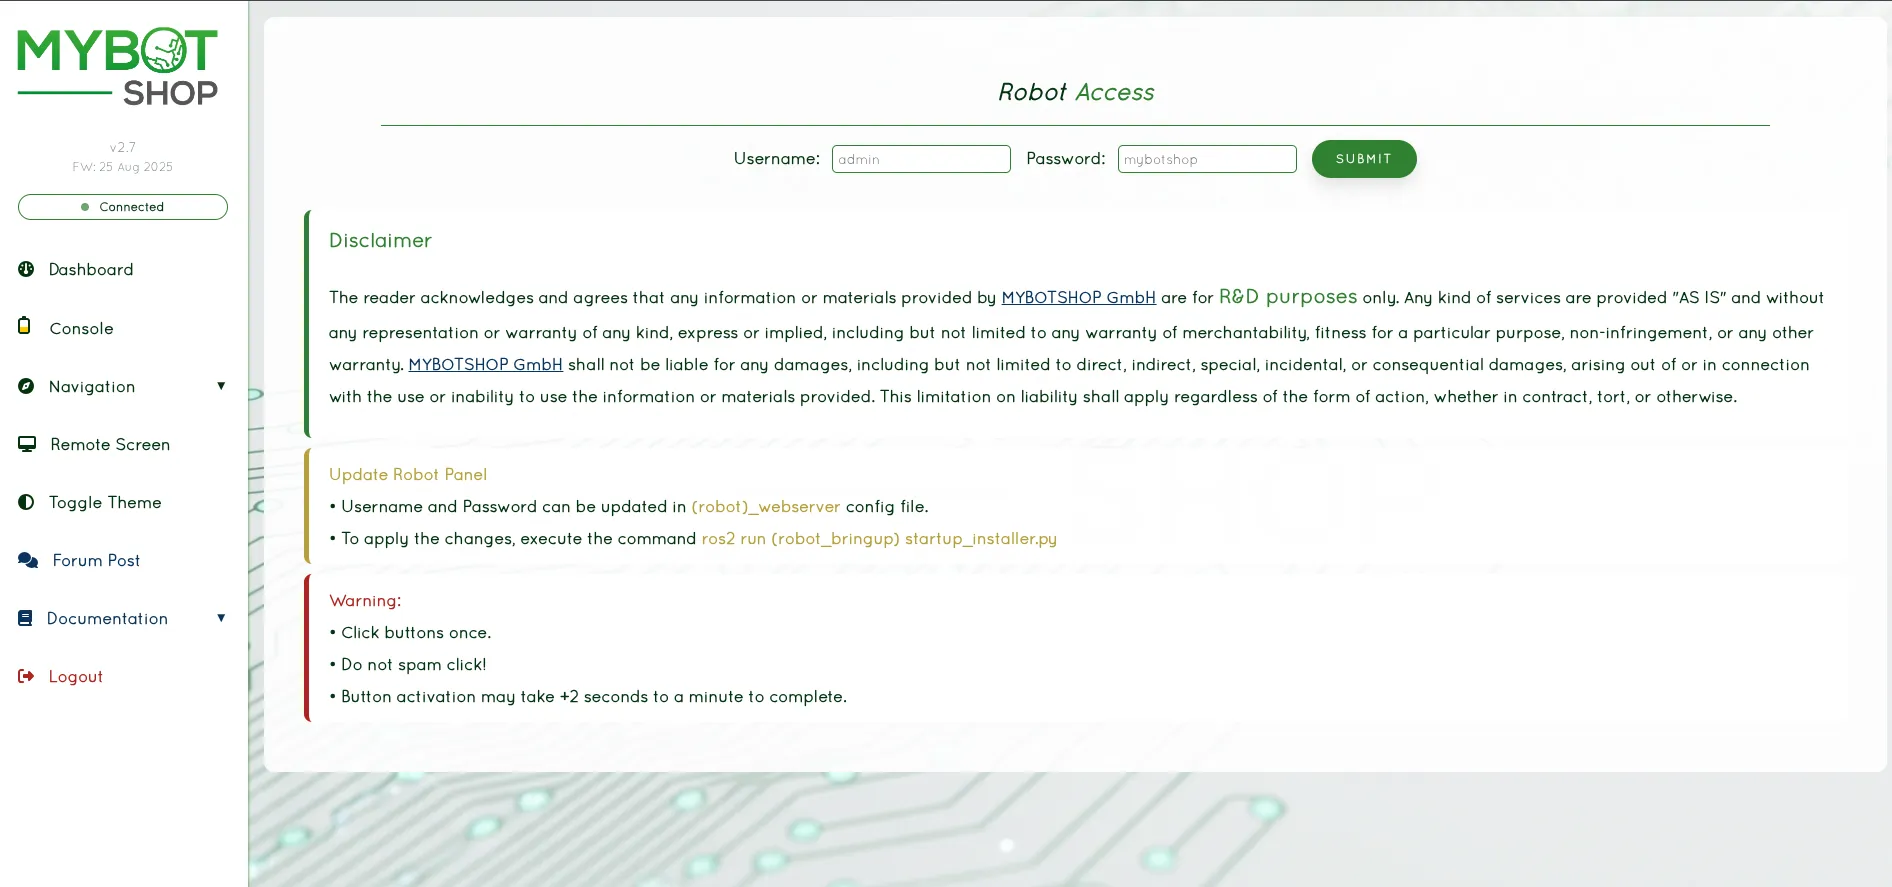
Webserver Login Page
Dashboard
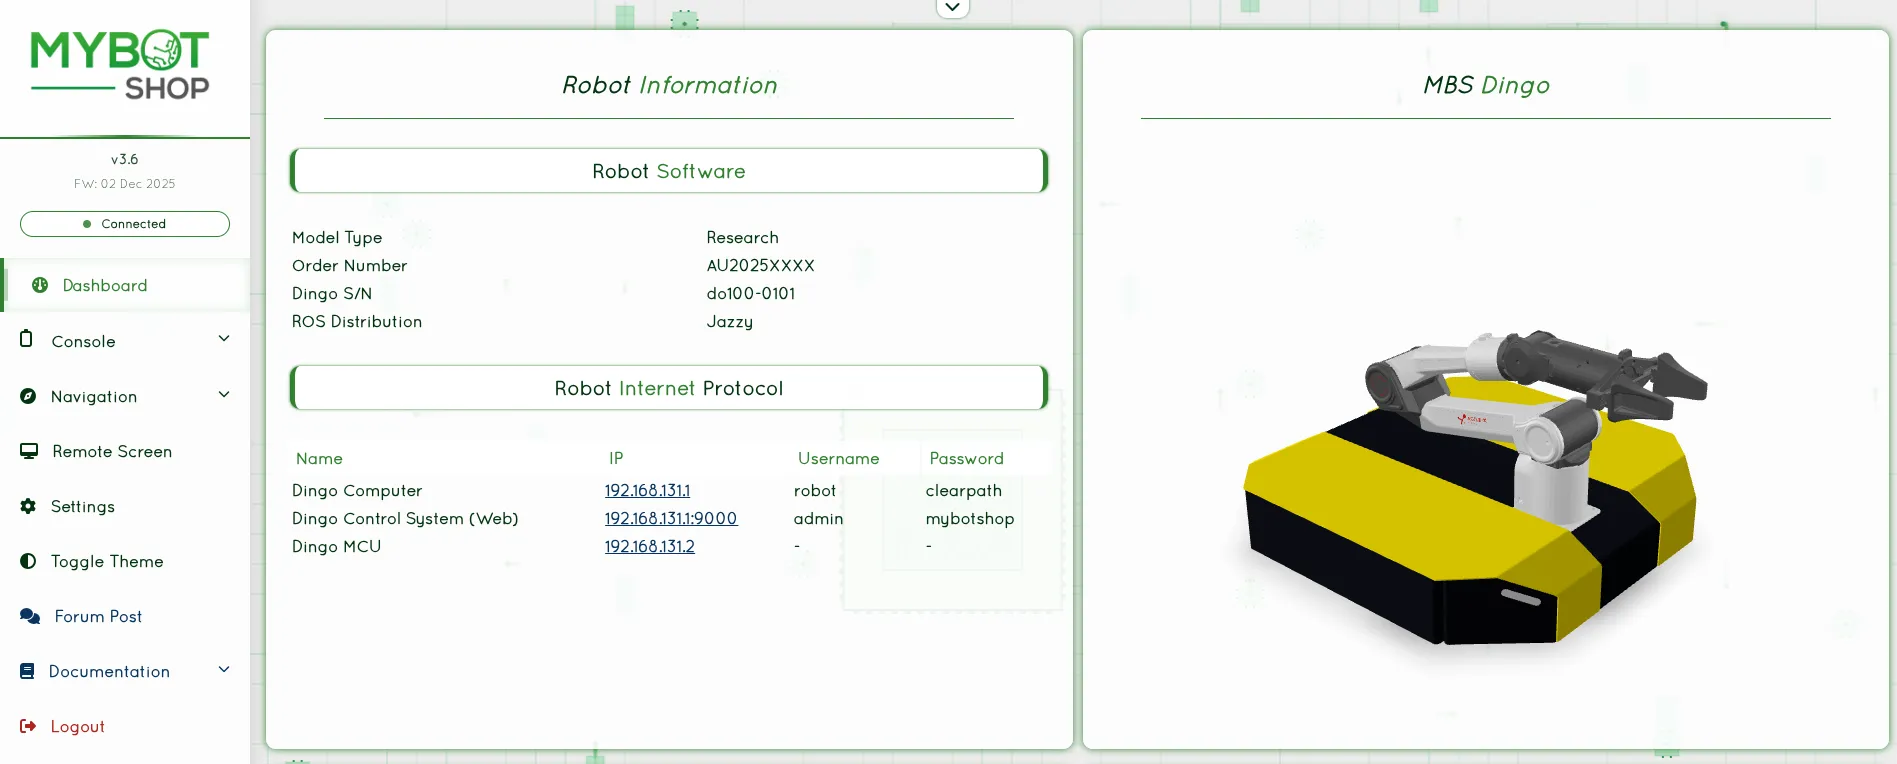
Main Dashboard with 3D Robot Visualization
Features:
Feature |
Description |
|---|---|
3D Visualization |
Real-time robot model via GLTF |
Joystick Teleop |
Browser-based joystick control |
Service Management |
Start/stop ROS2 nodes and services |
Map Visualization |
View navigation maps |
Battery Monitoring |
Real-time battery state |
VNC Access |
Remote desktop via VNC |
System Management
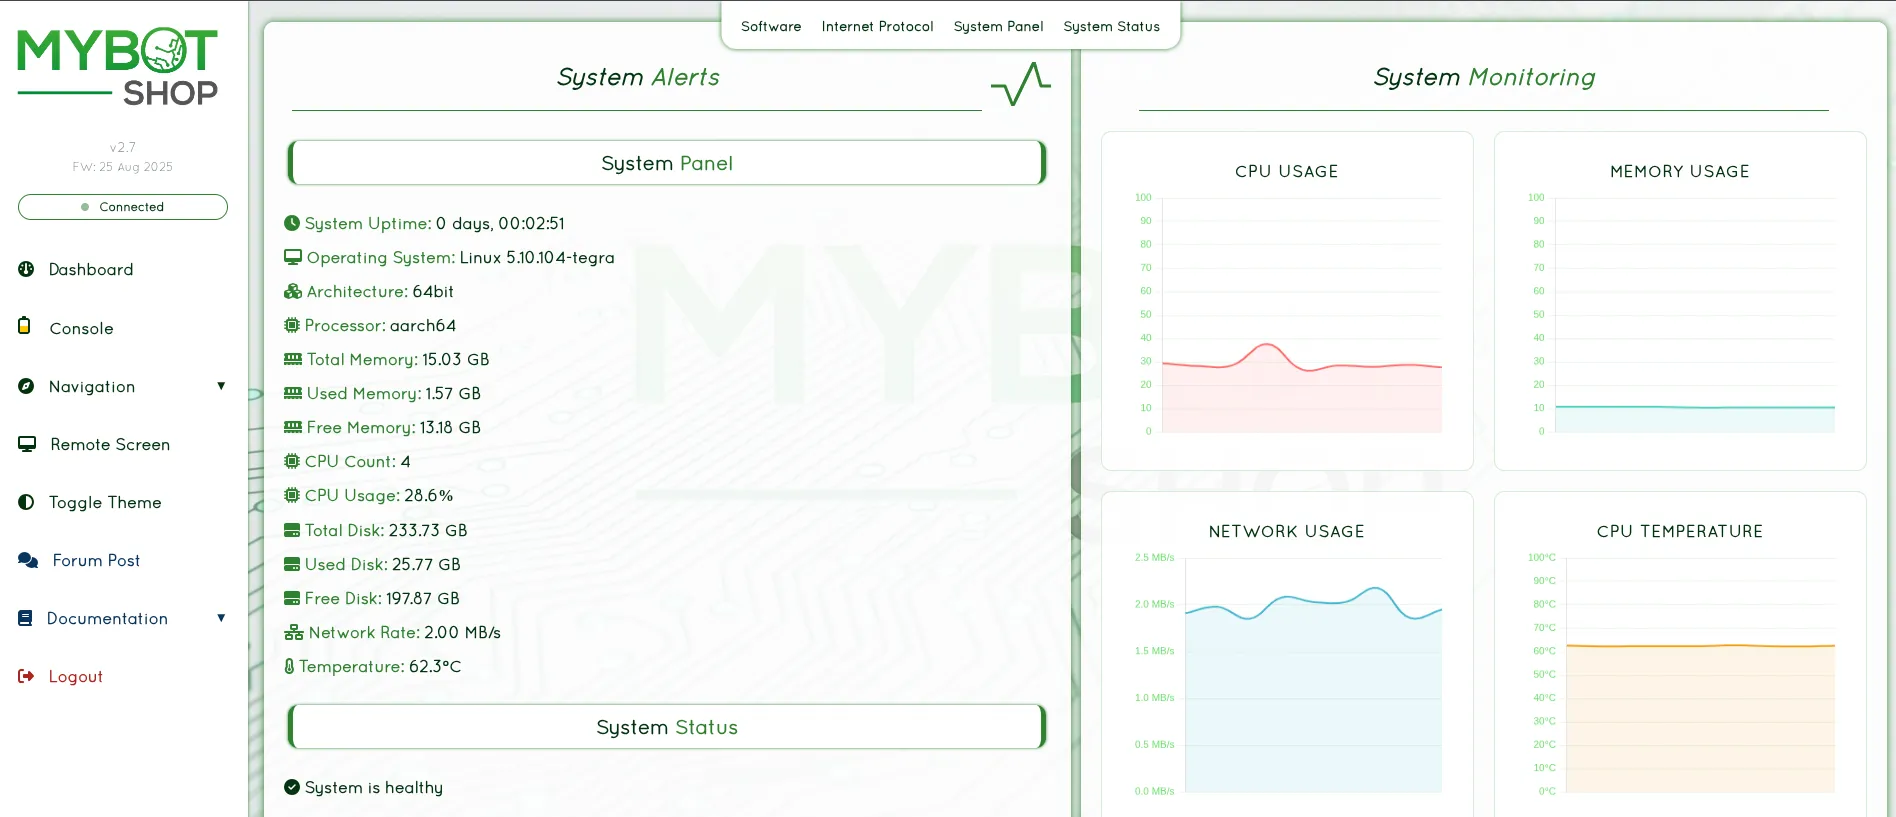
System Management Interface
Console
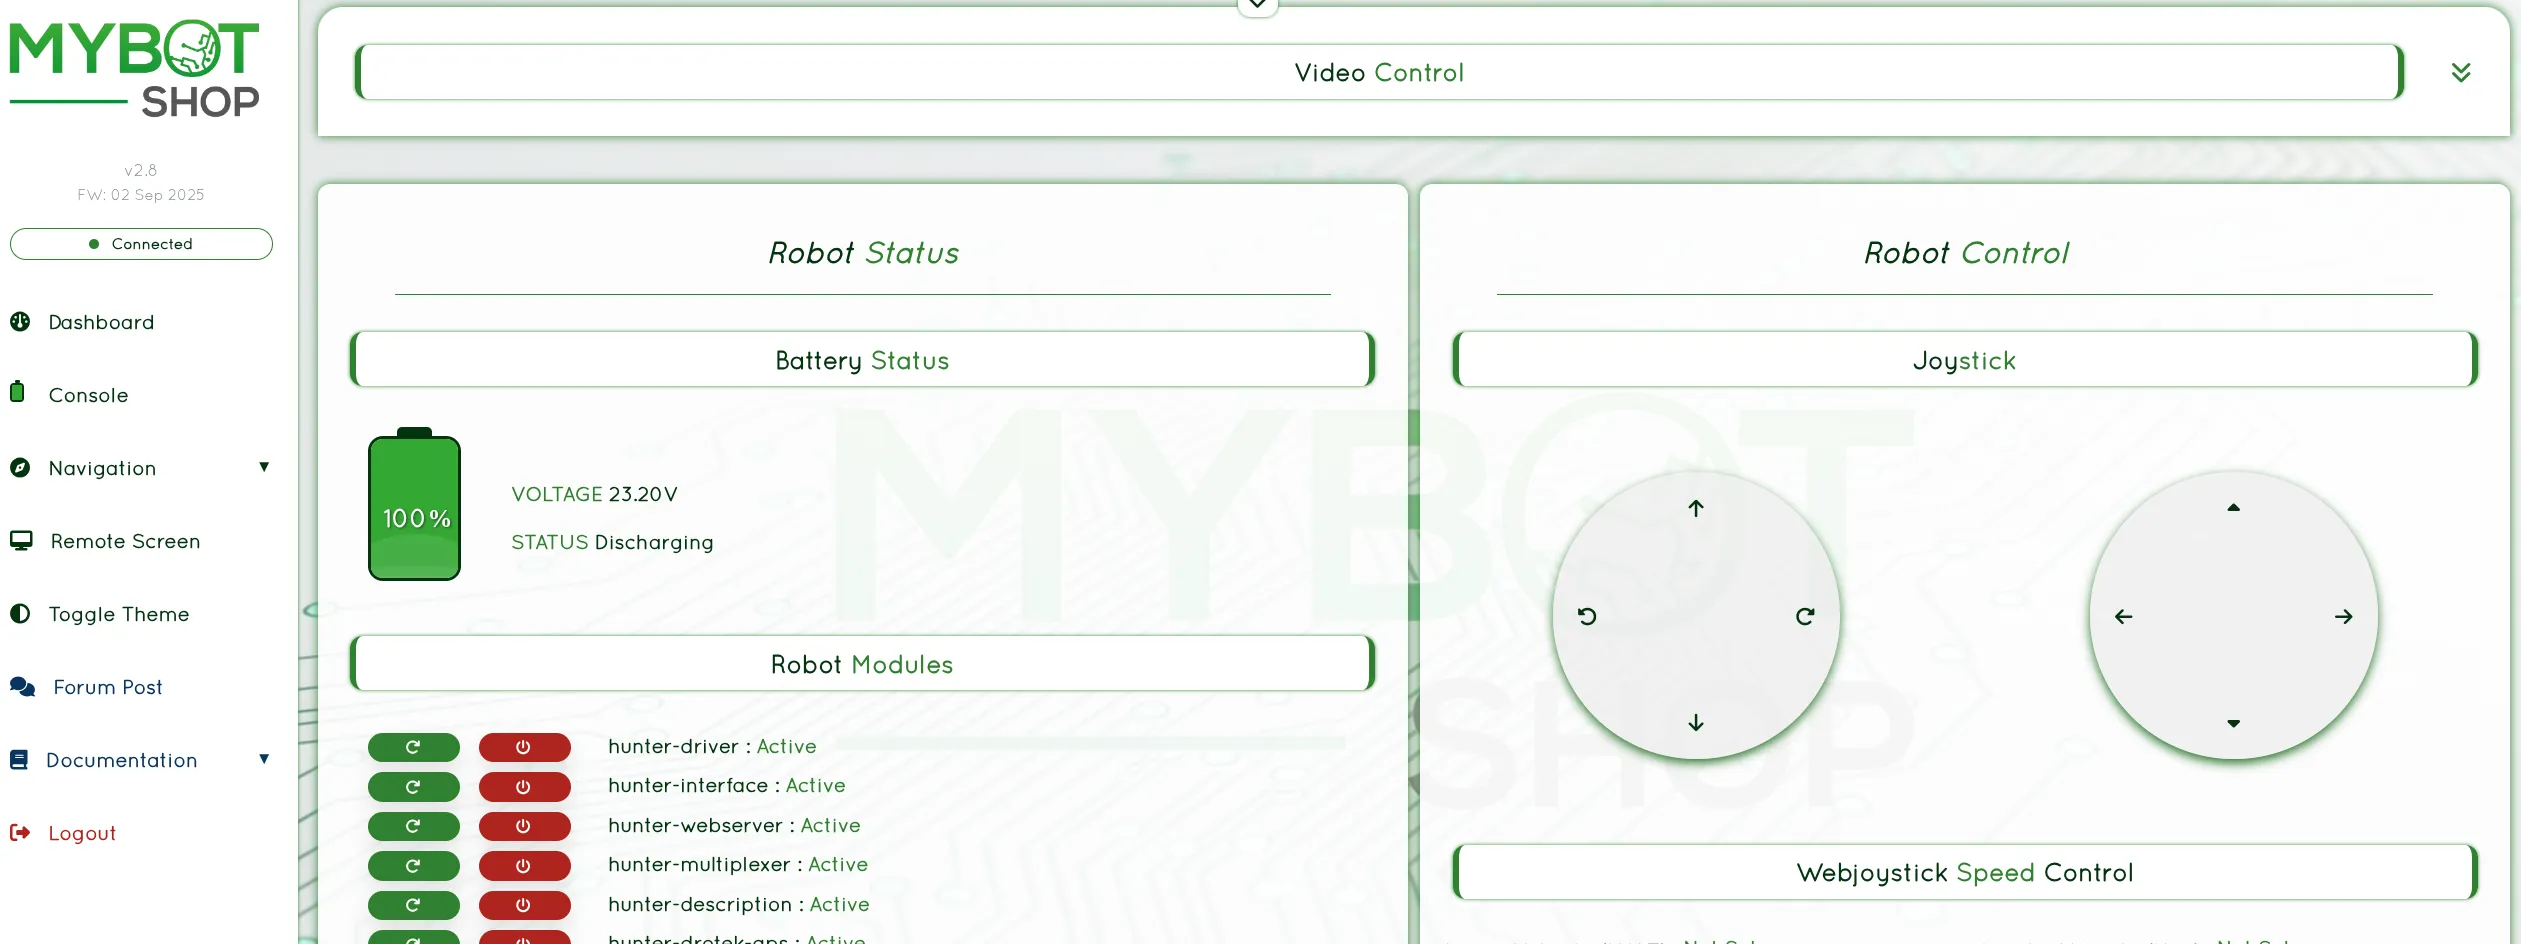
Web Console Interface with Joystick Control
Navigation
Indoor Navigation View with SLAM and Nav2 Controls
VNC Remote Desktop
VNC Remote Desktop Access
Configuration (config/robot_webserver.yaml):
Parameter |
Description |
|---|---|
|
Rosbag storage directory |
|
List of controllable services |
|
Map topic name |
|
Velocity command topic |
|
Emergency stop topic |
|
Battery state topic |
Launch Webserver:
The webserver is typically started automatically via systemd. To launch manually:
ros2 launch dingo_webserver webserver.launch.py
VNC Setup:
To enable VNC remote desktop:
vncpasswd ~/.vnc/passwd
# Password: mybotshop
Teleoperation
Keyboard Teleoperation
To operate the Dingo-D either in simulation or the real robot:
rosrun key_teleop key_teleop.py
Joystick Teleoperation
The Dingo-D can be controlled via a joystick connected to the robot.
Important
The Logitech controller dongle should be inserted and used with the Dingo PC (192.168.131.1). Do not use the dongle with the external NVIDIA PC (192.168.131.5).
Keyboard Teleoperation
Control the Dingo using keyboard:
ros2 run teleop_twist_keyboard teleop_twist_keyboard \
  --ros-args --remap cmd_vel:=/do100_0101/cmd_vel
Keyboard Controls:
i: Forwardk: Stopj: Turn leftl: Turn right,: Backwardu: Forward-left curveo: Forward-right curve
Web Joystick
If using the MYBOTSHOP webserver, a web-based joystick is available:
Web console with joystick control
Joystick Teleoperation
Install joystick packages:
sudo apt install ros-jazzy-joy ros-jazzy-teleop-twist-joy
Launch joystick teleoperation:
ros2 launch teleop_twist_joy teleop-launch.py
Logitech Controller
The Dingo can be controlled via the Logitech controller:
Ensure the Logitech dongle is connected to the Dingo PC (192.168.131.1)
Do not use the dongle with other computers
Custom Velocity Commands
Send velocity commands directly:
ros2 topic pub /do100_0101/cmd_vel geometry_msgs/msg/Twist \
  "{linear: {x: 0.5}, angular: {z: 0.0}}"
Note
Recommended teleoperation speed: 0.2 m/s for mapping.
Visualization
RViz Visualization
To view the Dingo current state:
roslaunch mmp_viz view_robot.launch
This package is useful when checking and integrating depth camera or other auxiliary sensors such as LiDAR sensors.
RViz2 Visualization
Launch RViz2 with Dingo model:
ros2 launch dingo_viz view_robot.launch.py
This displays:
Robot URDF model
TF frames
Coordinate axes
Sensor data (if available)
View Robot Model Only
To view just the robot model without running the base driver:
ros2 launch dingo_description display.launch.py use_rviz:=true
Web-Based Visualization
For remote visualization, use the web interface:
Remote desktop access for visualization
Custom RViz Configuration
Save your RViz configuration:
Configure displays as desired
File > Save Config As >
my_dingo_config.rviz
Load custom configuration:
rviz2 -d my_dingo_config.rviz
TF Tree
View the transform tree:
ros2 run tf2_tools view_frames
This generates a PDF showing the complete TF tree structure.
Foxglove Studio
For modern web-based 3D visualization:
Install Foxglove Bridge:
sudo apt install ros-jazzy-foxglove-bridgeLaunch the bridge:
ros2 launch foxglove_bridge foxglove_bridge_launch.xmlOpen Foxglove Studio and connect to your robot
Rigs
Hardware Configurations
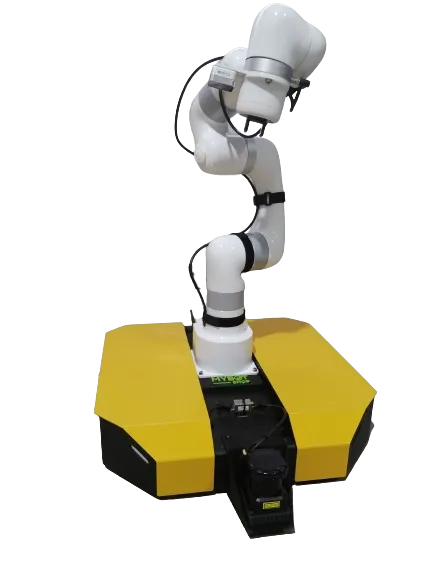
The Dingo-D (Noetic) can be configured with different sensor and accessory rigs.
Standard Configuration
Clearpath Dingo-D differential base
Ufactory Lite6 arm
Hokuyo LiDAR (192.168.131.20)
Intel RealSense D405 (wrist-mounted)
Network Devices
Device |
Network Address |
Users |
Password |
|---|---|---|---|
Dingo-D |
192.168.131.1 |
administrator |
mybotshop |
Hokuyo |
192.168.131.20 |
n/a |
n/a |
Lite6 |
192.168.131.50 |
n/a |
n/a |
Lite6 Web |
192.168.131.50:18333 |
n/a |
n/a |
Hardware Configurations
The Dingo D100 can be configured with different sensor and accessory rigs.
Standard Configuration
Clearpath Dingo-O omnidirectional base
AgileX Piper 6-DOF arm
Hokuyo LiDAR (192.168.131.20)
Intel RealSense D405 (wrist-mounted)
Adding Custom Sensors
The Dingo provides multiple interfaces for custom sensors:
USB ports: For cameras and peripherals
Ethernet: For IP-based sensors
24V Power: For powered accessories
Mounting Options
Use the Dingo’s mounting rails to attach additional hardware:
T-slot aluminum rails
80/20 compatible mounting brackets
Custom 3D printed mounts
Manipulation
Lite6 MoveIt
Note
As the Dingo-D Lite6 is a multi-robot system consisting of Lite6 and Lite6 gripper, the Lite6 Guides are applicable.
For the Lite6 ROS drivers please refer to the ufactory github section. To aid in manipulation tasks please refer to the
examples in the mmp_bringup/scripts/mmp_example.py. For recommended manipulation please refer to MoveIt documentation.
Lite6 Utilities
To operate the Lite6 from other means than ROS, the Python and C++ SDKs are available in the utils folder.
Direct control of the Lite6 is available via the app. To access the app, navigate into the /utils/app folder and run:
./UfactoryStudio-client-linux-1.0.1.AppImage
Alternatively, you can install the app image directly from their website and grant root permission to the image.
Connect to the IP address of 192.168.131.50 and you should have complete access to the arm.
The app has a built-in plugin to interface with robotiq gripper available in the control panels.
Important
The app can also be accessed via ssh or when connected to the same network as the Lite6 at 192.168.131.50:18333.
Complete steps for opening the app:
ssh -X administrator@192.168.131.1
mybotshop
cd
cd ros_ws/utils/app
./UfactoryStudio-client-linux-1.0.1.AppImage
This can be used when the Lite6 goes to error state. Alternatively, the error can be cleared via the Lite6 python API.
Lite6 Power Fuse
The Lite6 is powered by Dingo-D’s power. For safety reasons a 15 Amp fuse is installed. In case of a power surge,
the fuse will trigger and will have to be replaced. To replace it, open the Dingo-D’s central hatch located under the Lite6,
open the rubber cover over the MCU and replace the fuse.
Lite6 E-Stop
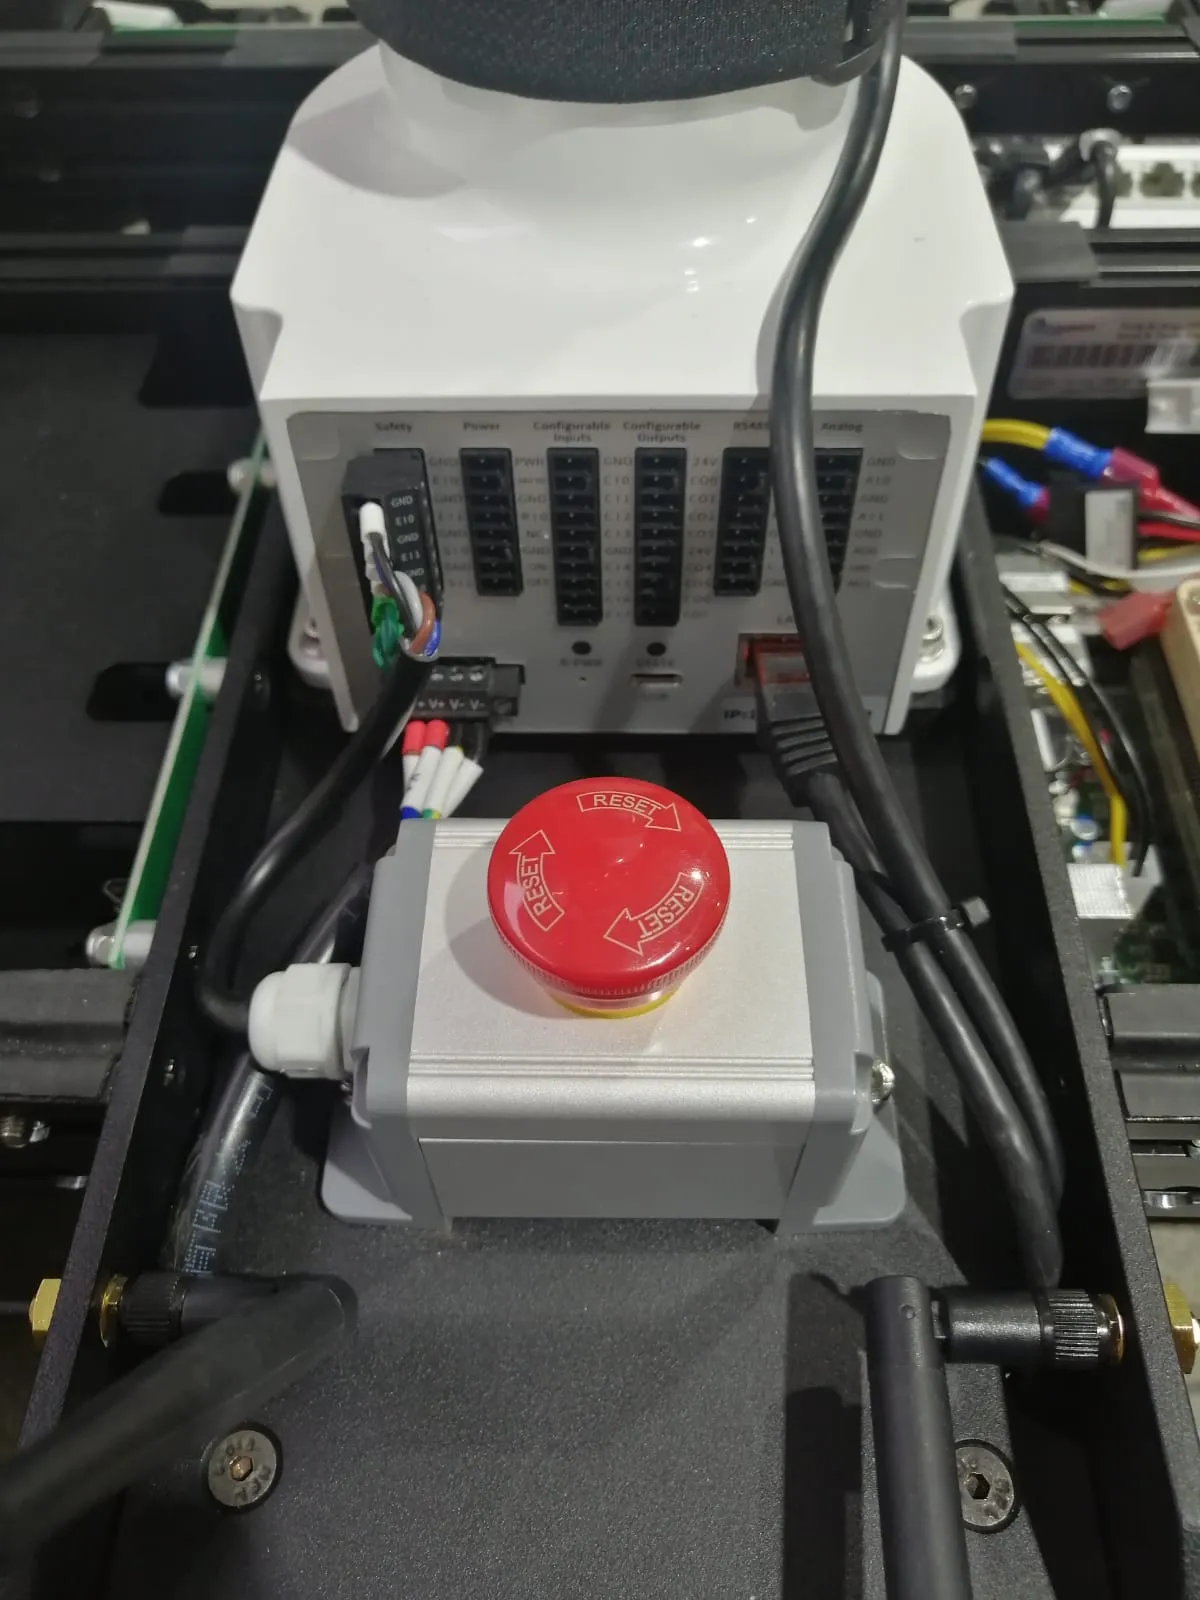
There’s a red Emergency Stop button positioned at the rear of the mounted arm. Pressing this button cuts off the power supply to the arm, providing a manual method to halt the arm in case of any malfunction or emergency situation.
AgileX Piper Arm
The Dingo D100 is equipped with an AgileX Piper 6-DOF robotic arm.
RViz2 with MoveIt2 Motion Planning for Piper Arm
Launch Piper Driver
Start the Piper arm driver:
ros2 launch dingo_manipulation piper.launch.py
MoveIt2 Planning
Launch MoveIt2 for motion planning:
ros2 launch dingo_manipulation piper_moveit.launch.py
MoveIt2 Features:
Motion planning with OMPL
Collision detection
Path visualization
Scene management
Piper Gripper
Control the Piper gripper:
Open Gripper:
ros2 topic pub /piper/gripper_cmd std_msgs/msg/Float64 "data: 0.0"
Close Gripper:
ros2 topic pub /piper/gripper_cmd std_msgs/msg/Float64 "data: 1.0"
Joint Control
Move individual joints:
ros2 topic pub /piper/joint_trajectory_controller/joint_trajectory \
  trajectory_msgs/msg/JointTrajectory \
  "{joint_names: ['joint1', 'joint2', 'joint3', 'joint4', 'joint5', 'joint6'], \
  points: [{positions: [0.0, 0.0, 0.0, 0.0, 0.0, 0.0], time_from_start: {sec: 2}}]}"
Safety Guidelines
Warning
Non-technical persons are not permitted to use the robotic arm as the damage it can cause is severe. Always follow safety guidelines when operating the manipulator.
Always ensure the workspace is clear before operating
Use slow speeds during testing
Keep emergency stop accessible
Follow the safety guidelines in the Safety section
Sensors
Hokuyo LiDAR
You can start up the Hokuyo driver located at the robot’s front:
roslaunch mmp_lidars lidars.launch
Once running, you should be able to view the laser scan data created by Hokuyo on RViz.
Intel RealSense D405
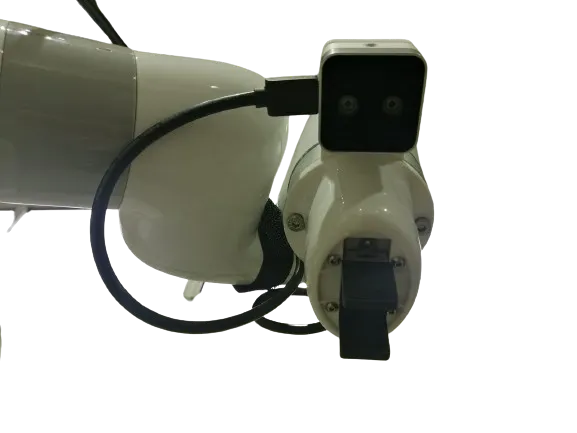
To initiate the hardware driver for the RealSense camera mounted on the wrist of the Lite6:
roslaunch mmp_realsense wrist_camera.launch
If the camera drivers operate correctly, you should be able to view the camera stream on RViz.
Built-in Sensors
The Dingo D100 includes:
Wheel Encoders: For odometry calculation
IMU: Internal measurement unit
Supported External Sensors
The Dingo’s expansion interfaces support various sensors:
LiDAR:
Velodyne VLP-16
Ouster OS1
SICK LMS series
RPLidar
Hokuyo
Cameras:
Intel RealSense D405/D435/D455
ZED/ZED2 Stereo Camera
USB webcams
IMU:
Drotek IMU
Xsens MTi series
Microstrain
Phidgets IMU
GPS:
u-blox receivers
Emlid Reach
Fixposition
Hokuyo LiDAR
The Hokuyo LiDAR provides 2D laser scan data.
Launch Hokuyo:
ros2 launch dingo_lidars hokuyo.launch.py
Configuration:
IP Address: 192.168.131.20
Provides 2D laser scan data
Intel RealSense D405
The Intel RealSense D405 depth camera is mounted on the Piper arm wrist.
Launch RealSense:
ros2 launch dingo_depth_camera realsense_d405.launch.py
Note
The RealSense camera provides RGB and depth data for manipulation tasks.
Sensor Topics
Common sensor topics:
/scan: 2D LiDAR scan/camera/color/image_raw: RealSense color image/camera/depth/image_rect_raw: RealSense depth image/imu/data: IMU data
Simulation
Gazebo Simulation
The Dingo-D can be simulated in Gazebo Classic.
Launch Simulation:
roslaunch mmp_gazebo simulation.launch
This launches:
Gazebo with the Dingo model
Robot state publisher
Joint state publisher
Gazebo Simulation
The Dingo D100 can be simulated in Gazebo Harmonic.
Prerequisites:
sudo apt install ros-jazzy-ros-gz
Launch Simulation:
ros2 launch dingo_gz_sim simulation.launch.py
This launches:
Gazebo Harmonic with the Dingo model
Robot state publisher
ros_gz bridge for topic communication
Simulation Topics
The simulation bridges the following topics:
/cmd_vel: Velocity commands/odom: Odometry data/scan: Simulated LiDAR/tf: Transform data/joint_states: Joint state information
Custom Worlds
Load a custom world:
ros2 launch dingo_gz_sim simulation.launch.py world:=custom_world.sdf
Adding Objects
Spawn objects in the simulation using Gazebo’s GUI or via command line:
gz service -s /world/default/create \
  --reqtype gz.msgs.EntityFactory \
  --reptype gz.msgs.Boolean \
  --req 'sdf: "<sdf>...</sdf>"'
Packages
Dingo Base Driver
To start the hardware-dingo drivers:
roslaunch dingo_base base.launch
Important
You need not manually execute this command, as the dingo hardware drivers are automatically launched during the robot’s startup process.
Lite6 Driver
To start the hardware-lite6 drivers:
roslaunch mmp_bringup lite6_driver.launch
This driver does not launch on startup. It is required for controlling the Lite6 arm.
Warning
Non-technical persons are not permitted to use the device as the damage it can cause is severe.
Visualization Package
roslaunch mmp_viz view_robot.launch
LiDAR Package
roslaunch mmp_lidars lidars.launch
RealSense Package
roslaunch mmp_realsense wrist_camera.launch
Core Packages
The Dingo D100 ROS2 software consists of the following packages:
dingo_bringup
Main launch package for the Dingo platform.
Launch Files:
system.launch.py: Full system bringupbase.launch.py: Base driver only
Usage:
ros2 launch dingo_bringup system.launch.py
dingo_description
URDF/Xacro robot description package.
Launch Files:
display.launch.py: Display robot model in RViz2
Usage:
ros2 launch dingo_description display.launch.py use_rviz:=true
dingo_viz
Visualization package with RViz2 configurations.
Launch Files:
view_robot.launch.py: View robot with sensors
Usage:
ros2 launch dingo_viz view_robot.launch.py
dingo_navigation
Navigation package with Nav2 configurations.
Launch Files:
slam.launch.py: SLAM mappingodom_navi.launch.py: Odometry-based navigationmap_navi.launch.py: Map-based navigation
Configuration:
param/nav2_slam.yamlparam/nav2_odom.yamlparam/nav2_map.yaml
dingo_webserver
Web-based control interface.
Launch Files:
webserver.launch.py: Start the Flask webserver
Configuration:
config/robot_webserver.yaml
dingo_manipulation
Piper arm manipulation package.
Launch Files:
piper.launch.py: Piper arm driverpiper_moveit.launch.py: MoveIt2 planning
Package Installation
Install from source:
cd /opt/mybotshop/src
git clone <repository_url>
cd /opt/mybotshop
colcon build --symlink-install
source install/setup.bash
Debugging
Common Issues
Robot not responding to commands:
Check if ROS master is running:
roscoreVerify network connection:
ping 192.168.131.1Check ROS topics:
rostopic list
No sensor data:
Verify sensor connections
Check sensor-specific topics
Review sensor launch files
Diagnostic Commands
Check ROS Topics:
rostopic list
rostopic echo /odom
Check ROS Nodes:
rosnode list
rosnode info /dingo_base
Check TF Tree:
rosrun tf view_frames
Check Service Status:
sudo service {service_name} status
Rebuild Workspace
cd ~/catkin_ws
catkin build
source devel/setup.bash
Common Issues
Robot not responding to commands:
Check service status:
sudo service dingo-platform statusVerify network connection:
ping 192.168.131.1Check ROS2 topics:
ros2 topic list
No sensor data:
Verify sensor connections
Check sensor-specific topics
Review sensor launch files
Diagnostic Commands
Check ROS2 Topics:
ros2 topic list
ros2 topic echo /do100_0101/odom
Check ROS2 Nodes:
ros2 node list
ros2 node info /dingo_base
Check TF Tree:
ros2 run tf2_tools view_frames
Check Service Status:
sudo systemctl status dingo-platform
journalctl -u dingo-platform -f
Network Debugging
Verify IP Configuration:
ifconfig
ip addr show
Check ROS2 Domain:
echo $ROS_DOMAIN_ID
Test Connectivity:
ping 192.168.131.1
ping 192.168.131.2
Log Files
View System Logs:
journalctl -u dingo-platform -f
journalctl -u dingo-webserver -f
ROS2 Logging:
ros2 run rqt_console rqt_console
Restarting Services
Restart All Services:
sudo service dingo-platform restart
sudo service dingo-webserver restart
Rebuild Workspace:
cd /opt/mybotshop
colcon build --symlink-install
source install/setup.bash
Miscellanious
SSH Access
Connect to the robot via SSH:
ssh -X administrator@192.168.131.1
# Password: mybotshop
Programming Examples
Examples of programming the Lite6 and Dingo-D are provided in:
mmp_bringup/scripts/mmp_example.py
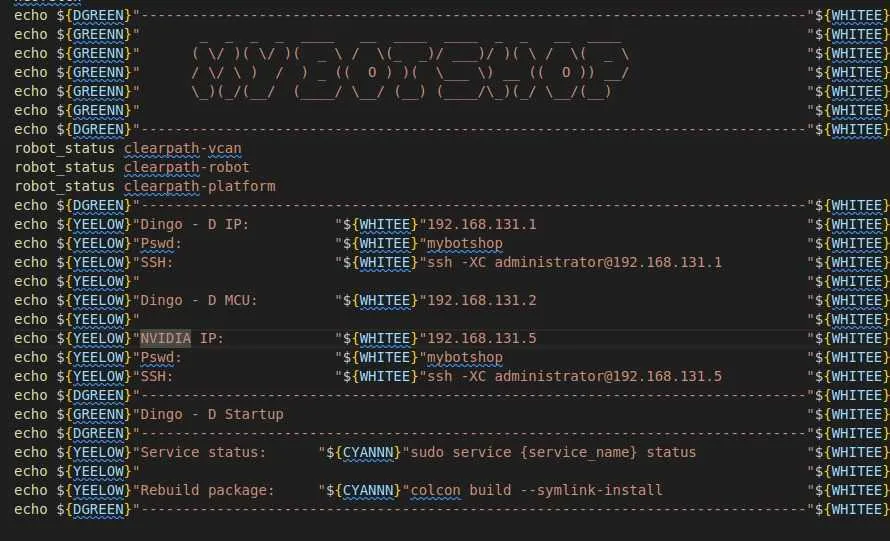
Message-of-the-Day (MOTD)
To configure a custom MOTD:
sudo chmod -x /etc/update-motd.d/*
sudo nano /etc/update-motd.d/45-mbs-motd
sudo chmod +x /etc/update-motd.d/45-mbs-motd
Example MOTD script:
#!/bin/sh

robot_status clearpath-vcan
robot_status clearpath-robot
robot_status clearpath-platform

echo "-------------------------------------------------------------------------------"
echo "Dingo - D IP:          192.168.131.1"
echo "Password:              mybotshop"
echo "SSH:                   ssh -XC administrator@192.168.131.1"
echo
echo "Dingo - D MCU:         192.168.131.2"
echo
echo "NVIDIA IP:             192.168.131.5"
echo "Password:              mybotshop"
echo "SSH:                   ssh -XC administrator@192.168.131.5"
echo "-------------------------------------------------------------------------------"
echo "Dingo - D Startup"
echo "-------------------------------------------------------------------------------"
echo "Service status:        sudo service {service_name} status"
echo "Rebuild package:       colcon build --symlink-install"
echo "-------------------------------------------------------------------------------"
SSH Access
Connect to the robot via SSH:
ssh -X robot@192.168.131.1
# Password: clearpath
File Transfer
Transfer files to/from the robot:
# Copy to robot
scp local_file.txt robot@192.168.131.1:~/

# Copy from robot
scp robot@192.168.131.1:~/remote_file.txt ./
Remote Desktop
Access the robot desktop via VNC through the webserver:
Navigate to
http://192.168.131.1:9000Click “Remote Screen” in the sidebar
Connect using VNC password:
mybotshop
ROS2 Environment Variables
Common environment variables:
export ROS_DOMAIN_ID=0
export RMW_IMPLEMENTATION=rmw_cyclonedds_cpp
export DINGO_NS=do100_0101
Updating Software
Update the ROS2 workspace:
cd /opt/mybotshop/src
git pull
cd /opt/mybotshop
colcon build --symlink-install
source install/setup.bash
Backup Configuration
Backup important configuration files:
tar -czvf dingo_backup.tar.gz \
  /etc/clearpath/robot.yaml \
  /opt/mybotshop/src/mybotshop
Factory Reset
To restore factory settings, contact MYBOTSHOP support for the recovery image.
Installation
ROS Noetic Installation
The ROS driver for the robots is initially supported for ROS Noetic. All ROS related software should be installed on the Remote-PC. The Dingo-D is pre-installed with the required drivers and ROS distribution.
PC Setup
ROS Noetic installation requires Ubuntu 20.04.
Download Ubuntu 20.04
Follow the Ubuntu 20.04 Installation guide
ROS Noetic Installation
You may run the following commands to install ROS Noetic or follow the instructions from the ROS wiki.
Enter the Ubuntu terminal:
cd
Set up the source list:
sudo sh -c 'echo "deb http://packages.ros.org/ros/ubuntu $(lsb_release -sc) main" > /etc/apt/sources.list.d/ros-latest.list'
Set up the keys:
sudo apt install curl
curl -s https://raw.githubusercontent.com/ros/rosdistro/master/ros.asc | sudo apt-key add -
Install ROS Noetic:
sudo apt update
sudo apt install ros-noetic-desktop-full
Add ROS environment to your bash file:
echo "source /opt/ros/noetic/setup.bash" >> ~/.bashrc
source ~/.bashrc
Install python dependencies and initialize rosdep:
sudo apt install python3-rosdep python3-rosinstall python3-rosinstall-generator python3-wstool build-essential
sudo rosdep init
rosdep update
Catkin Workspace
Ensure ROS Noetic is correctly setup:
cd ..
source /opt/ros/noetic/setup.bash
Install catkin_tools:
sudo apt install python3-catkin-tools
Create your workspace:
mkdir -p ~/catkin_ws/src
cd ~/catkin_ws/
catkin build
Enable the workspace:
source devel/setup.bash
Add to bashrc to avoid typing every time:
gedit ~/.bashrc
Add the following line at the end:
source /home/<your_computer_username>/catkin_ws/devel/setup.bash
Verify everything is working:
echo $ROS_PACKAGE_PATH
ROS2 Jazzy Installation
The Dingo D100 comes pre-installed with ROS2 Jazzy. For external PC setup:
Prerequisites:
Ubuntu 24.04 LTS
ROS2 Jazzy
Install ROS2 Jazzy:
sudo apt update && sudo apt install locales
sudo locale-gen en_US en_US.UTF-8
sudo update-locale LC_ALL=en_US.UTF-8 LANG=en_US.UTF-8
export LANG=en_US.UTF-8

sudo apt install software-properties-common
sudo add-apt-repository universe
sudo apt update && sudo apt install curl -y
sudo curl -sSL https://raw.githubusercontent.com/ros/rosdistro/master/ros.key -o /usr/share/keyrings/ros-archive-keyring.gpg
echo "deb [arch=$(dpkg --print-architecture) signed-by=/usr/share/keyrings/ros-archive-keyring.gpg] http://packages.ros.org/ros2/ubuntu $(. /etc/os-release && echo $UBUNTU_CODENAME) main" | sudo tee /etc/apt/sources.list.d/ros2.list > /dev/null
sudo apt update && sudo apt upgrade -y
sudo apt install ros-jazzy-desktop
Source ROS2:
echo "source /opt/ros/jazzy/setup.bash" >> ~/.bashrc
source ~/.bashrc
Clearpath Setup
For Clearpath Dingo setup, use the computer installer:
wget -c https://raw.githubusercontent.com/clearpathrobotics/clearpath_computer_installer/main/clearpath_computer_installer.sh
bash -e clearpath_computer_installer.sh
Robot Configuration
Edit the robot configuration file:
sudo nano /etc/clearpath/robot.yaml
Example configuration:
serial_number: do100-0101
version: 0
system:
  hosts:
    - hostname: cpr-do100-0101
      ip: 192.168.131.1
  ros2:
    namespace: do100_0101
platform:
  controller: logitech
Workspace Setup
Create a ROS2 workspace:
mkdir -p ~/dingo_ws/src
cd ~/dingo_ws
colcon build --symlink-install
source install/setup.bash
Add to bashrc:
echo "source ~/dingo_ws/install/setup.bash" >> ~/.bashrc
Dependencies
Install common dependencies:
sudo apt install ros-jazzy-navigation2 ros-jazzy-nav2-bringup
sudo apt install ros-jazzy-slam-toolbox
sudo apt install ros-jazzy-teleop-twist-keyboard ros-jazzy-teleop-twist-joy
sudo apt install ros-jazzy-foxglove-bridge