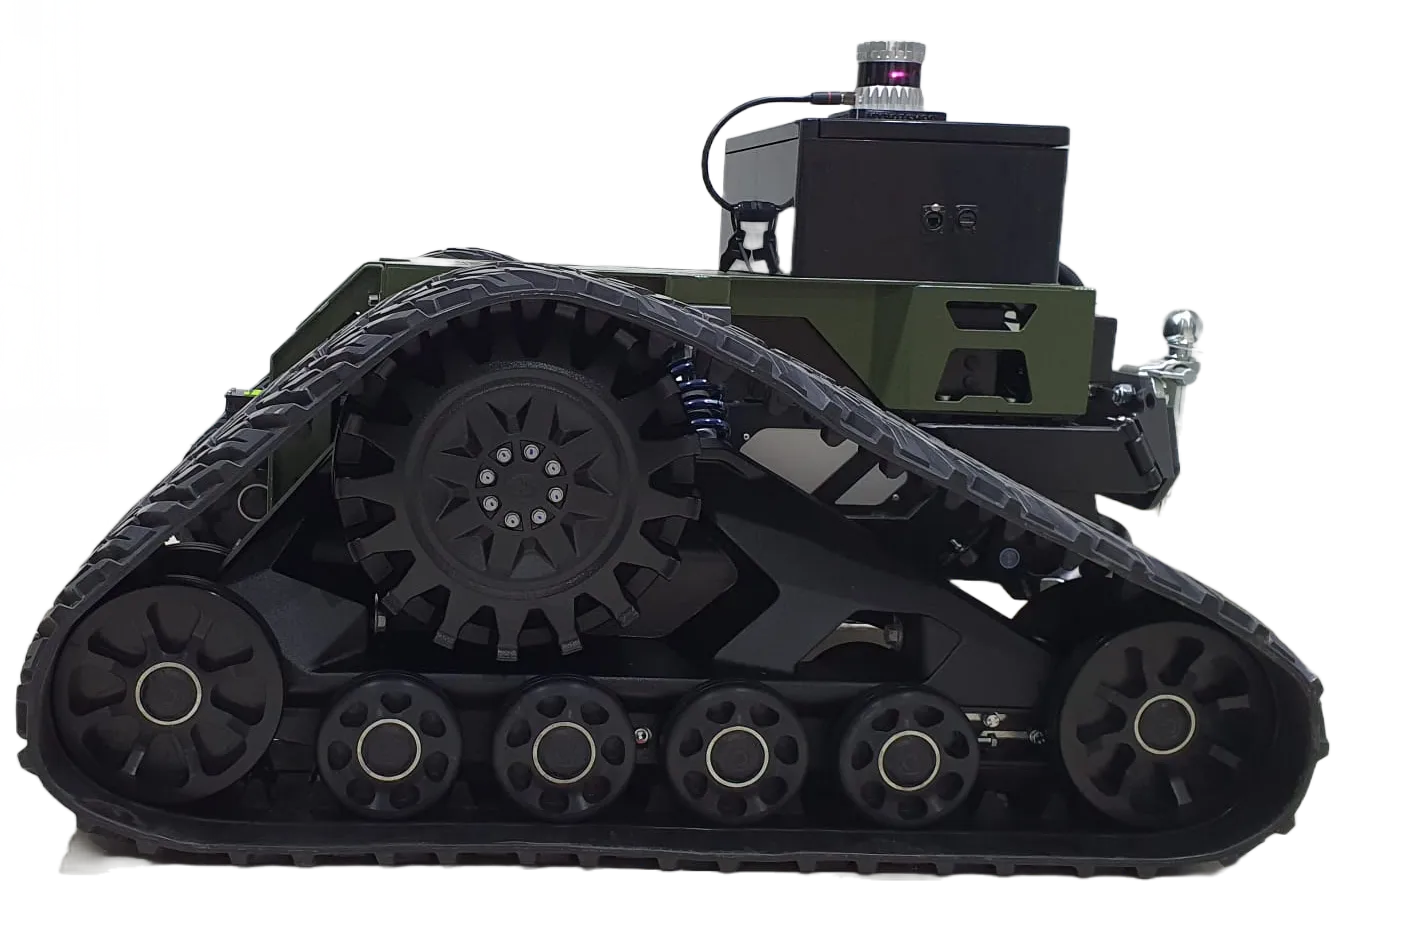
Pre-requisites
Safety Guidelines Autonomous Mobile Robot.
Network Interface Pre-requisites.
Installation
Pre-requisite Software
The ROS driver for the robots is initially supported for the
ROS Noetic. All of the ROS-related software should be installed either on
remote PC/Nvidia board on the robot. The steps shown below are for remote PC
both boards usually come with pre-installed ROS distribution.
Note: All the ROS related software should be installed/run on remote PC/Rasberry Pi/Nvidia board, nothing needs to be installed on the robots control board as they come pre-installed.
Ubuntu 20.04 - ROS NOETIC
The ROS driver for the robots is initially supported for the
ROS Noetic. All of ROS related software should be installed in a Remote-PC. The
steps for shown below are for Remote-PC.
Warning
Care should be taken when installing ROS so that it matches with your CPU’s architecture (i.e. armhf, amd64, arm6, etc.)
PC Setup
ROS Noetic installation requires Ubutnu 20.04.
Download Ubuntu 20.04
Follow the Ubuntu 20.04 Installation guide
ROS-noetic Installation
The ros driver provided can be run either on a remote PC or on board robot computer. Usually, the on-board computer already has pre-installed ROS distribution, so the instructions below will be applicable to a remote computer. You may run the following commands to install ROS noetic or you can simply follow the instructions from the roswiki.
Enter the Ubuntu terminal and type in the following command:
cd
The next step is setting up the source list:
sudo sh -c 'echo "deb http://packages.ros.org/ros/ubuntu $(lsb_release -sc) main" > /etc/apt/sources.list.d/ros-latest.list'
After which you will set up the keys:
sudo apt install curl
curl -s https://raw.githubusercontent.com/ros/rosdistro/master/ros.asc | sudo apt-key add -
Then, you will install ROS-noetic:
sudo apt update
sudo apt install ros-noetic-desktop-full
Finally, you will add ROS environment to your bash file:
echo "source /opt/ros/noetic/setup.bash" >> ~/.bashrc
source ~/.bashrc
Install python dependencies and initialize repo:
sudo apt install python3-rosdep python3-rosinstall python3-rosinstall-generator python3-wstool build-essential
sudo rosdep init
rosdep update
Catkin Workspace
Ensure that you have correctly setup ROS noetic:
source /opt/ros/noetic/setup.bash
Install catkin_tools:
sudo apt install python3-catkin-tools
Create your workspace:
mkdir -p ~/catkin_ws/src
cd ~/catkin_ws/
catkin build
Enable the workspace:
source devel/setup.bash
Add to bashrc:
echo "source ~/catkin_ws/devel/setup.bash" >> ~/.bashrc
Ubuntu 18.04 - ROS MELODIC

The ROS driver for the robots is also supported for ROS Melodic on Ubuntu 18.04.
ROS-Melodic Installation
Run following commands to install ROS Melodic or follow the instructions.
sudo sh -c 'echo "deb http://packages.ros.org/ros/ubuntu $(lsb_release -sc) main" > /etc/apt/sources.list.d/ros-latest.list'
sudo apt install curl
curl -s https://raw.githubusercontent.com/ros/rosdistro/master/ros.asc | sudo apt-key add -
sudo apt update
sudo apt install ros-melodic-desktop-full
echo "source /opt/ros/melodic/setup.bash" >> ~/.bashrc
source ~/.bashrc
Installation Robot
Note
ROS2 Foxy reached end-of-life. Please consider upgrading to ROS2 Jazzy.
The ROVO2 ROS2 Foxy packages can be installed on Ubuntu 20.04.
1. Install ROS2 Foxy
Follow the official ROS2 Foxy installation guide.
2. Clone and Build
mkdir -p ~/ros2_ws/src
cd ~/ros2_ws/src
# Clone ROVO2 packages
cd ~/ros2_ws
colcon build --symlink-install
source install/setup.bash
Installation External
For external computers:
colcon build --symlink-install --packages-select rovo_description rovo_viz
source install/setup.bash
Installation Robot
The ROVO2 comes pre-installed with ROS2 Jazzy. For a fresh installation or re-installation, follow these steps:
1. Set Robot Hostname
sudo hostnamectl set-hostname rovo-unit-071
2. Create Workspace Directory
sudo mkdir /opt/mybotshop && sudo chown -R robot:robot /opt/mybotshop
3. Clone and Install
Clone the repository to the robot’s PC and run the installer:
cd /opt/mybotshop/src/mybotshop/robot_installer
sudo chmod +x total_install.sh
sudo ./total_install.sh
4. Build ROS2 Workspace
cd /opt/mybotshop
colcon build --symlink-install --cmake-args -DCMAKE_BUILD_TYPE=Release
source install/setup.bash
5. Install Startup Services
ros2 run rovo_autostart startup_installer.py
6. Disable System Suspend
sudo systemctl mask sleep.target suspend.target hibernate.target hybrid-sleep.target
sudo systemctl disable systemd-networkd-wait-online.service
sudo systemctl mask systemd-networkd-wait-online.service
7. Configure Network
Edit the netplan configuration:
sudo nano /etc/netplan/01-network-manager.yaml
Add the following configuration:
network:
  version: 2
  renderer: NetworkManager
  bridges:
    br0:
      interfaces:
        - eno1
        - enp3s0
      dhcp4: no
      addresses:
        - 192.168.131.1/24
      nameservers:
        addresses:
          - 8.8.8.8
          - 1.1.1.1
      parameters:
        stp: false
        forward-delay: 0
      optional: true

  ethernets:
    eno1:
      dhcp4: no
      optional: true
    enp1s0:
      dhcp4: no
      optional: true
Apply the configuration:
sudo netplan apply
Installation External
For external (host) computers that need to visualize and interact with the ROVO2:
1. Clone the Repository
Clone the ROVO2 repository into your ROS2 workspace.
2. Build Essential Packages
colcon build --symlink-install --packages-select rovo_description rovo_viz
source install/setup.bash
3. Set Environment and Launch
export ROVO_NS="rovo_unit_071"
ros2 launch rovo_viz view_robot.launch.py
Dependencies
Install the required ROS2 packages:
sudo apt-get install ros-jazzy-urdf ros-jazzy-xacro \
                     ros-jazzy-joint-state-publisher ros-jazzy-robot-state-publisher \
                     ros-jazzy-joy ros-jazzy-teleop-twist-joy ros-jazzy-twist-mux \
                     ros-jazzy-navigation2 ros-jazzy-nav2-bringup \
                     ros-jazzy-ros-gz ros-jazzy-ros-gz-bridge
Autostart
Note
For ROS Noetic, startup is managed via roslaunch and custom scripts. See the Packages section for bringup commands.
Systemd Services
Systemd services for ROS2 Foxy follow a similar pattern to Jazzy.
# Check service status
sudo systemctl status rovo_platform.service

# Start a service
sudo systemctl start rovo_platform.service

# Stop a service
sudo systemctl stop rovo_platform.service
Note
Service configurations may differ between Foxy and Jazzy installations.
Systemd Services
The ROVO2 uses systemd services for automatic startup of ROS2 nodes.
Install Startup Services:
ros2 run rovo_autostart startup_installer.py
Service Management:
Services can be managed via the webserver or command line:
# Check service status
sudo systemctl status rovo_platform.service

# Start a service
sudo systemctl start rovo_platform.service

# Stop a service
sudo systemctl stop rovo_platform.service

# Enable service at boot
sudo systemctl enable rovo_platform.service

# Disable service at boot
sudo systemctl disable rovo_platform.service
Available Services:
Service |
Description |
|---|---|
|
Platform driver (CAN, odometry, IMU) |
|
Web control interface |
|
Joystick and twist mux |
Environment Configuration
Setup Script (config/setup.bash):
This script sets up environment variables and aliases.
Environment Variables:
Variable |
Default |
Description |
|---|---|---|
|
|
Robot namespace |
Useful Aliases:
# Build and source workspace
rovo_build
CAN Interface Setup
The CAN interface is configured via the rovo_can.bash script:
sudo ip link set can0 down
sudo ip link set can0 type can bitrate 500000
sudo ip link set can0 up
udev Rules
Hardware udev rules are installed at /etc/udev/rules.d/45-mbs.rules for consistent device naming.
Files:
config/setup.bash- Environment variables and aliasesconfig/startup.bash- Startup scriptconfig/rovo_can.bash- CAN interface setupdebian/45-mbs.rules- udev rules for hardwarescripts/startup_installer.py- Systemd service installer
Webserver
Note
Web interface is not available for ROS Noetic.
Robot Webserver
Note
The webserver interface for ROS2 Foxy may have limited functionality compared to Jazzy. Please upgrade to ROS2 Jazzy for the full webserver experience.
Access: http://192.168.131.1:9000
Robot Webserver
The ROVO2 features a web-based control interface built with Flask.
Access: http://192.168.131.1:9000
Default Credentials:
Username:
adminPassword:
mybotshop
Login
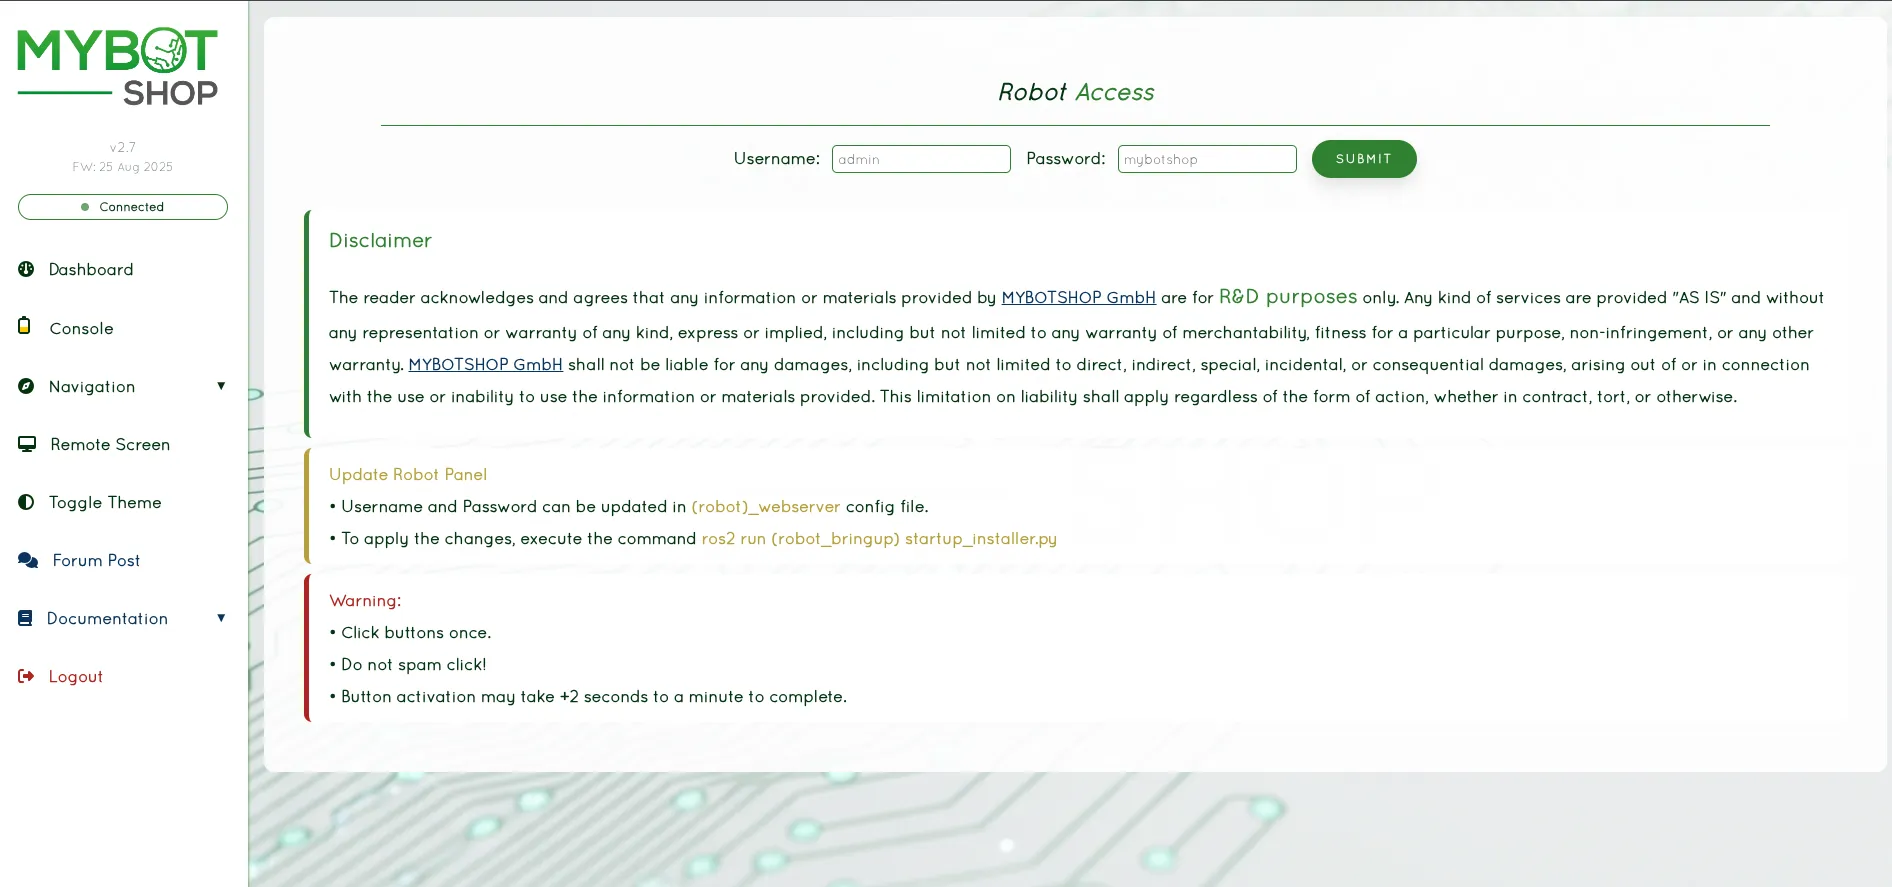
Webserver Login Page
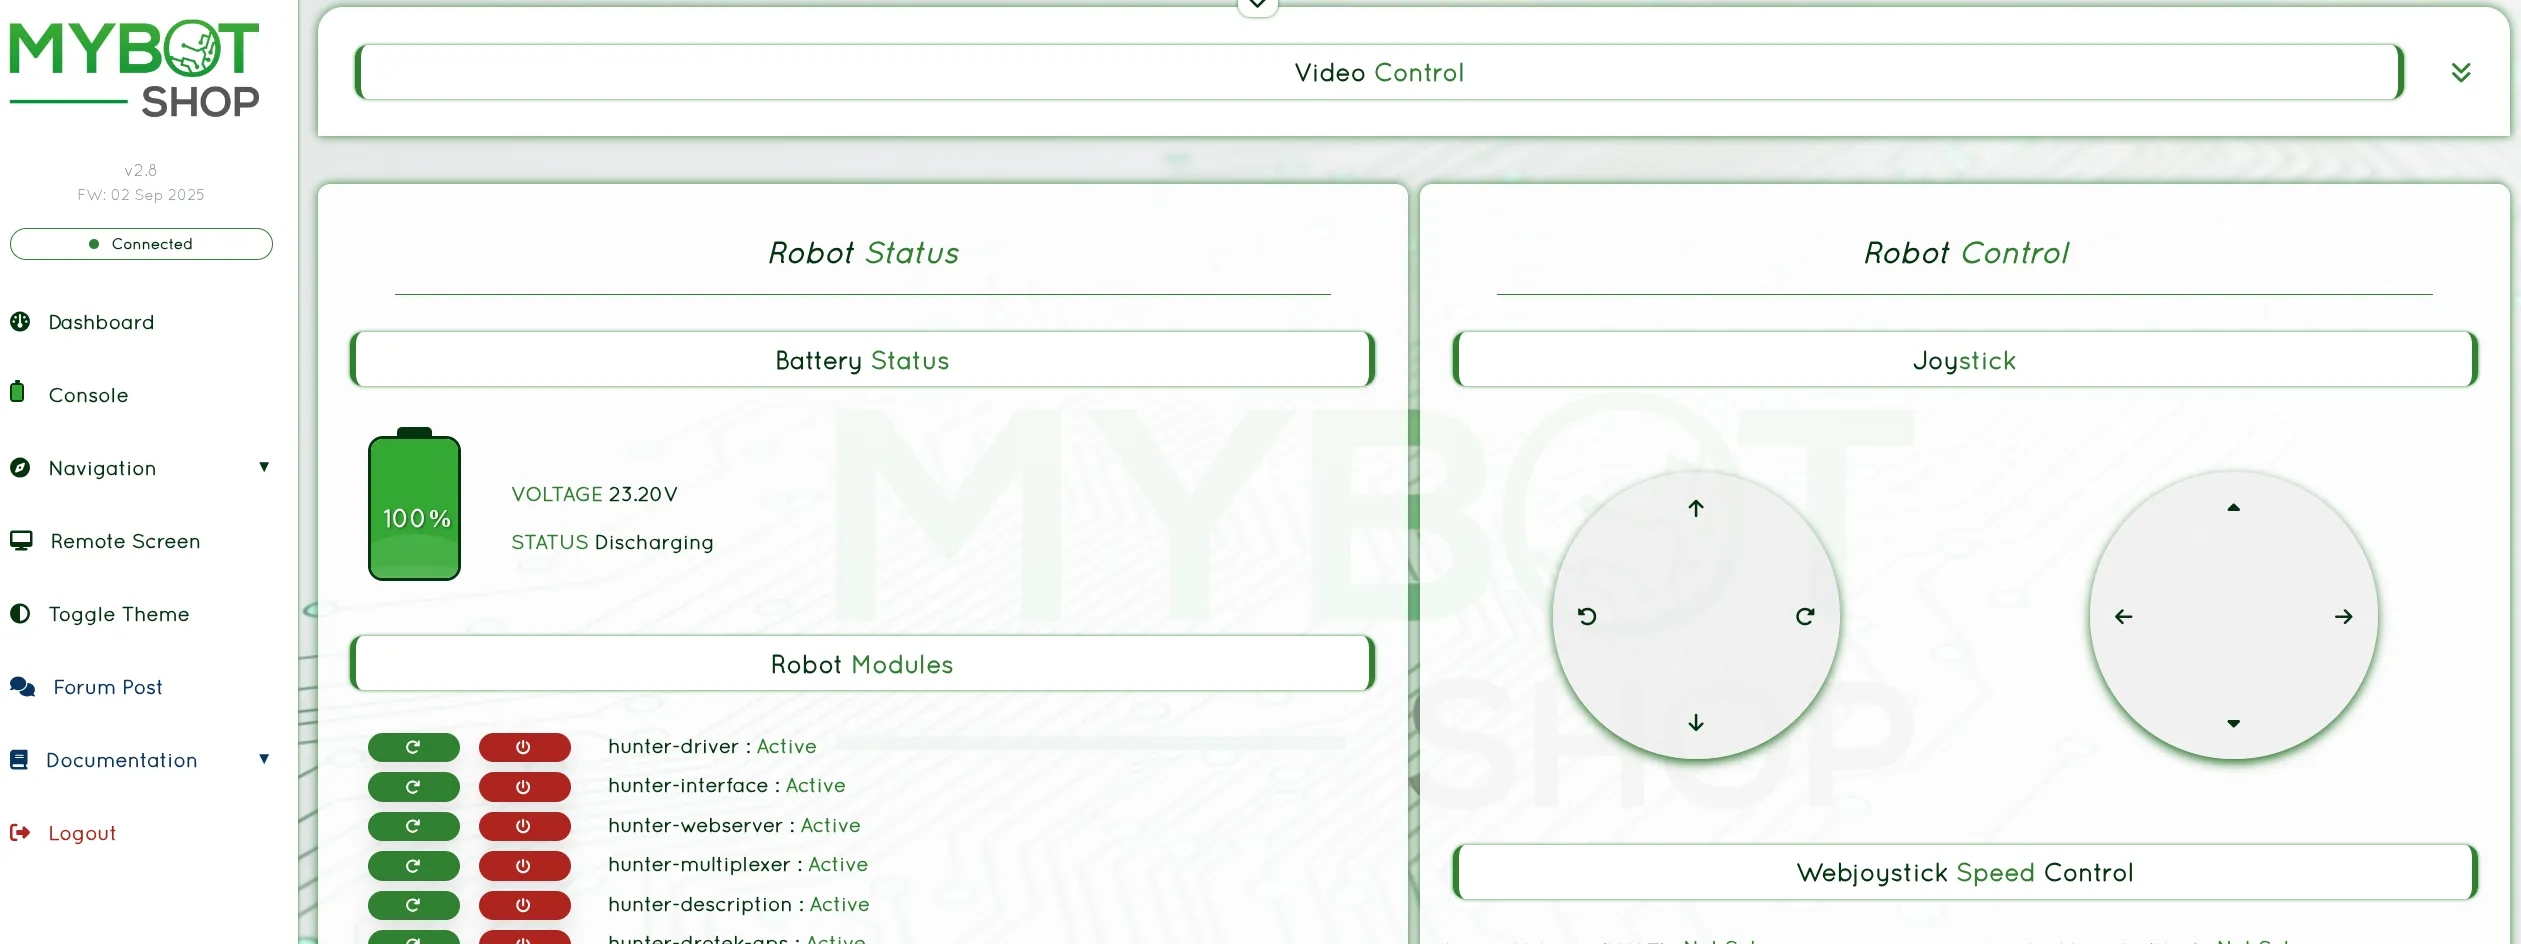
Dashboard
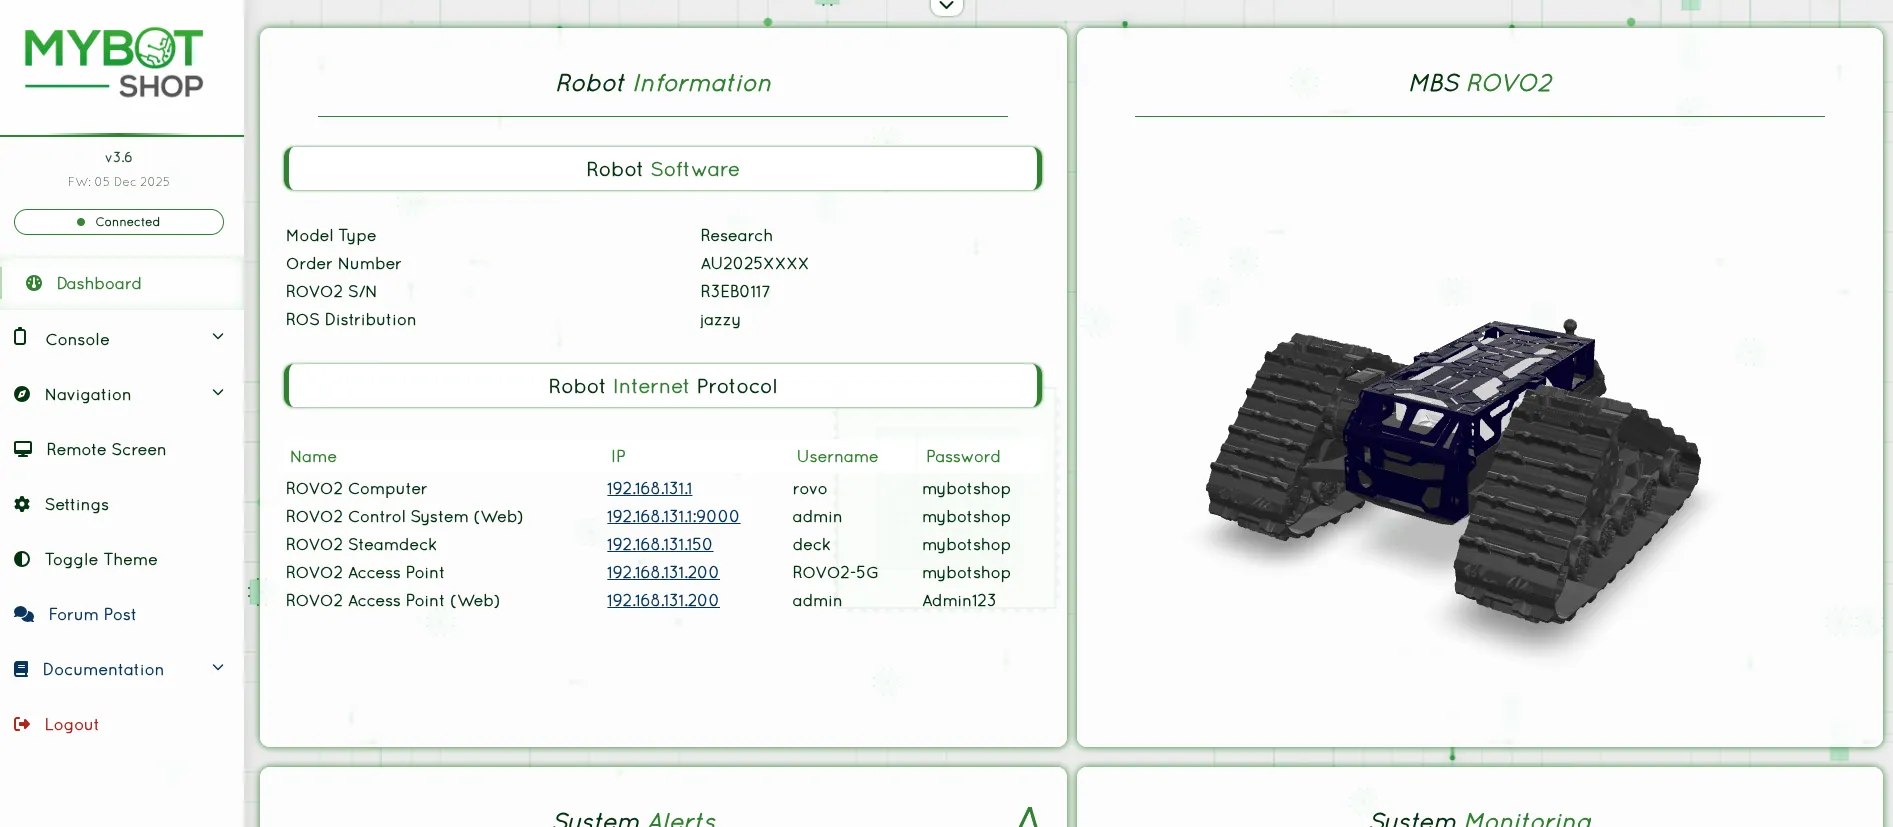
Main Dashboard with 3D Robot Visualization
Features:
Feature |
Description |
|---|---|
3D Visualization |
Real-time robot model via GLTF |
Joystick Teleop |
Browser-based joystick control |
Service Management |
Start/stop ROS2 nodes and services |
Map Visualization |
View navigation maps |
Battery Monitoring |
Real-time battery state |
GPS Waypoints |
Record and manage GPS waypoints |
Rosbag Recording |
Start/stop rosbag recordings |
VNC Access |
Remote desktop via VNC |
System Management
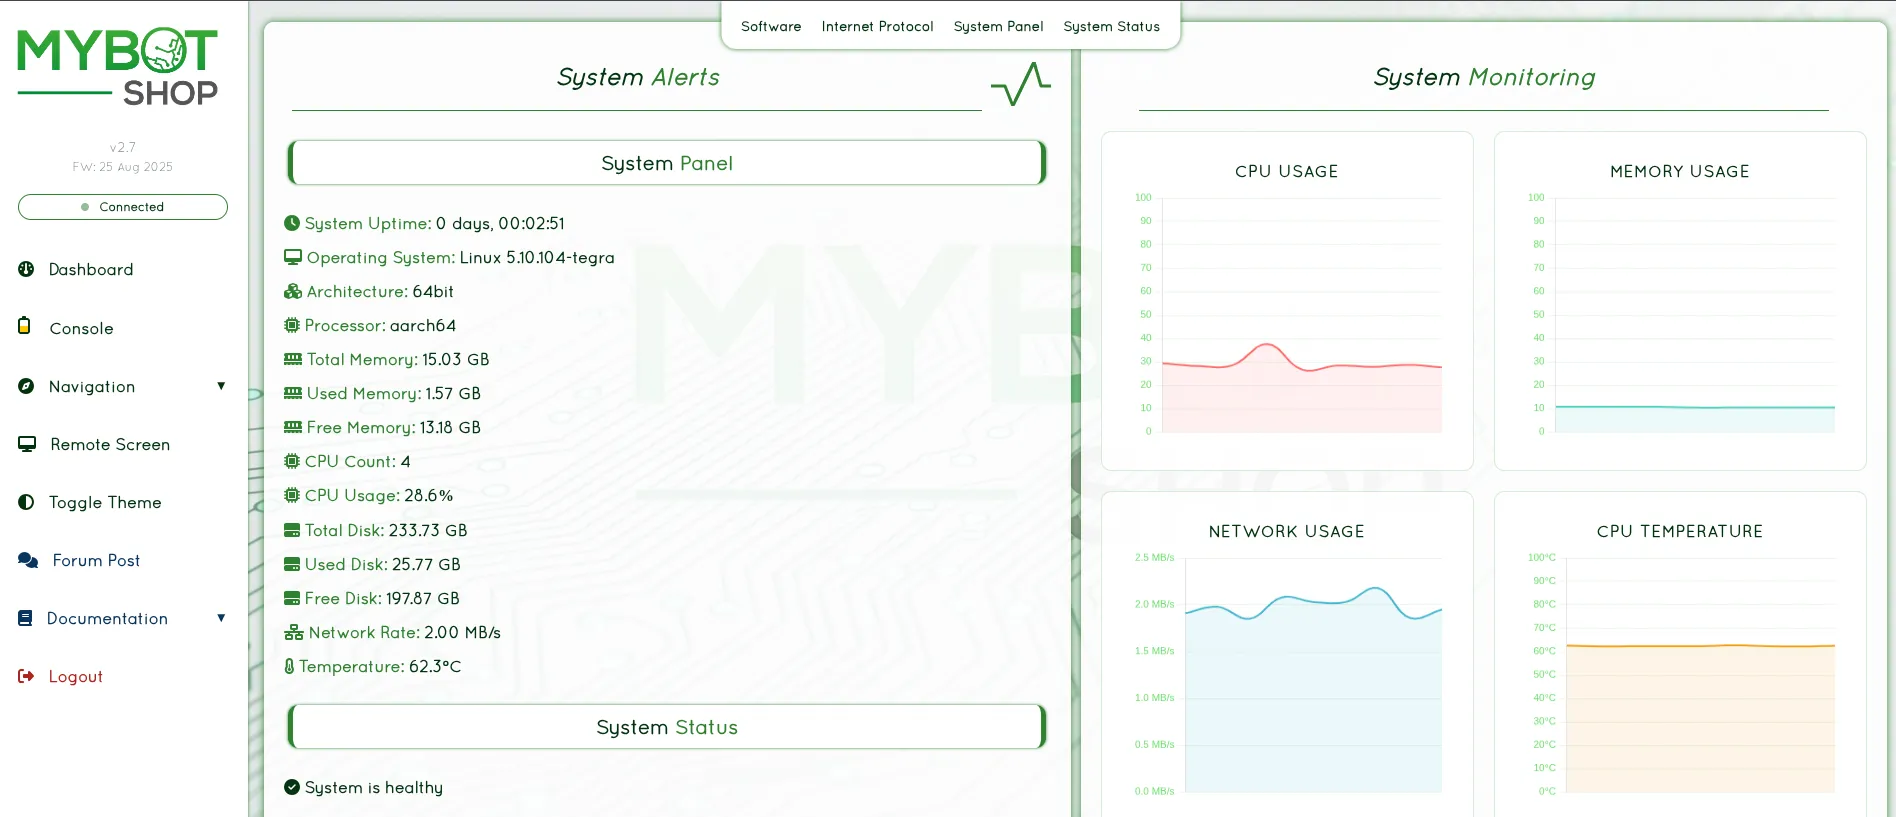
System Management Interface
Console
Web Console Interface
Indoor Navigation
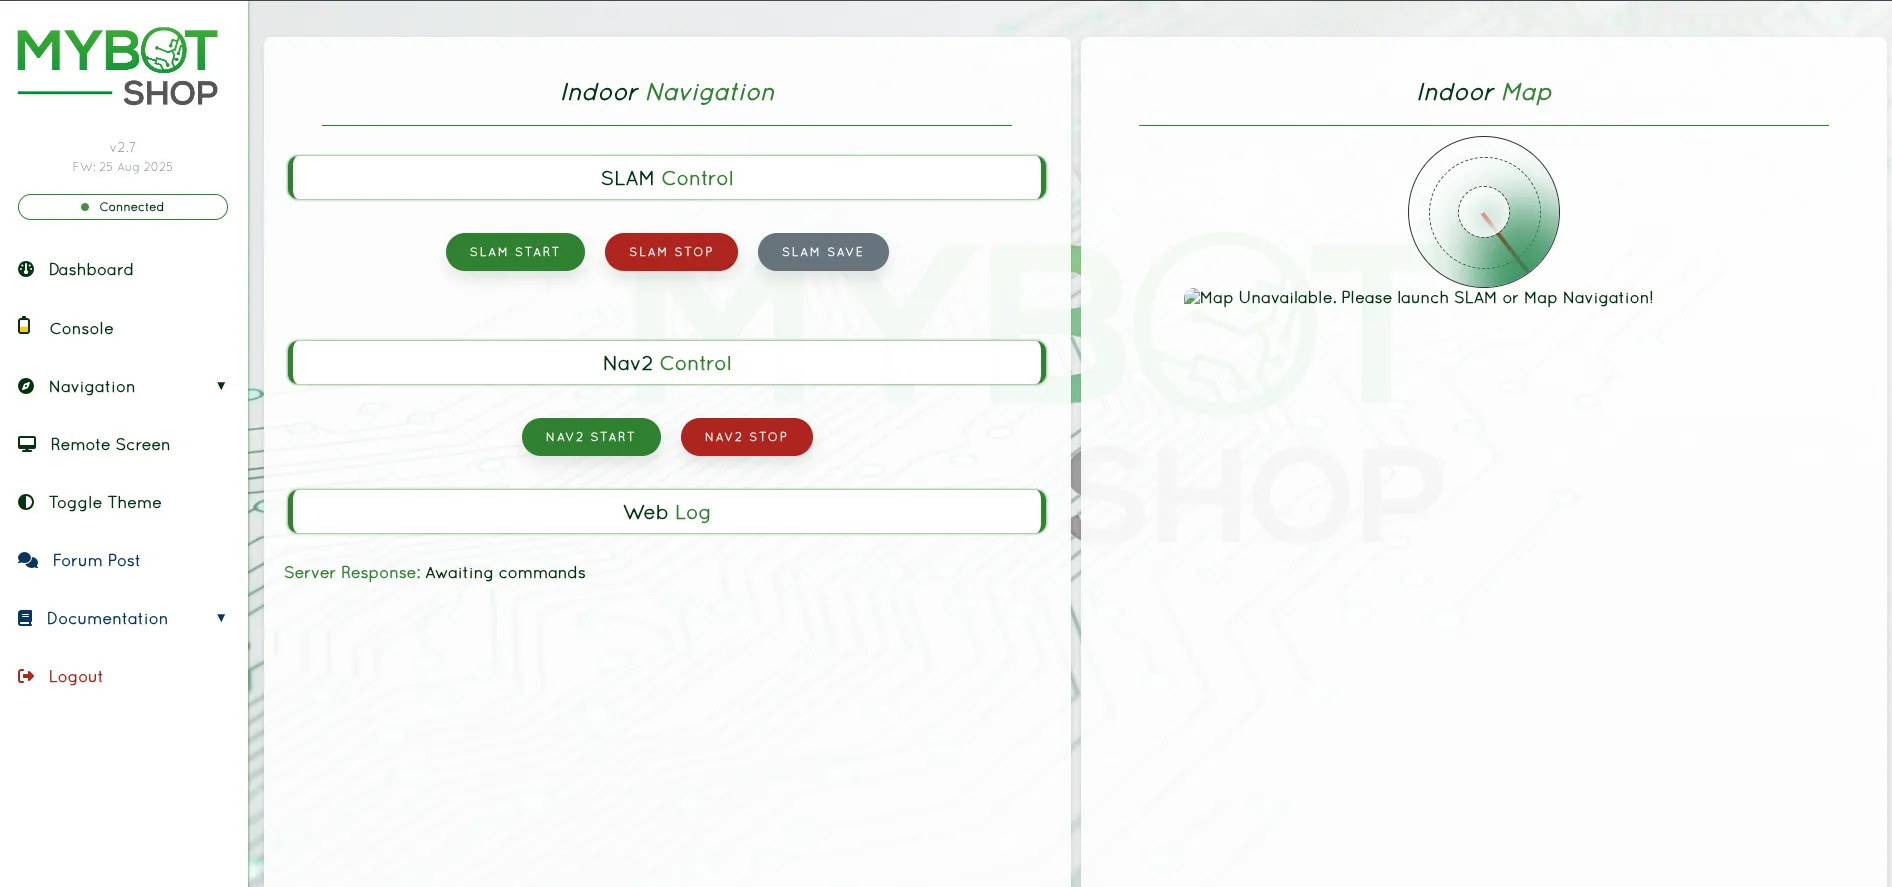
Indoor Navigation View
Outdoor Navigation
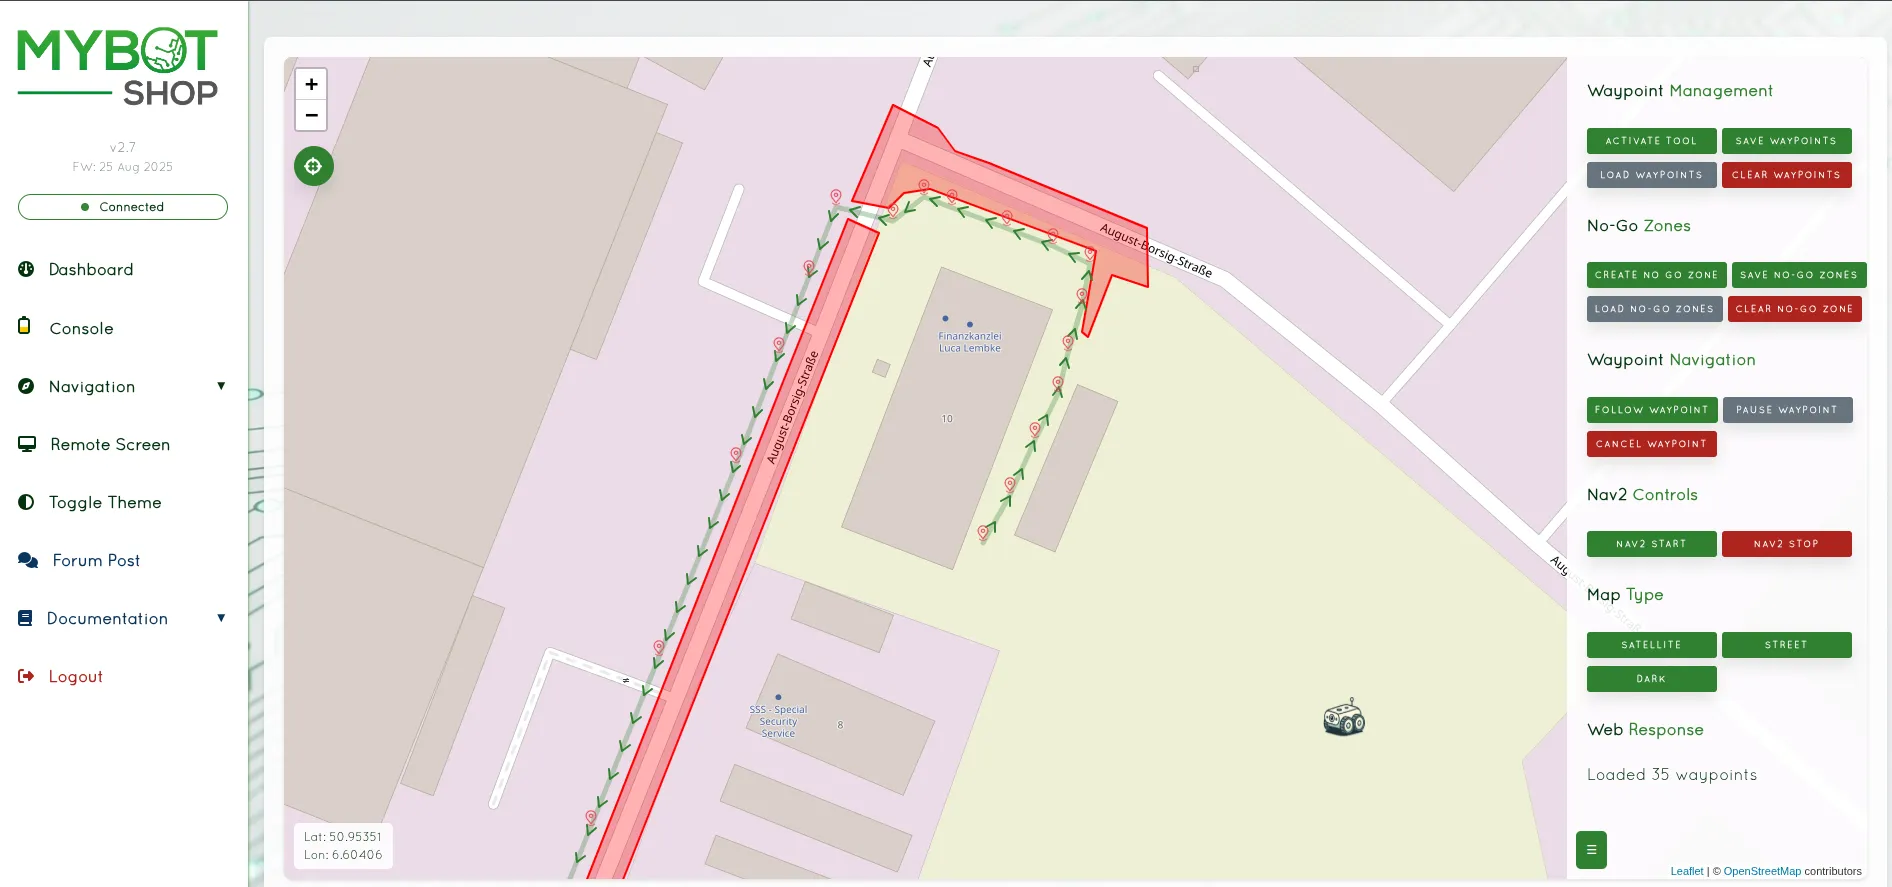
Outdoor Navigation View with GPS
VNC Remote Desktop
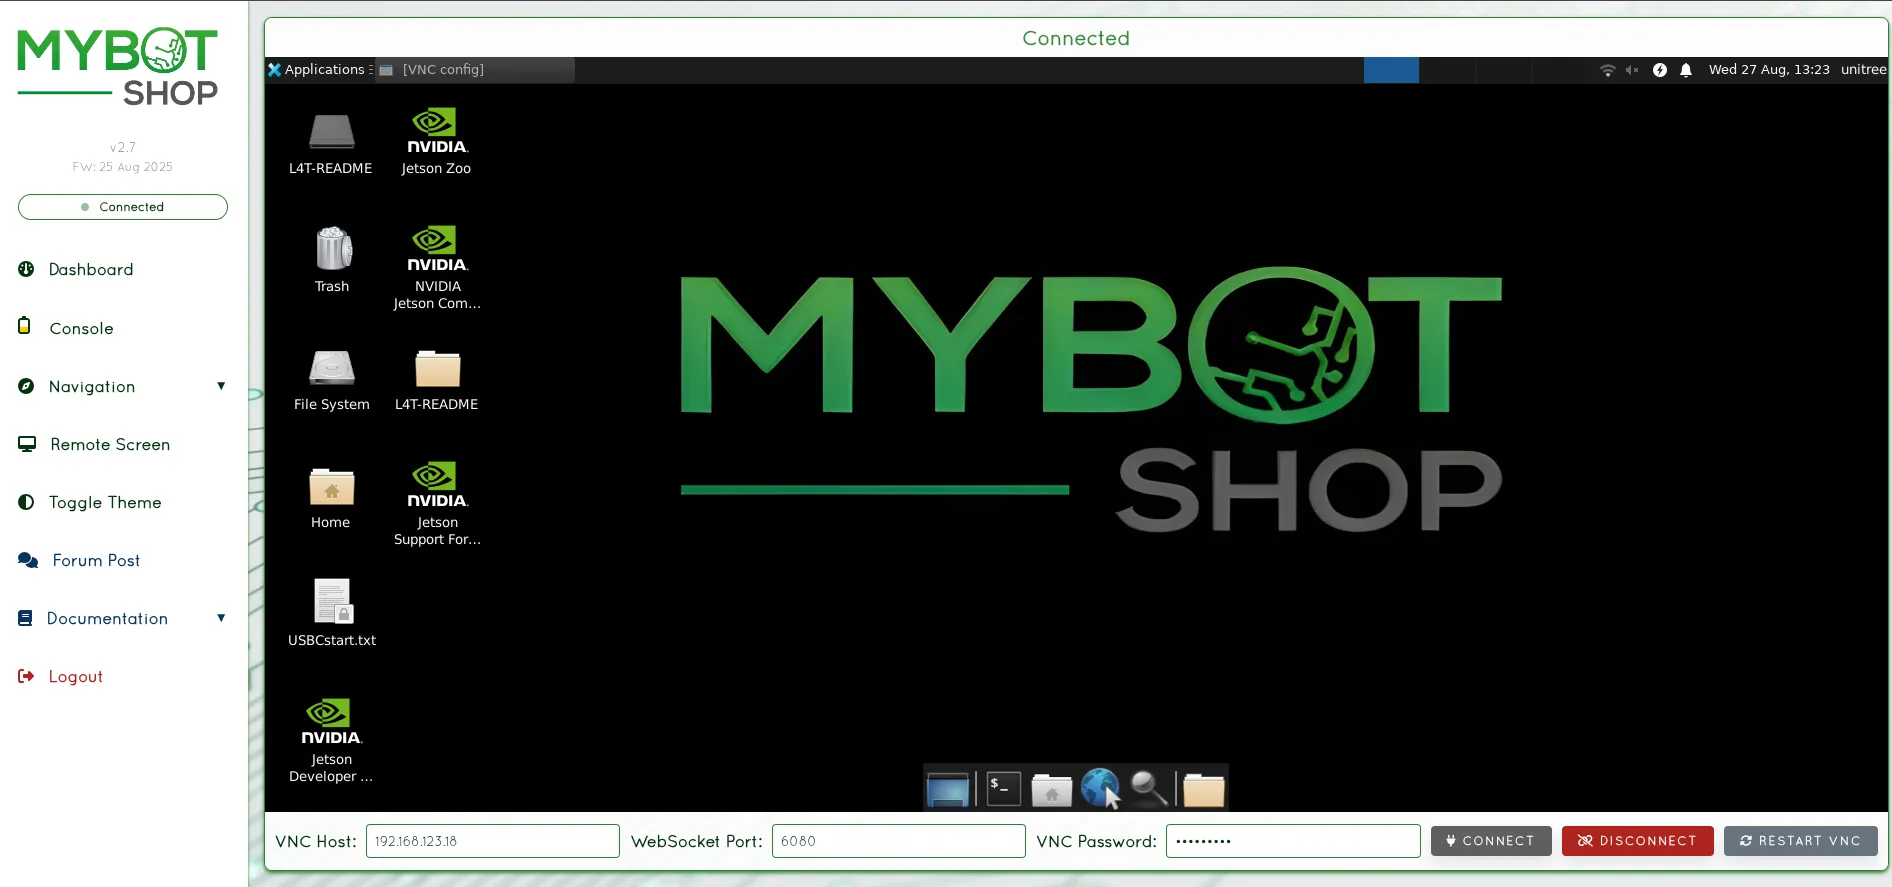
VNC Remote Desktop Access
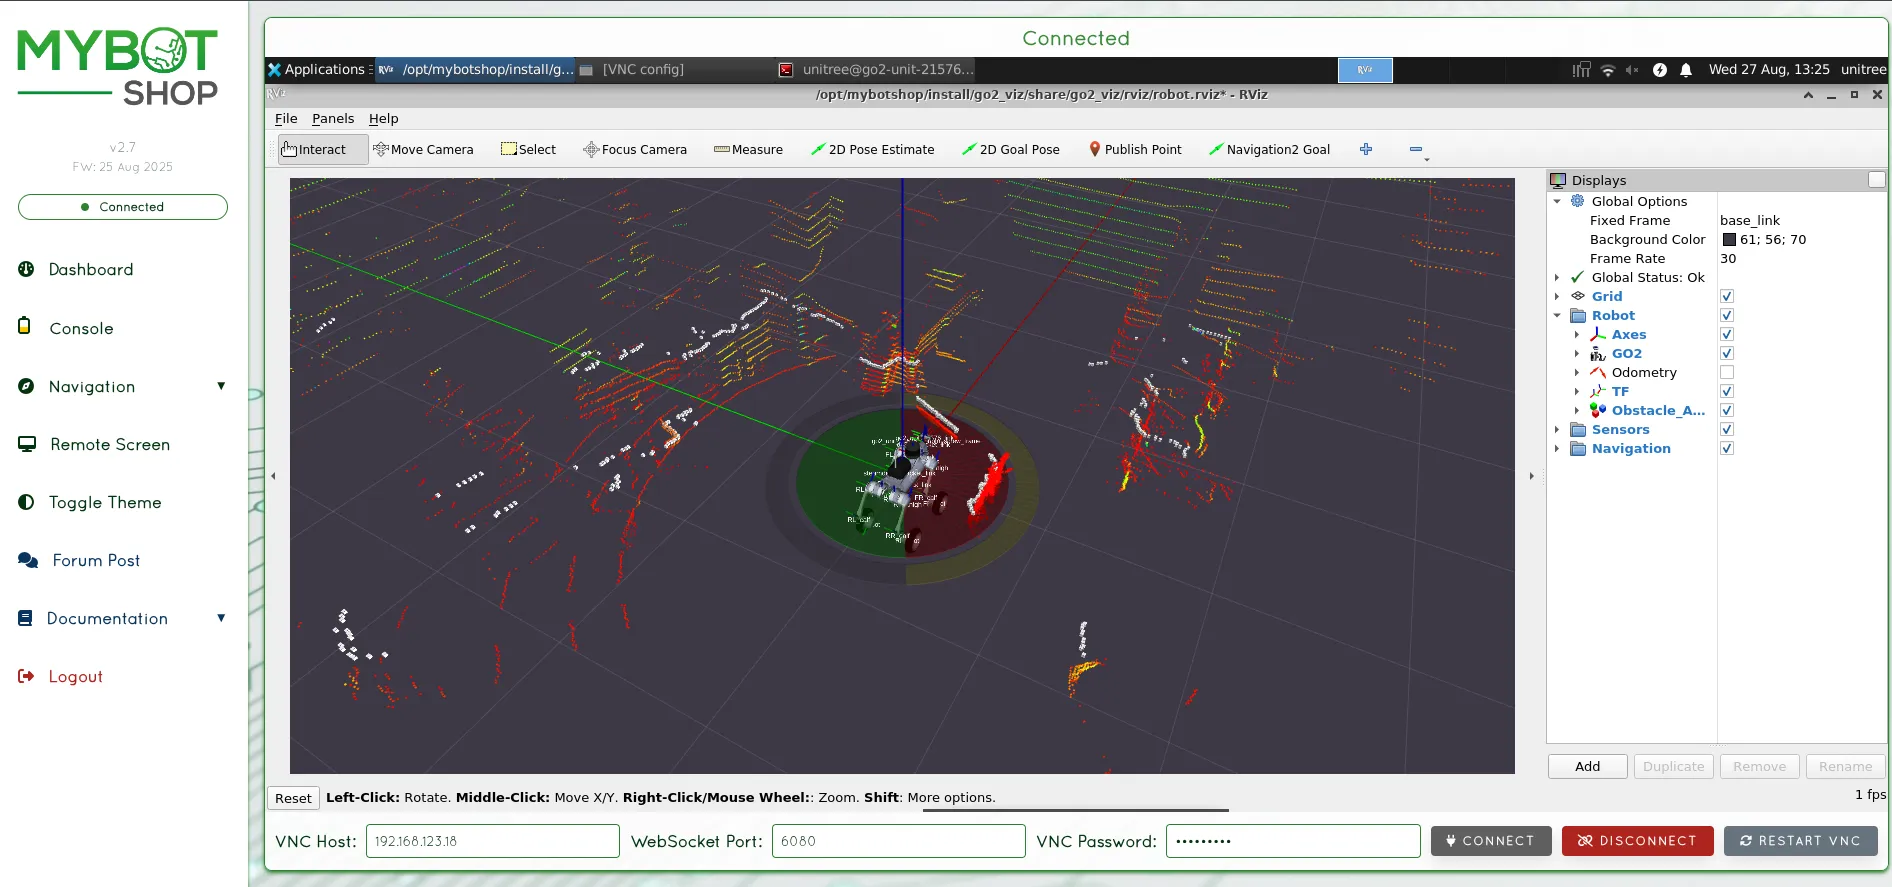
VNC with RViz2 Visualization
Configuration (config/robot_webserver.yaml):
Parameter |
Description |
|---|---|
|
Rosbag storage directory |
|
List of controllable services |
|
Map topic name |
|
Velocity command topic |
|
Emergency stop topic |
|
GPS topic |
|
Battery state topic |
Launch Webserver:
The webserver is typically started automatically via systemd. To launch manually:
ros2 launch rovo_webserver webserver.launch.py
Dependencies:
pip3 install Flask playsound TTS
sudo apt-get install espeak-ng
VNC Setup:
To enable VNC remote desktop:
vncpasswd ~/.vnc/passwd
# Password: mybotshop
Firmware Updates:
The webserver supports firmware updates for the ROS2 workspace:
Navigate to the Firmware Update section
Upload a
.zipor.tar.gzarchive containing the new workspaceThe system automatically:
Creates a backup of the current workspace
Extracts and replaces the old workspace
Rebuilds using
colcon build
Restart ROS2 services after update
Teleoperation
Keyboard Teleop
rosrun teleop_twist_keyboard teleop_twist_keyboard.py
Joystick Control
The ROVO2 supports joystick control via the Logitech controller. See the Packages section for controller mapping details.
Keyboard Teleop
ros2 run teleop_twist_keyboard teleop_twist_keyboard
Joystick Control
The ROVO2 supports joystick control via the teleop_twist_joy package.
Note
For ROS2 Foxy, joystick and twist mux configurations may differ from Jazzy. Please refer to the package documentation for Foxy-specific setup.
Command Line Interface
Teleoperate the ROVO2 using the keyboard via ROS2:
Warning
Extreme caution required when using the ROVO2. Please go through the provided manuals before operating.
Prerequisites:
Ensure
rovo_autostartservices are running (check via webserver)Robot platform drivers must be active
Do not run duplicate drivers
1. Set Gear
Before moving the robot, set the appropriate gear:
# Set gear to 1 (drive mode)
ros2 service call /$ROVO_NS/platform/set_gear rovo_interface/srv/SetGear "{gear: 1}"
2. Launch Keyboard Teleop
ros2 run teleop_twist_keyboard teleop_twist_keyboard --ros-args --remap cmd_vel:=/$ROVO_NS/cmd_vel
3. Control Keys
Key |
Action |
|---|---|
i |
Move forward |
k |
Stop |
, |
Move backward |
j |
Turn left |
l |
Turn right |
u |
Forward + left |
o |
Forward + right |
m |
Backward + left |
. |
Backward + right |
q/z |
Increase/decrease speed |
4. Return to Neutral
When finished, set the gear back to neutral:
ros2 service call /$ROVO_NS/platform/set_gear rovo_interface/srv/SetGear "{gear: 0}"
Joystick Control
The ROVO2 supports Logitech joystick control with the following button mapping:
Button |
Function |
|---|---|
Button 4 (LB) |
Enable movement (hold) |
Button 5 (RB) |
Enable turbo mode |
Left Stick Y |
Linear X velocity |
Right Stick X |
Angular Z velocity |
Speed Modes:
Normal Mode: 0.2 m/s linear, 0.3 rad/s angular
Turbo Mode: 1.0 m/s linear, 1.0 rad/s angular
Twist Mux Priority
The ROVO2 uses a twist multiplexer to handle velocity commands from multiple sources:
Priority |
Source |
Topic |
|---|---|---|
255 |
E-Stop (Lock) |
|
25 |
Logitech Joystick |
|
20 |
Steamdeck |
|
15 |
Web Interface |
|
10 |
Interactive Marker |
|
5 |
External |
|
3 |
Autonomous (High) |
|
2 |
Autonomous (Mid) |
|
1 |
Autonomous (Low) |
|
Web Interface Control
Access the webserver at http://192.168.131.1:9000 for browser-based joystick control.
Steamdeck Control
The ROVO2 can be controlled via Steamdeck using the steamdeck_joy_teleop interface.
Visualization
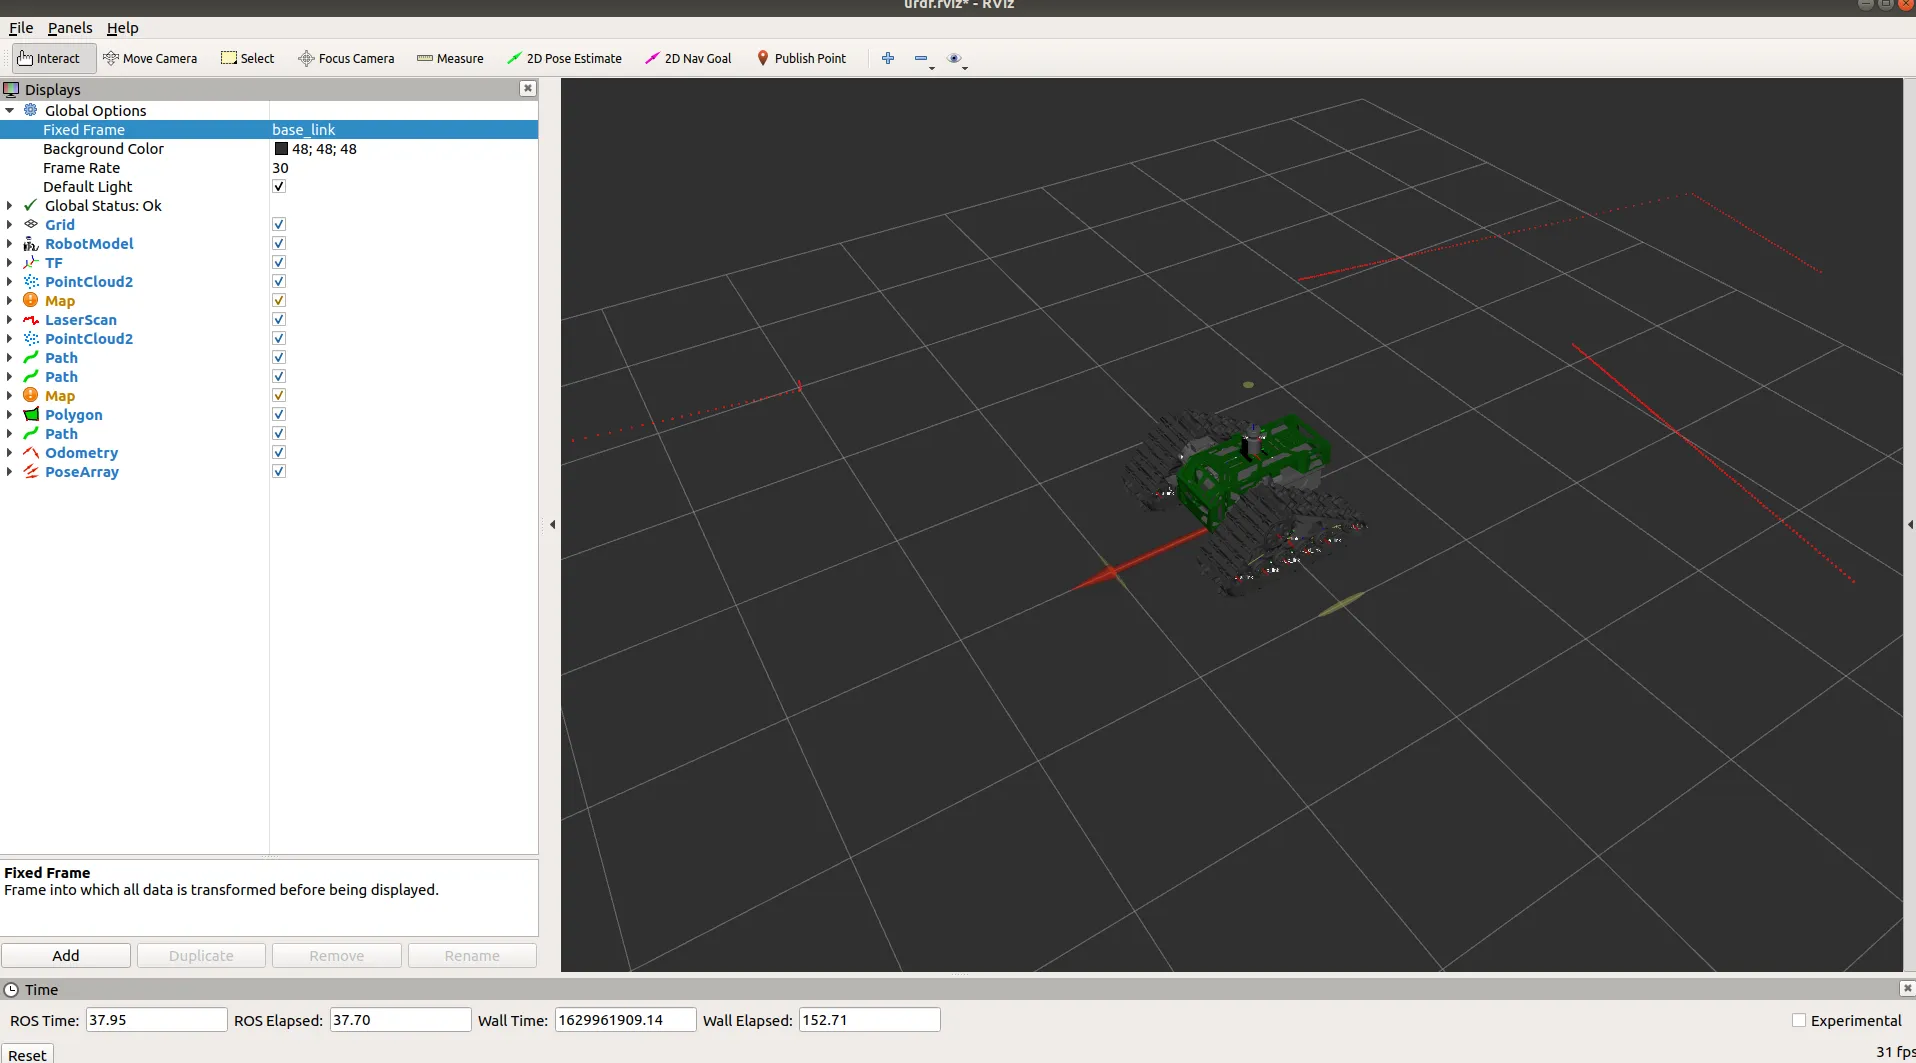
RViz
Launch RViz for robot visualization:
roslaunch rovo_viz view_robot.launch
RViz2
Launch RViz2 for robot visualization:
ros2 launch rovo_viz view_robot.launch.py
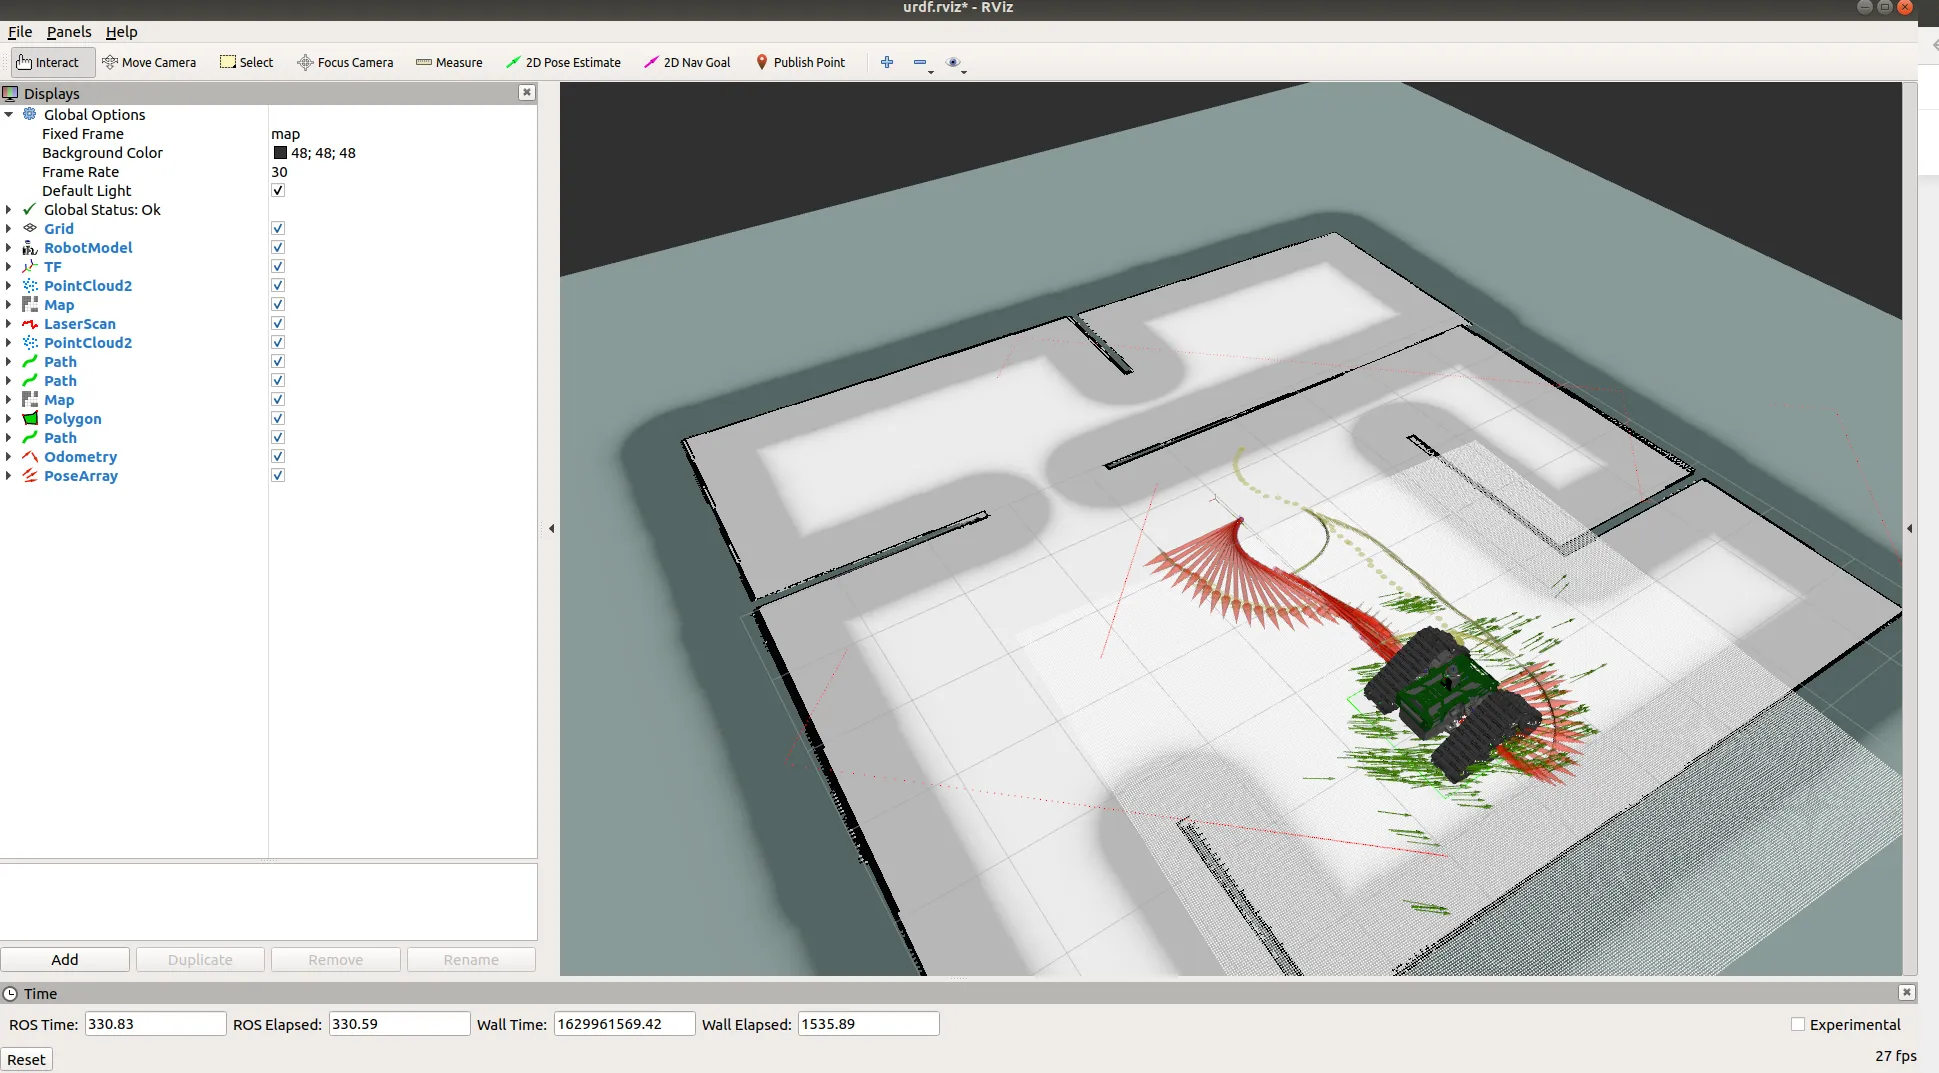
RViz2
RViz2 is used for visualizing the robot state, sensor data, and navigation information.
ROVO2 Visualization in RViz2 with Gazebo Simulation
Launch RViz2:
ros2 launch rovo_viz view_robot.launch.py
Available Configurations:
Configuration |
Description |
|---|---|
|
Full robot visualization with navigation |
|
Robot model only |
|
Steamdeck optimized view |
Displayed Elements:
Robot model (URDF)
TF transforms
Odometry
LiDAR point cloud
Depth camera images
Navigation costmaps
Path planning visualization
External Host Setup:
To visualize the robot from an external computer:
Build visualization packages:
colcon build --symlink-install --packages-select rovo_description rovo_viz
source install/setup.bash
Set the robot namespace:
export ROVO_NS="rovo_unit_071"Launch RViz2:
ros2 launch rovo_viz view_robot.launch.py
Note
Ensure your computer is on the same network as the robot and ROS2 DDS discovery is configured properly.
Navigation
Navigation Setup
Important
It is imperative to tune the Rovo according to your requirements before testing it. Be sure to remain vigilant when the robot is moving autonomously.
Hardware Requirements:
Autonomous ground vehicle (AGV)
Camera (Visual Odometry)
Inertial measurement unit (IMU)
Logitech controller
Recommended: LiDAR, Depth Camera
Software Requirements:
Ubuntu 18.04/Ubuntu 20.04
ROS-melodic/ROS-noetic
MBS Navigation Package
Warning
The provided MBS navigation package allows for point to point navigation utilizing GPS coordinates or indoor map coordinates. Caution must be exercised when using the package around people.
Simulation Navigation
Start the simulation and the navigation stack:
roslaunch rovo_gazebo gazebo_world.launch
roslaunch rovo_navigation odom_navigation.launch
Use the
2D pose estimatetool in RViz to correct position if needed.Select the
2D Nav Goalto set a navigation target.
Real-world Navigation
Start the navigation stack:
roslaunch rovo_base base.launch
roslaunch rovo_navigation odom_navigation.launch
Use RViz tools to set position and goals.
Mapping
A sensor device is required with the Rovo for mapping such as a depth camera or a lidar.
Simulation Mapping:
roslaunch rovo_gazebo gazebo_world.launch
roslaunch rovo_navigation map_navigation.launch
rosrun key_teleop key_teleop.py key_vel:=rovo_velocity_controller/cmd_vel
Save the Map:
rosrun map_server map_saver -f rovo_map
Real-world Mapping:
rosrun gmapping slam_gmapping scan:=base_scan
Navigation
Nav2 navigation is supported on ROS2 Foxy.
Odometry Navigation:
ros2 launch rovo_navigation odom_navigation.launch.py
Map Navigation:
ros2 launch rovo_navigation map_navigation.launch.py
Note
Nav2 parameters and behavior trees may differ between Foxy and Jazzy. Please use the appropriate configuration files for your ROS2 version.
Simultaneous Localization and Mapping
SLAM allows the robot to build a map while localizing itself within it.
Prerequisites:
Ensure
rovo_autostartservices are runningLiDAR sensor must be active
Launch SLAM:
ros2 launch rovo_navigation slam.launch.py
Mapping Procedure:
Launch SLAM as shown above
Use teleop to drive the robot slowly (recommended: 0.2 m/s)
Cover all areas you want to map
Ensure good loop closures by revisiting previously mapped areas
Save the Map:
Once satisfied with the map, save it:
ros2 run nav2_map_server map_saver_cli -f /opt/mybotshop/src/mybotshop/rovo_navigation/maps/custom_map \
  --ros-args --remap map:=/$ROVO_NS/map
Rebuild Workspace (if using custom map name):
cd /opt/mybotshop && colcon build --symlink-install
source /opt/mybotshop/install/setup.bash
Odometry Navigation
Odometry navigation allows the robot to navigate using only odometry data, without a pre-built map.
Launch Odometry Navigation:
ros2 launch rovo_navigation odom_navi.launch.py
This mode is useful for:
Simple point-to-point navigation
Testing navigation in unknown environments
Scenarios where mapping is not required
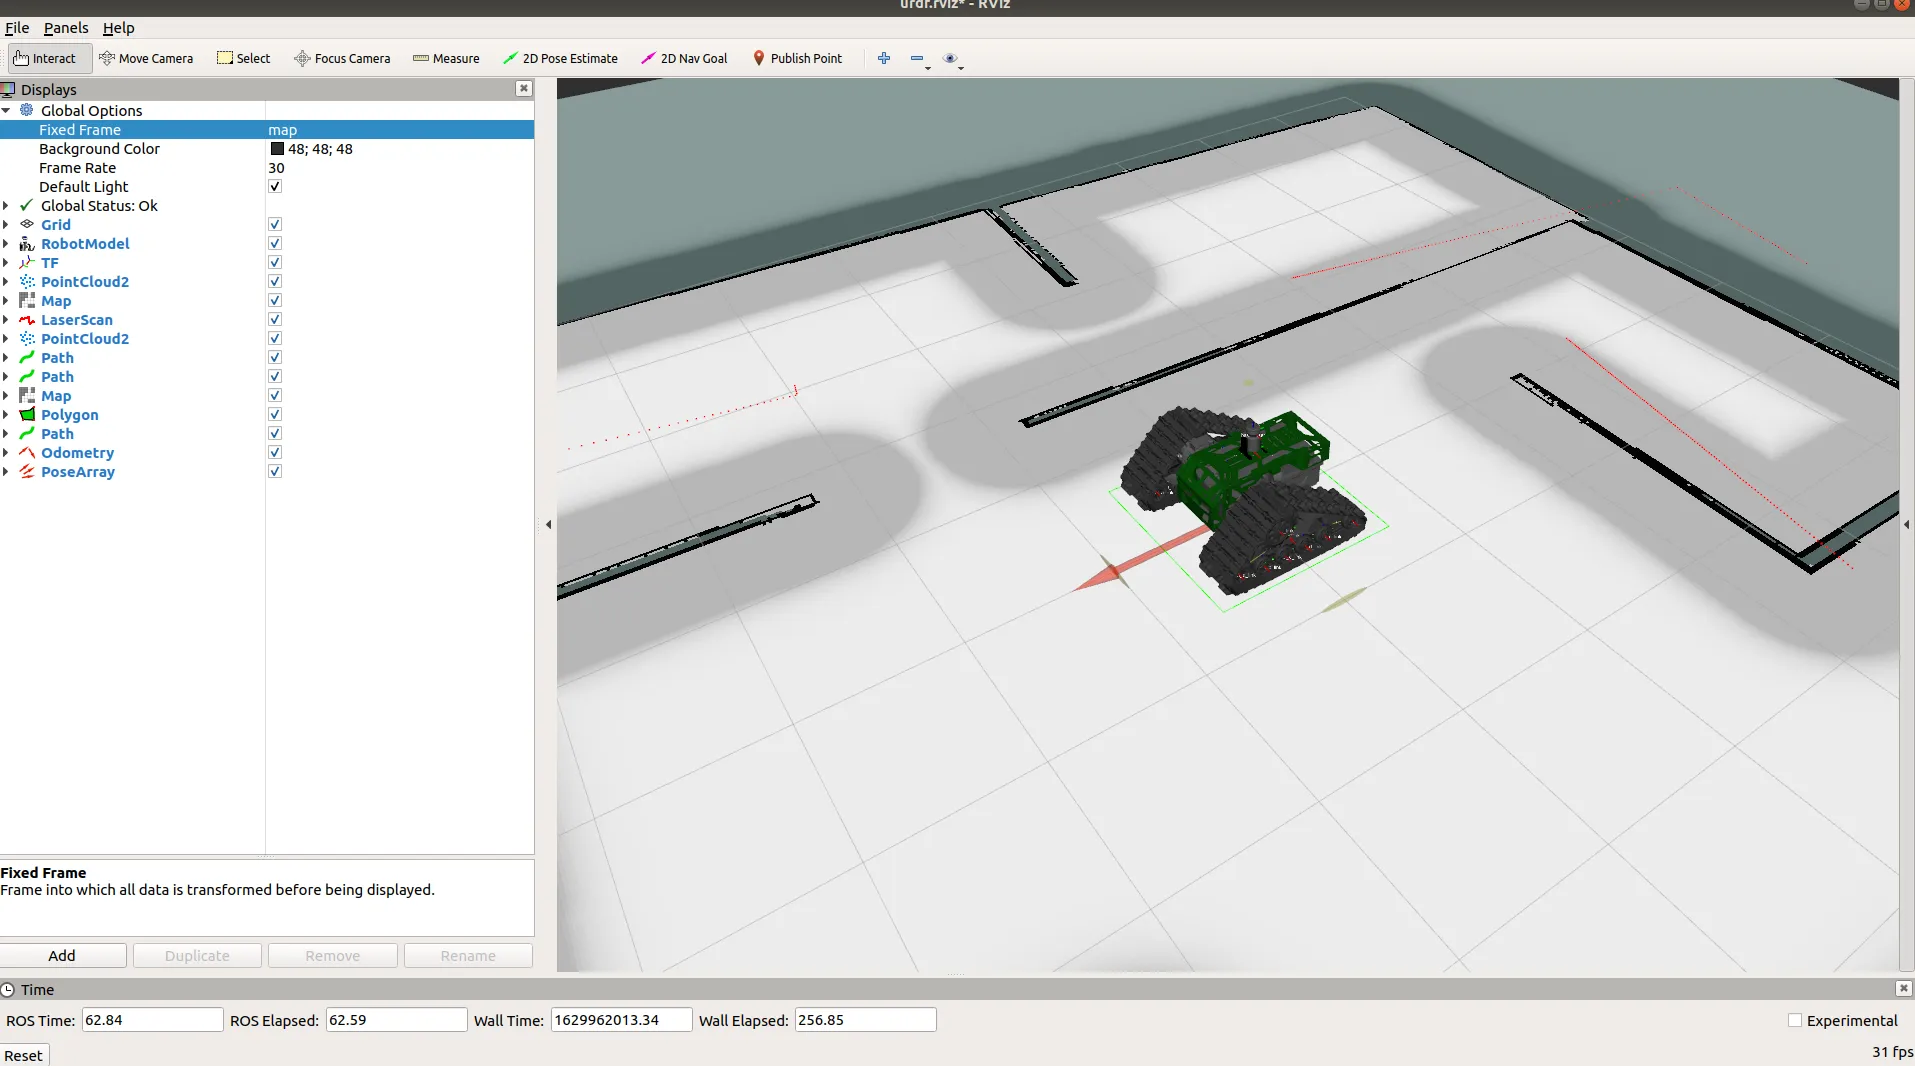
Map Navigation
Map-based navigation provides full autonomous navigation using a pre-built map.
ROVO2 Navigation Stack in RViz2
Prerequisites:
A saved map must exist
Map must be built and available in the ROS package
Launch Map Navigation:
ros2 launch rovo_navigation map_navi.launch.py
ROVO2 Navigation Goal Completed
Setting Goals:
Goals can be set via:
RViz2 “2D Goal Pose” tool
Command line
Webserver interface
Configuration Files:
param/nav2_slam.yaml- SLAM parametersparam/nav2_odom.yaml- Odometry navigation parametersparam/nav2_map.yaml- Map navigation parametersbehavior_trees/nav_to_pose.xml- Custom behavior tree
Dependencies:
sudo apt-get install ros-jazzy-navigation2 ros-jazzy-nav2-bringup ros-jazzy-twist-mux
For more information, see the Nav2 documentation.
GPS Navigation
GPS-based navigation is available for outdoor operations. Configure based on your GPS hardware and use the webserver for waypoint recording and playback.
Sensors
Sensor Augmentation
Rovo can be upgraded with different sensors and accessories.
Ouster LiDAR
Attention
The Ouster organization have updated their installation method. Please follow the instructions in the Ouster ROS github.
Dependencies:
sudo apt install build-essential cmake libglfw3-dev libglew-dev libeigen3-dev \
     libjsoncpp-dev libtclap-dev
ROS Dependencies:
sudo apt install ros-melodic-ros-core ros-melodic-pcl-ros \
     ros-melodic-tf2-geometry-msgs ros-melodic-rviz
ZED2 Camera
Requirements:
Zed Camera
CUDA 10.2+
Internet connection
Verify Installation:
roslaunch zed_wrapper zed2.launch
roslaunch zed_display_rviz display_zed2.launch
Emlid REACH RS2 GPS
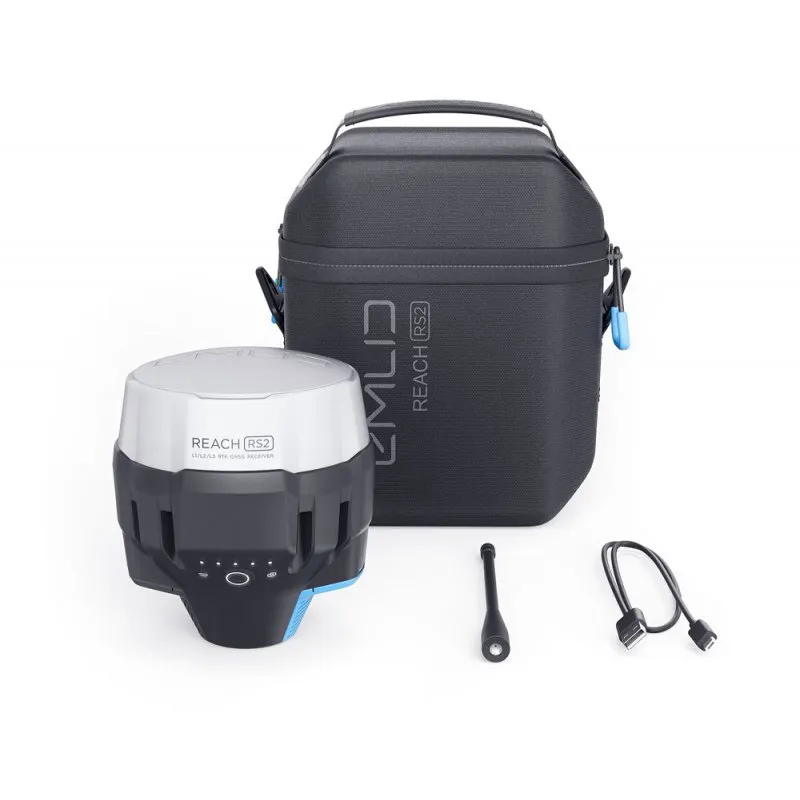
Data Sheets:
Documentation:
Important
Please note that the Emlid Reach RS2 works on 2.4GHz band when connecting to a WiFi network. Position of GPS relative to the ground severely effects accuracy and connectivity.
Setup Procedure:
Connect to the Emlid via WiFi hotspot (SSID: Reach, Password: emlidreach)
Install the ReachView 3 app
Configure settings
ROS Driver:
cd catkin_ws/src
git clone https://github.com/enwaytech/reach_rs_ros_driver
catkin build
Phidgets IMU
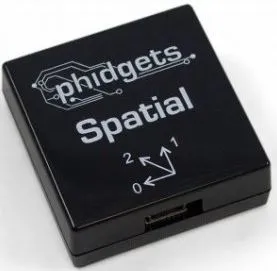
Phidgets IMU
Check Status:
sudo service mbs_husky status
Check IMU Data:
rostopic echo /IMU/data_raw
rostopic echo /IMU/mag
Depth Cameras
Intel RealSense D435i is supported via the realsense-ros package for Foxy.
sudo apt-get install ros-foxy-realsense2-camera
Lidars
Ouster LiDAR support is available through the Ouster ROS2 driver.
Note
Sensor drivers for ROS2 Foxy may have different configurations than Jazzy. Please check individual sensor documentation for Foxy compatibility.
Depth Cameras
The ROVO2 supports the Intel RealSense D435i depth camera for RGB-D perception.
Test Native Driver:
ros2 launch realsense2_camera rs_launch.py depth_module.depth_profile:=1280x720x30 pointcloud.enable:=true
Launch via ROVO2 Package:
The camera can be controlled via the webserver or systemctl. When disabled via services, test manually:
ros2 launch rovo_depth_camera realsense.launch.py
Published Topics:
Topic |
Type |
|---|---|
|
|
|
|
|
|
Note
The ROVO2 utilizes the camera’s inbuilt IMU. External USB connection may be required for depth functionality.
Lidars
The ROVO2 supports Ouster OS1-64 LiDAR for 3D perception and mapping.

Ouster LiDAR Point Cloud Visualization
Network Configuration:
Default IP:
192.168.131.20
Launch via ROVO2 Package:
The LiDAR can be controlled via the webserver or systemctl. When disabled via services, test manually:
ros2 launch rovo_lidar ouster.launch.py
Published Topics:
Topic |
Type |
|---|---|
|
|
|
|
|
|
Dependencies:
# Install Ouster ROS2 driver
sudo apt-get install ros-jazzy-ouster-ros
For more information, see the Ouster ROS2 driver documentation.
GPS
The ROVO2 supports the Emlid Reach RS2 for high-precision RTK GPS positioning.
Emlid Reach RS2 GPS Module
GPS integration is available for outdoor navigation and waypoint recording. Configuration depends on the specific GPS hardware installed on your ROVO2 unit.
Auxiliary
The ROVO2 platform includes an integrated IMU that publishes orientation and acceleration data.
Platform IMU Published Topic:
/<ns>/platform/imu/data(sensor_msgs/Imu)
The ROVO2 also supports external Phidgets Spatial IMU for enhanced orientation accuracy.
Phidgets Spatial IMU
Installation:
sudo apt-get install ros-jazzy-phidgets-drivers
Published Topics:
Topic |
Type |
|---|---|
|
|
|
|
The BMS provides battery state information.
Published Topic:
/<ns>/platform/bms/state(sensor_msgs/BatteryState)
Simulation
Gazebo Simulation
Once the ROS packages are set up for use, you can verify whether they are working correctly or not by running the following command:
roslaunch rovo_simulator gazebo_world.launch
This should start two applications: RViz and Gazebo with pre-loaded gazebo drivers.
Be sure to change the Fixed Frame in the global options to base_link.
Important
Due to simulation limitation the tracks of the Rovo do not make contact with the ground, instead the treads are directly into contact with the ground. Also, simulation with the Rovo is computationally heavy, so a powerful computer is required to run the simulations.
Gazebo
ROS2 Foxy uses Gazebo Classic (Gazebo 11) for simulation.
ros2 launch rovo_simulator gazebo_world.launch.py
Note
For ROS2 Jazzy, use Gazebo Harmonic instead of Gazebo Classic.
Gazebo
The ROVO2 uses Gazebo Harmonic for simulation, which is the recommended simulator for ROS2 Jazzy.
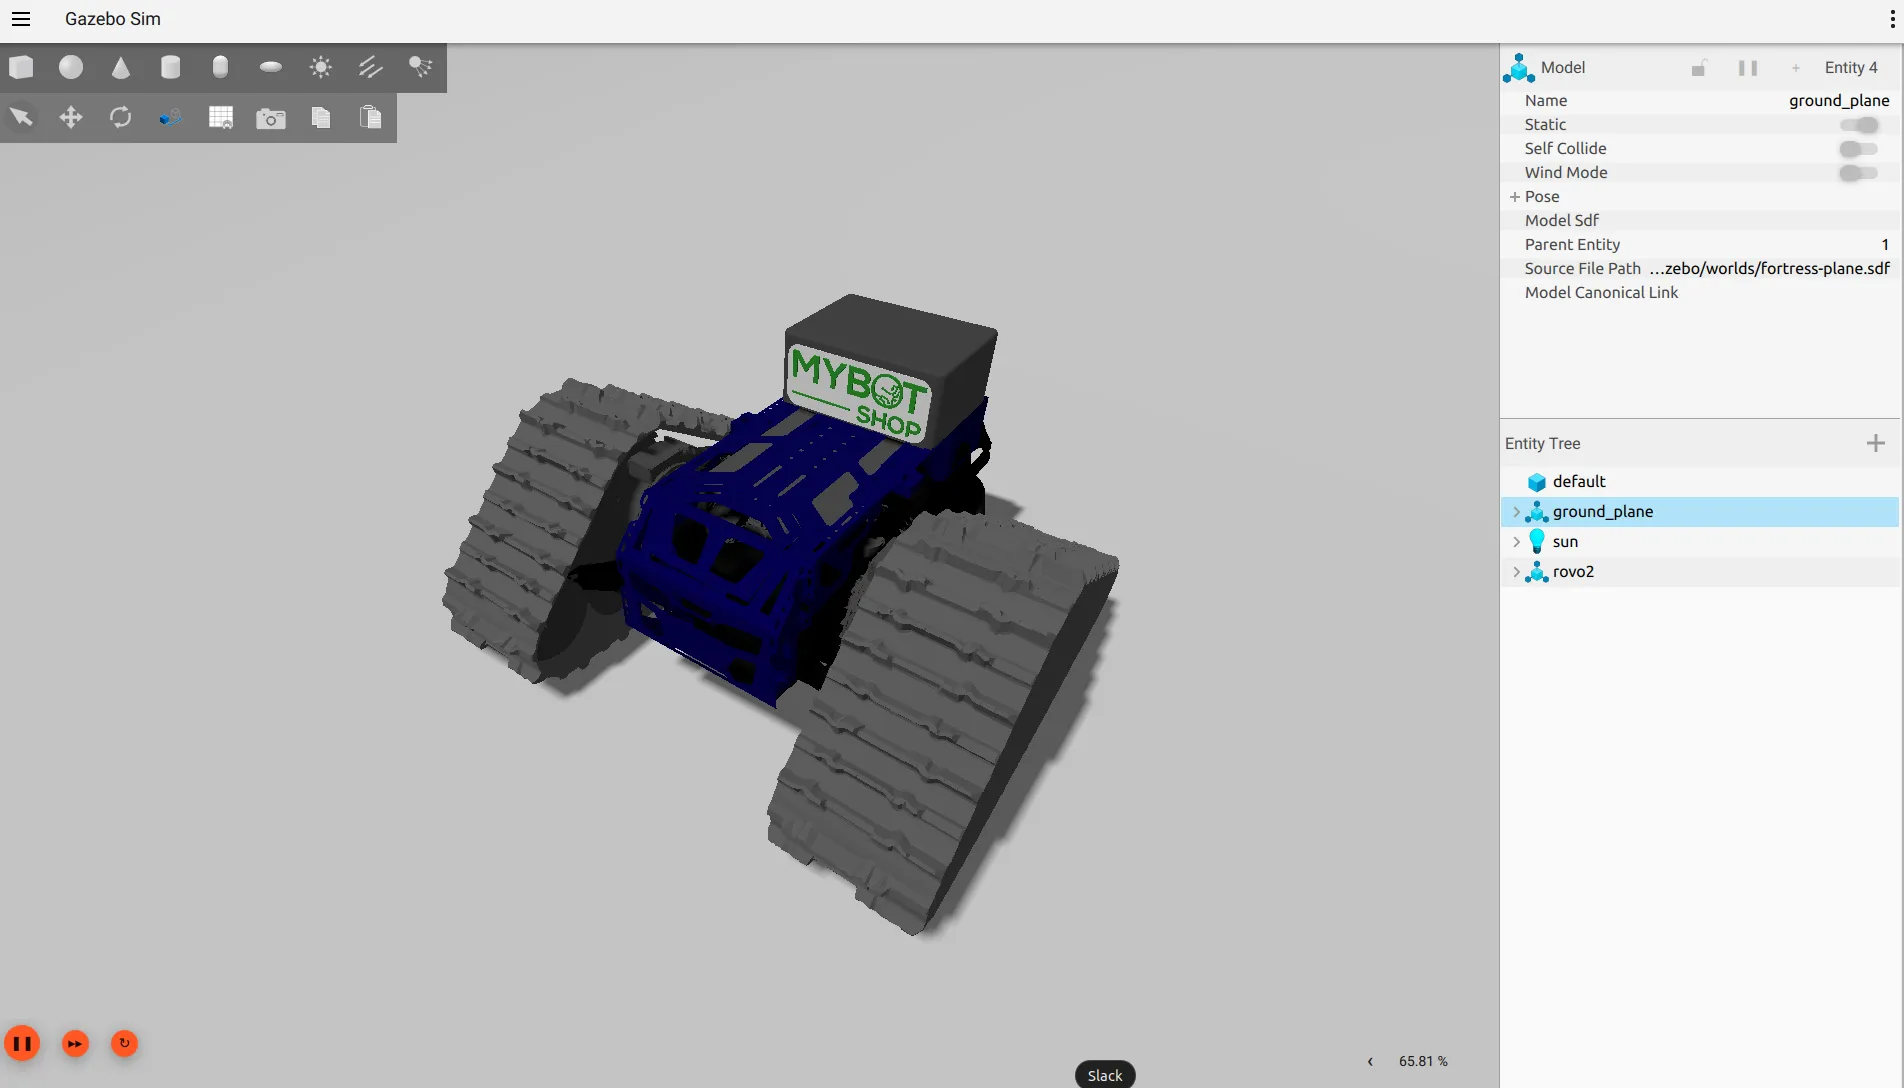
ROVO2 Simulation in Gazebo Harmonic
Launch Simulation:
ros2 launch rovo_gazebo simulation.launch.py
Available Worlds:
World File |
Description |
|---|---|
|
Flat ground plane (default) |
|
Industrial substation environment |
|
Lunar terrain |
Teleoperate in Simulation:
ros2 run teleop_twist_keyboard teleop_twist_keyboard
Simulated Sensor Topics:
Topic |
Type |
Description |
|---|---|---|
|
|
Simulation time |
|
|
Robot odometry |
|
|
IMU data |
|
|
RGB camera |
|
|
Depth image |
|
|
RGB-D point cloud |
|
|
LiDAR scan |
|
|
LiDAR point cloud |
Clean Up Gazebo Processes:
If Gazebo does not close properly, use the cleanup script:
ros2 run rovo_gazebo kill_gz.sh
Dependencies:
sudo apt-get install ros-jazzy-ros-gz ros-jazzy-ros-gz-bridge
For more information, see the Gazebo Harmonic documentation.
Isaac Sim
NVIDIA Isaac Sim integration is planned for future releases. Check back for updates on Isaac Sim support for the ROVO2 platform.
Packages
A rospackage that contains the core functionalities to enable the robot to function autonomously.
rovo_base
This ros package contains the hardware drivers that communicate with the 3-phase motors of the Rovo.
roslaunch rovo_base base.launch
rovo_bringup
This ros package launches the base driver as well as all necessary auxiliary components such as the inertial measurment unit (IMU), Lidar (if availabe), robot description (required for visualization), and ekf_localization (robot position estimation).
roslaunch rovo_bringup system_bringup.launch
rovo_control
This ros package fuses the robots tracked wheels movement with the inertial measurment unit (IMU) using the extended kalman filter. It provides the transforms from the robots base link to the odometry frame as well as mapping for the logitech controller.
Keys |
Description |
|---|---|
1 |
Switches Rovo to higher gear |
2 |
Switches Rovo to lower gear |
9 |
Enables control of the ROVO via ROS |
5 |
Activates the horn in Rovo |
j |
Provides acceleration for in the direction pushed in Rovo |
rovo_description
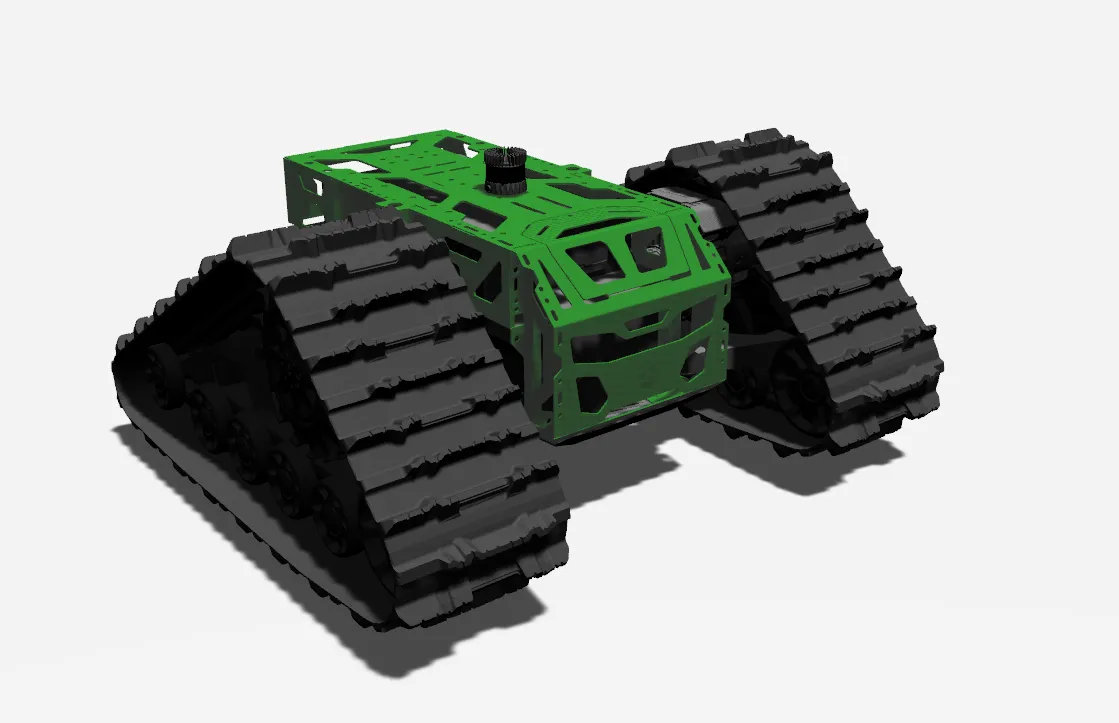
This is a ros package that contains the 3D models of the Rovo in URDF format.
Warning
Running this command will shut the Rovo Bringup description driver.
roslaunch rovo_description description.launch
rovo_navigation
Odom Navigation:
roslaunch rovo_navigation odom_navigation.launch
Map Navigation:
roslaunch rovo_navigation map_navigation.launch
rovo_simulator
roslaunch rovo_simulator gazebo_world.launch
rovo_viz
This ros package is used for visualization of the robots current state.
roslaunch rovo_viz view_robot.launch
rovo_description
URDF and Xacro robot description files for the ROVO2 tracked robot platform.
ros2 launch rovo_description description.launch.py
rovo_base
Hardware driver for the ROVO2 platform.
ros2 run rovo_base base_driver
rovo_bringup
System bringup package.
ros2 launch rovo_bringup bringup.launch.py
rovo_viz
Visualization package for RViz2.
ros2 launch rovo_viz view_robot.launch.py
Note
ROS2 Foxy packages are legacy. For the latest features, use ROS2 Jazzy.
rovo_description
URDF and Xacro robot description files for the ROVO2 tracked robot platform.
Contents:
launch/rovo_description.launch.py- Robot state publisherlaunch/view_robot.launch.py- View URDF in RVizmeshes/- Platform and sensor visual meshesxacro/robot.xacro- Main robot description
Usage:
# Publish robot description
ros2 launch rovo_description rovo_description.launch.py

# Get URDF from Xacro
xacro $(ros2 pkg prefix rovo_description)/share/rovo_description/xacro/robot.xacro
rovo_platform
Hardware driver and control interface for the ROVO2 tracked robot platform. Provides CAN bus communication, motor control, odometry publishing, and ROS2 service interfaces.
Configuration Parameters (config/rovo_platform.yaml):
Parameter |
Default |
Description |
|---|---|---|
|
|
CAN node ID |
|
|
CAN interface name |
|
|
CAN bitrate (500 kbit/s) |
|
|
Distance between tracks (m) |
|
|
Maximum linear speed (m/s) |
|
|
Drive sprocket diameter (m) |
|
|
Gear ratio (16.0 for i16, 7.0 for i7) |
|
|
Publish TF transforms |
Published Topics:
Topic |
Type |
Description |
|---|---|---|
|
|
Robot odometry |
|
|
Track joint states |
|
|
IMU data |
|
|
Battery state |
Subscribed Topics:
Topic |
Type |
Description |
|---|---|---|
|
|
Velocity commands |
Services:
Service |
Type |
Description |
|---|---|---|
|
|
Set gear (0=neutral, 1-3=drive) |
Usage:
ros2 launch rovo_platform rovo_driver.launch.py

# Set gear
ros2 service call /$ROVO_NS/platform/set_gear rovo_interface/srv/SetGear "{gear: 1}"
rovo_controller
Joystick teleoperation and command multiplexing for the ROVO2 platform.
Twist Mux Priority Table:
Priority |
Source |
Topic |
|---|---|---|
255 |
E-Stop (Lock) |
|
25 |
Logitech Joystick |
|
20 |
Steamdeck |
|
15 |
Web Interface |
|
10 |
Interactive Marker |
|
5 |
External |
|
3 |
Autonomous (High) |
|
2 |
Autonomous (Mid) |
|
1 |
Autonomous (Low) |
|
Logitech Joystick Button Mapping:
Button |
Function |
|---|---|
Button 4 (LB) |
Enable movement |
Button 5 (RB) |
Enable turbo mode |
Left Stick Y |
Linear X velocity |
Right Stick X |
Angular Z velocity |
Speed Settings:
Mode |
Linear (m/s) |
Angular (rad/s) |
|---|---|---|
Normal |
0.2 |
0.3 |
Turbo |
1.0 |
1.0 |
rovo_gazebo
Gazebo Harmonic simulation package for the ROVO2 platform.
Available Worlds:
fortress-plane.sdf- Flat ground plane (default)fortress-substation.sdf- Industrial substation environmentfortress-moon.sdf- Lunar terrain
Simulated Topics (GZ -> ROS):
Topic |
Type |
Description |
|---|---|---|
|
|
Simulation time |
|
|
Robot odometry |
|
|
IMU data |
|
|
RGB camera |
|
|
Depth image |
|
|
RGB-D point cloud |
|
|
LiDAR scan |
|
|
LiDAR point cloud |
rovo_navigation
Nav2-based navigation stack for the ROVO2 platform.
Launch Files:
Launch File |
Description |
|---|---|
|
SLAM mapping mode |
|
Odometric navigation (no map) |
|
Map-based autonomous navigation |
Configuration Files:
param/nav2_slam.yaml- SLAM parametersparam/nav2_odom.yaml- Odometry navigation parametersparam/nav2_map.yaml- Map navigation parametersbehavior_trees/nav_to_pose.xml- Custom behavior tree
rovo_viz
RViz2 visualization package with pre-configured displays.
RViz Configurations:
rviz/robot.rviz- Full robot visualization with navigationrviz/model.rviz- Robot model onlyrviz/steam.rviz- Steamdeck optimized view
rovo_autostart
System bringup and automatic startup configuration.
Files:
config/setup.bash- Environment variables and aliasesconfig/startup.bash- Startup scriptconfig/rovo_can.bash- CAN interface setupdebian/45-mbs.rules- udev rules for hardwarescripts/startup_installer.py- Systemd service installer
Environment Variables:
Variable |
Default |
Description |
|---|---|---|
|
|
Robot namespace |
rovo_webserver
Web-based robot control interface with Flask backend.
Features:
Real-time robot visualization (3D model via GLTF)
Joystick teleoperation
Service management (start/stop ROS nodes)
Map visualization
Battery monitoring
GPS waypoint recording
Rosbag recording
VNC remote desktop access
Access: http://192.168.131.1:9000
rovo_interface
Custom ROS2 service definitions for the ROVO2 platform.
SetGear.srv:
uint8 gear      # 0=neutral, 1-3=drive gears
---
string message
bool success
Usage:
# Set gear to 1
ros2 service call /$ROVO_NS/platform/set_gear rovo_interface/srv/SetGear "{gear: 1}"
Debugging
Topic Debugging
List all topics:
rostopic list
Echo a topic:
rostopic echo /odom
Check topic frequency:
rostopic hz /odom
Topic Debugging
List all topics:
ros2 topic list
Echo a topic:
ros2 topic echo /odom
Check topic frequency:
ros2 topic hz /odom
Service Debugging
List all services:
ros2 service list
Call a service:
ros2 service call /rovo_base/set_gear rovo_msgs/srv/SetGear "{gear: 1}"
RQT
RQT provides a GUI framework for ROS2 debugging tools.
Launch RQT:
ros2 run rqt_gui rqt_gui --ros-args --remap tf:=/$ROVO_NS/tf --remap tf_static:=/$ROVO_NS/tf_static
Available Plugins:
Topic Monitor
Service Caller
Parameter Reconfigure
Node Graph
TF Tree
Dynamic Reconfigure
Use dynamic reconfigure to adjust parameters at runtime:
ros2 run rqt_gui rqt_gui --ros-args --remap tf:=/$ROVO_NS/tf --remap tf_static:=/$ROVO_NS/tf_static
From the GUI, select Plugins > Configuration > Dynamic Reconfigure.
TF
TF Tree Visualization:
ros2 run rqt_tf_tree rqt_tf_tree --force-discover \
  --ros-args --remap tf:=/$ROVO_NS/tf --remap tf_static:=/$ROVO_NS/tf_static
Generate TF Frames PDF:
ros2 run tf2_tools view_frames.py --force-discover \
  --ros-args --remap tf:=/$ROVO_NS/tf --remap tf_static:=/$ROVO_NS/tf_static
Topic Debugging
List all topics:
ros2 topic list
Echo a topic:
ros2 topic echo /$ROVO_NS/platform/odom
Check topic frequency:
ros2 topic hz /$ROVO_NS/platform/odom
Service Debugging
List all services:
ros2 service list
Call a service:
ros2 service call /$ROVO_NS/platform/set_gear rovo_interface/srv/SetGear "{gear: 0}"
Node Debugging
List all nodes:
ros2 node list
Get node info:
ros2 node info /rovo_platform
CAN Debugging
Test CAN Module:
# Configure CAN interface
sudo ip link set can0 down
sudo ip link set can0 type can bitrate 500000
sudo ip link set can0 up

# Monitor CAN traffic
sudo candump can0
Miscellanious
Useful Commands
Build Workspace:
cd ~/catkin_ws
catkin build
source devel/setup.bash
Useful Commands
Build Workspace:
cd ~/ros2_ws
colcon build --symlink-install
source install/setup.bash
Check ROS2 Environment:
printenv | grep ROS
Sync Host and Robot
Synchronize files between host computer and robot using rsync:
Sync to Robot:
rsync -avP -t --delete -e ssh src robot@192.168.131.1://opt/mybotshop
Sync to Steamdeck:
rsync -avP -t --delete -e ssh src deck@192.168.131.150://home/deck/ros2_ws
Core Launch Files
Warning
Do not run these files manually as they should already be running via the webserver!
These launch files are managed by systemd services and the webserver:
Platform Driver:
ros2 launch rovo_platform rovo_driver.launch.py
Webserver:
ros2 launch rovo_webserver webserver.launch.py
Controller:
ros2 launch rovo_controller controller.launch.py
Robot Description:
ros2 launch rovo_description rovo_description.launch.py
CAN Hardware Connections
Recommended Parts:
Primary: Part 1-1564337-1
Backup: Part 967650-1
Pin Mapping:
ROVO |
Peak-USB |
|---|---|
Pin1 Can2 Low |
Pin2 Can Low |
Pin2 Can2 High |
Pin7 Can High |
Pin3 Can Gnd |
Pin3 Can Gnd |
Useful Commands
Build Workspace:
cd /opt/mybotshop
colcon build --symlink-install --cmake-args -DCMAKE_BUILD_TYPE=Release
source install/setup.bash
Quick Build Alias:
rovo_build
Check ROS2 Environment:
printenv | grep ROS
Source Workspace:
source /opt/mybotshop/install/setup.bash