MMP BI
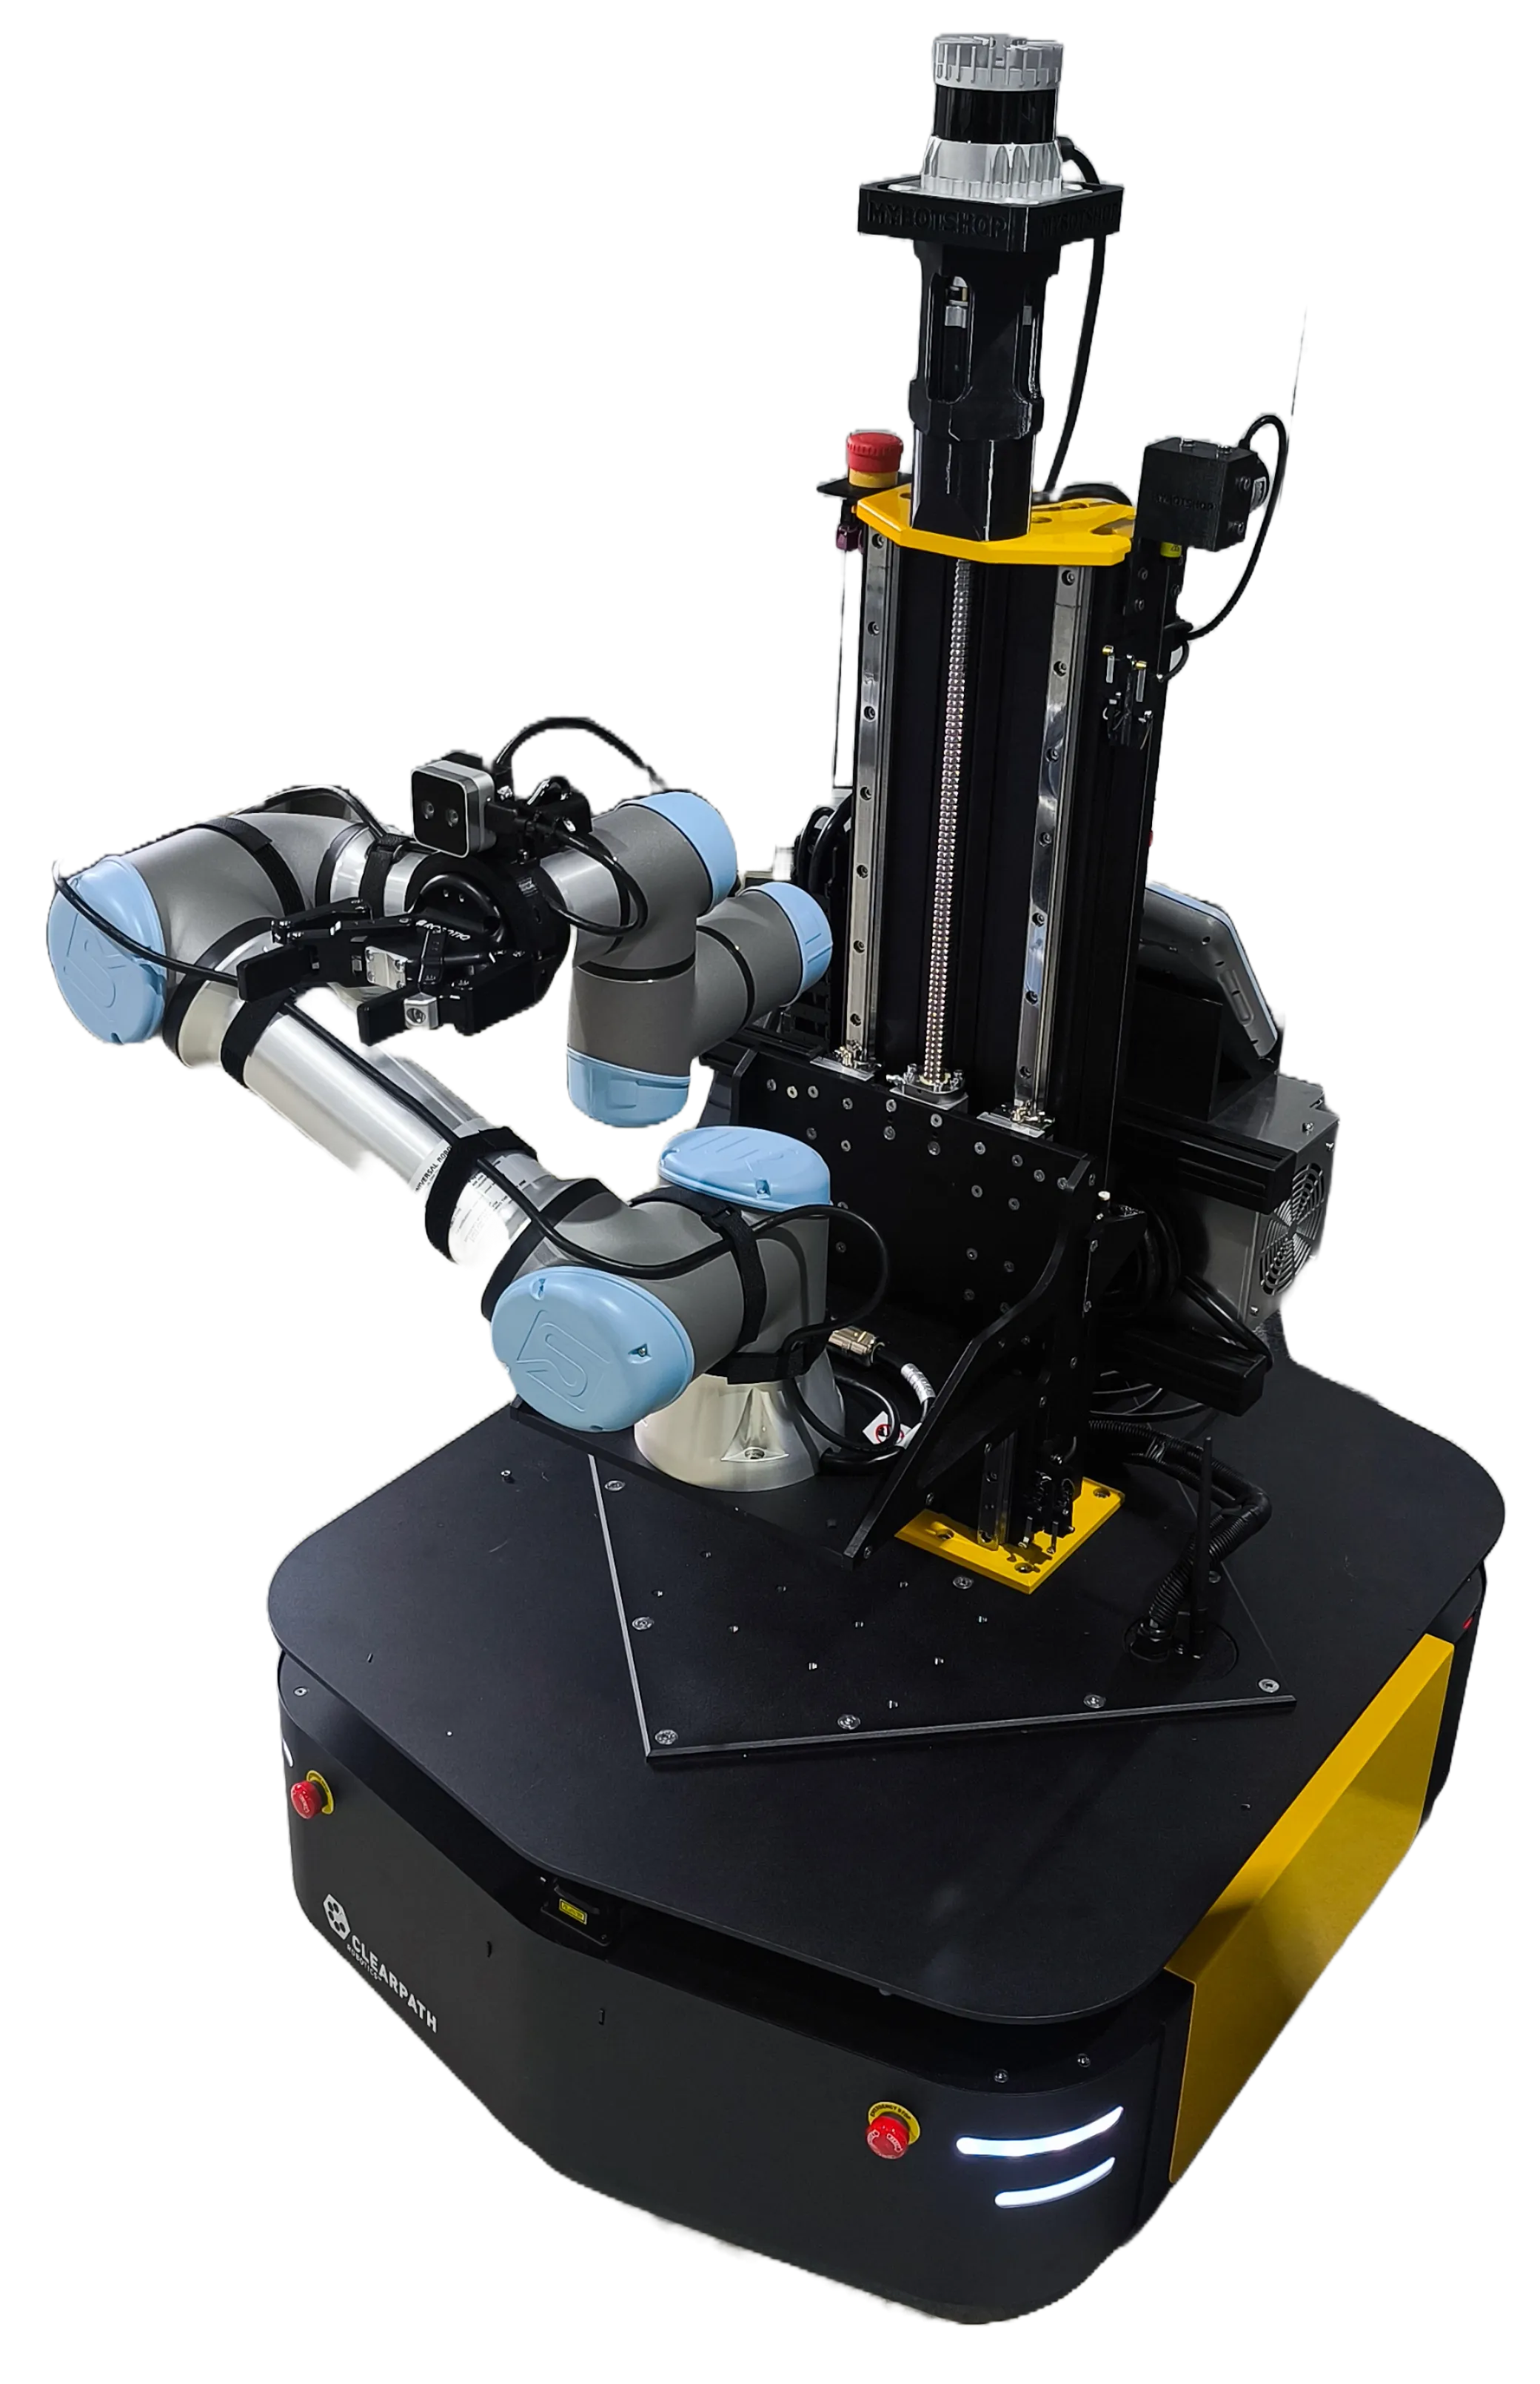
This specifies the configuration for Mobile Manipulation Platform (MMP) BI version. It has the following components Custom Lift System ,Stepper Motor, Rope Encoder, Ouster lidar, Intel realsense D455 and D405 depth cameras, Universal Robot UR5e and Robotiq 2F-140 gripper.
Data Sheets
Documentations
Powering on the Ridgeback
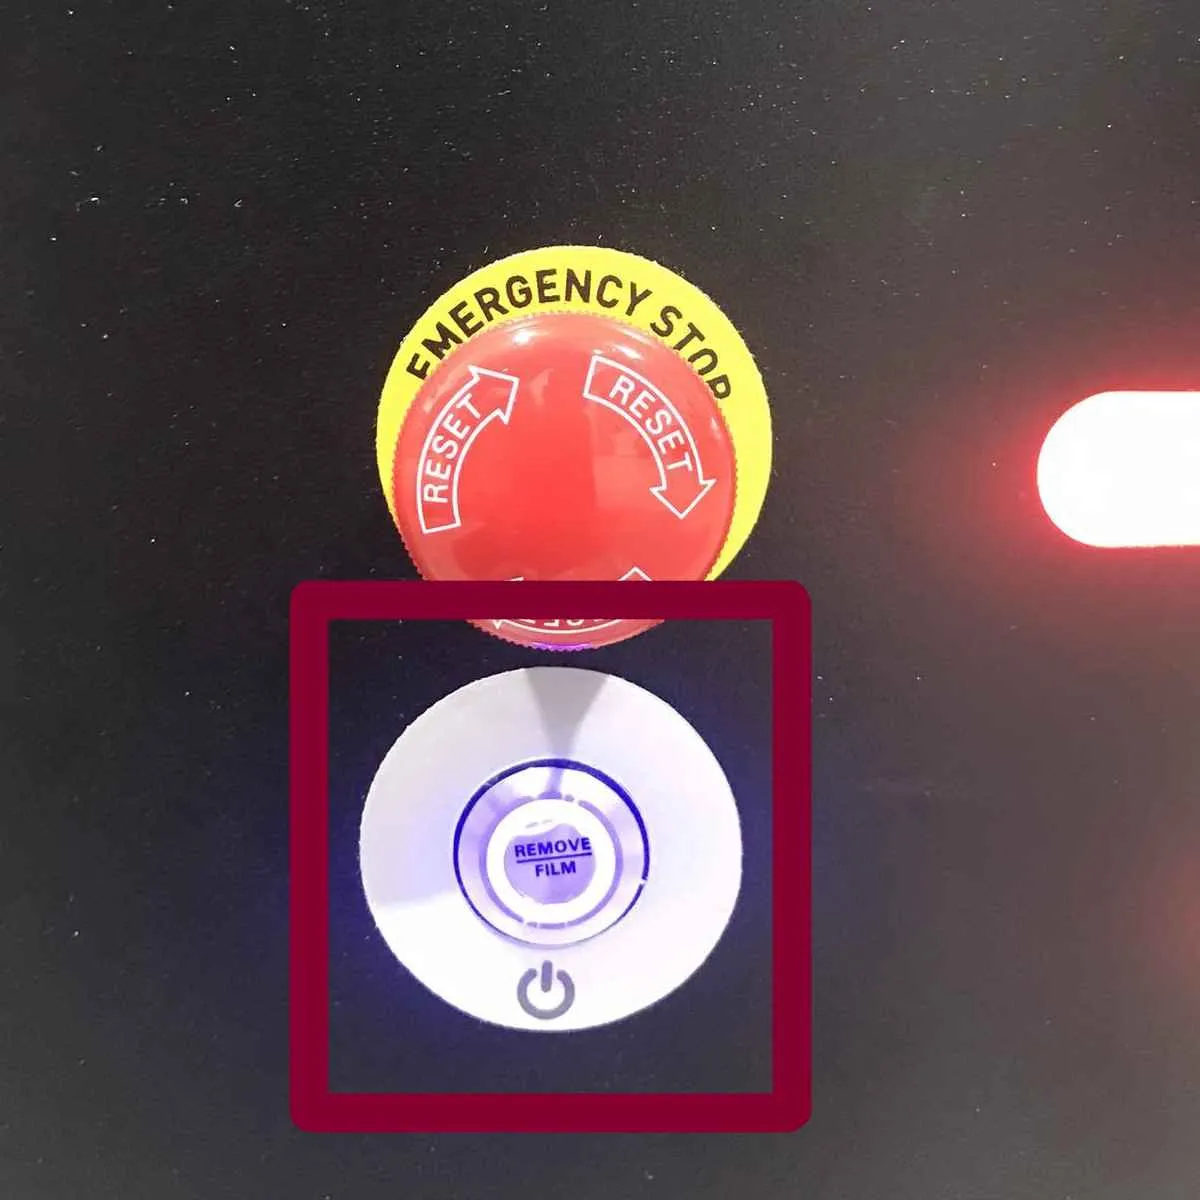
Power Button |
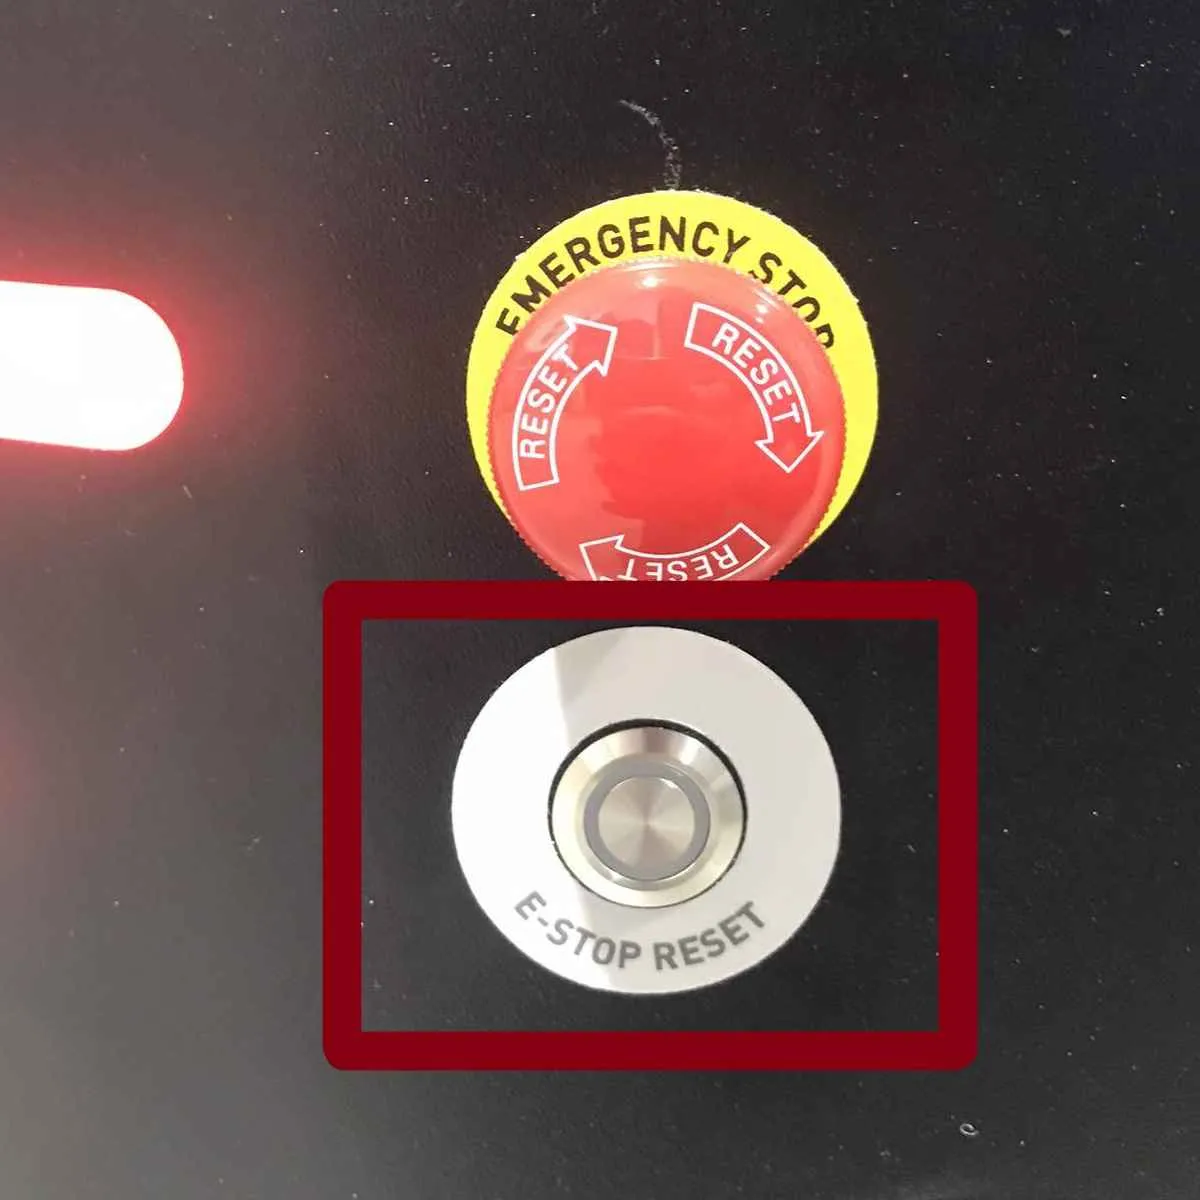
E-reset Button |
Release Switch |
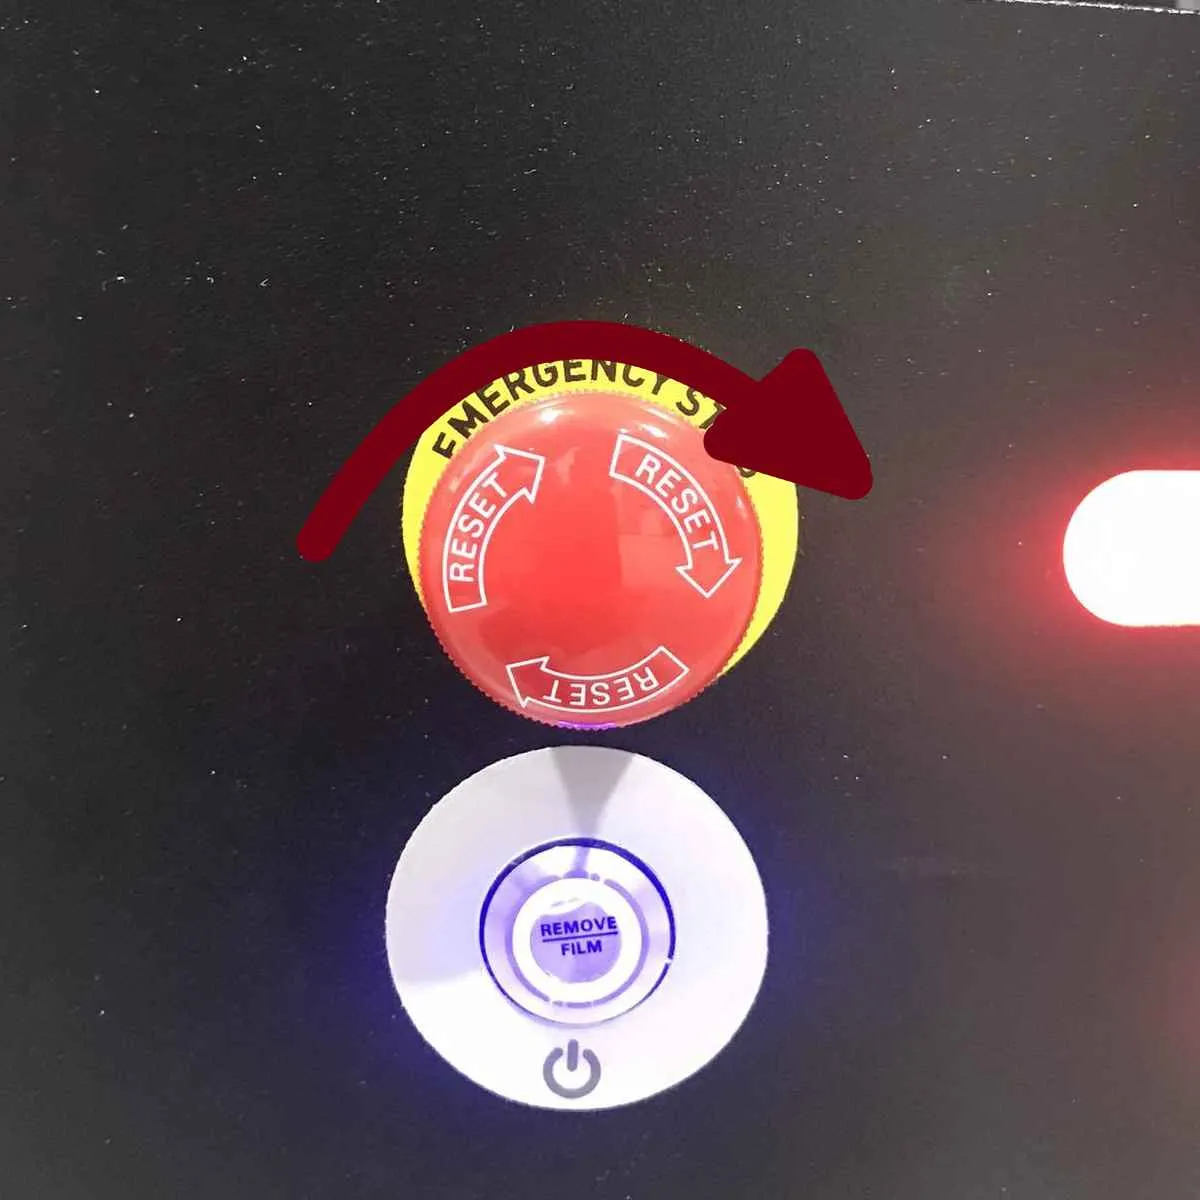
Ensure the emergency buttons on all 4 corners are released.
◦ To check if the emergency switch is released, twist the switch in the indicated direction on it. If it pops up, then the switch has successfully been released.
Press the power button on the rear of the ridgeback. It has the power symbol.
Once the ridgeback is powered on and all the switches have been released, press the e-reset button. It is on the rear where the ridgeback has a yellow flashing light.
Powering on the UR5e

UR5e should be in, i.e. it is in remote mode and on power off state
The UR5e should only be powered on when the ridgeback is fully powered on (i.e. the ridgeback has white lights infront and/or the yellow light is flashing for the e-reset).
The UR5e can be powered on via the teach pendants power button.
It may take upto a few minutes for the UR5e to startup.
Ensure all the emergency switches are released (i.e. on the teach pendant as well as on the lift).
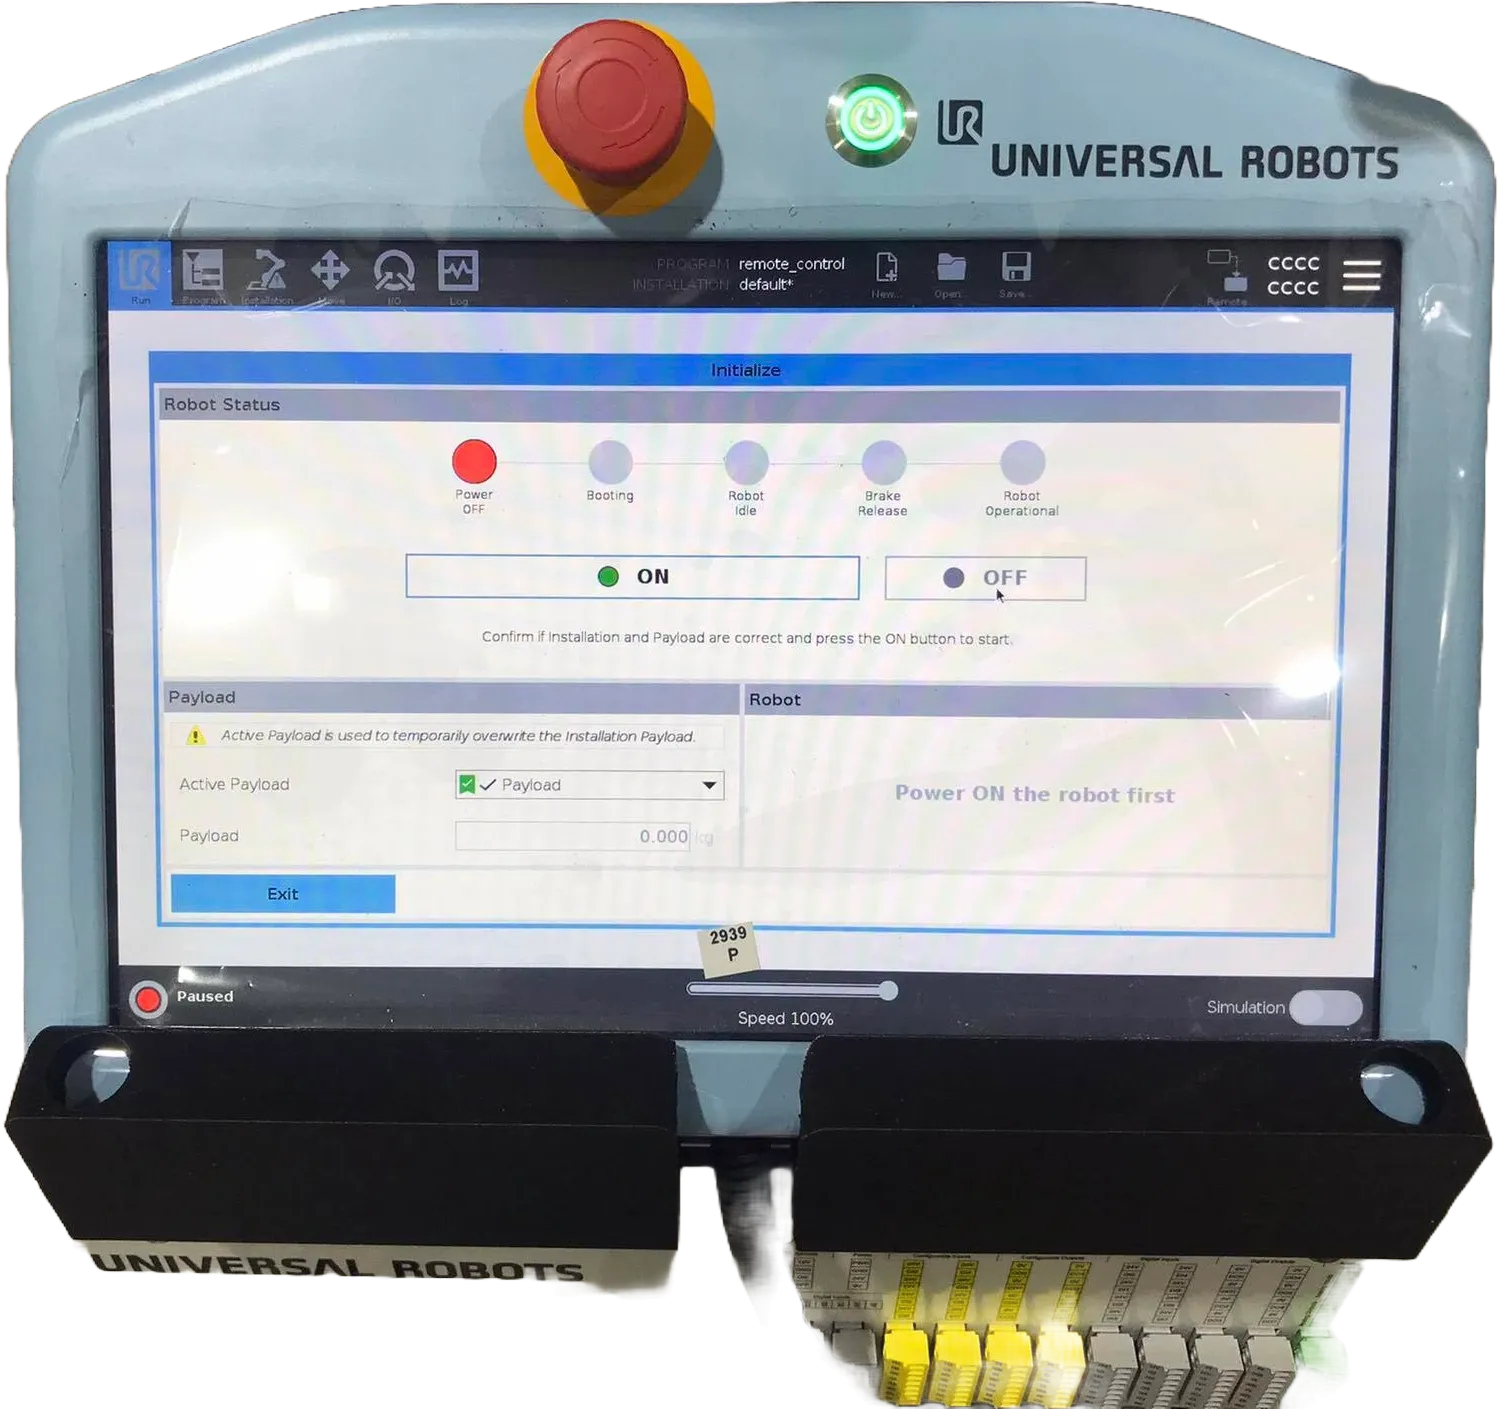
Teach pendant Switch Released |
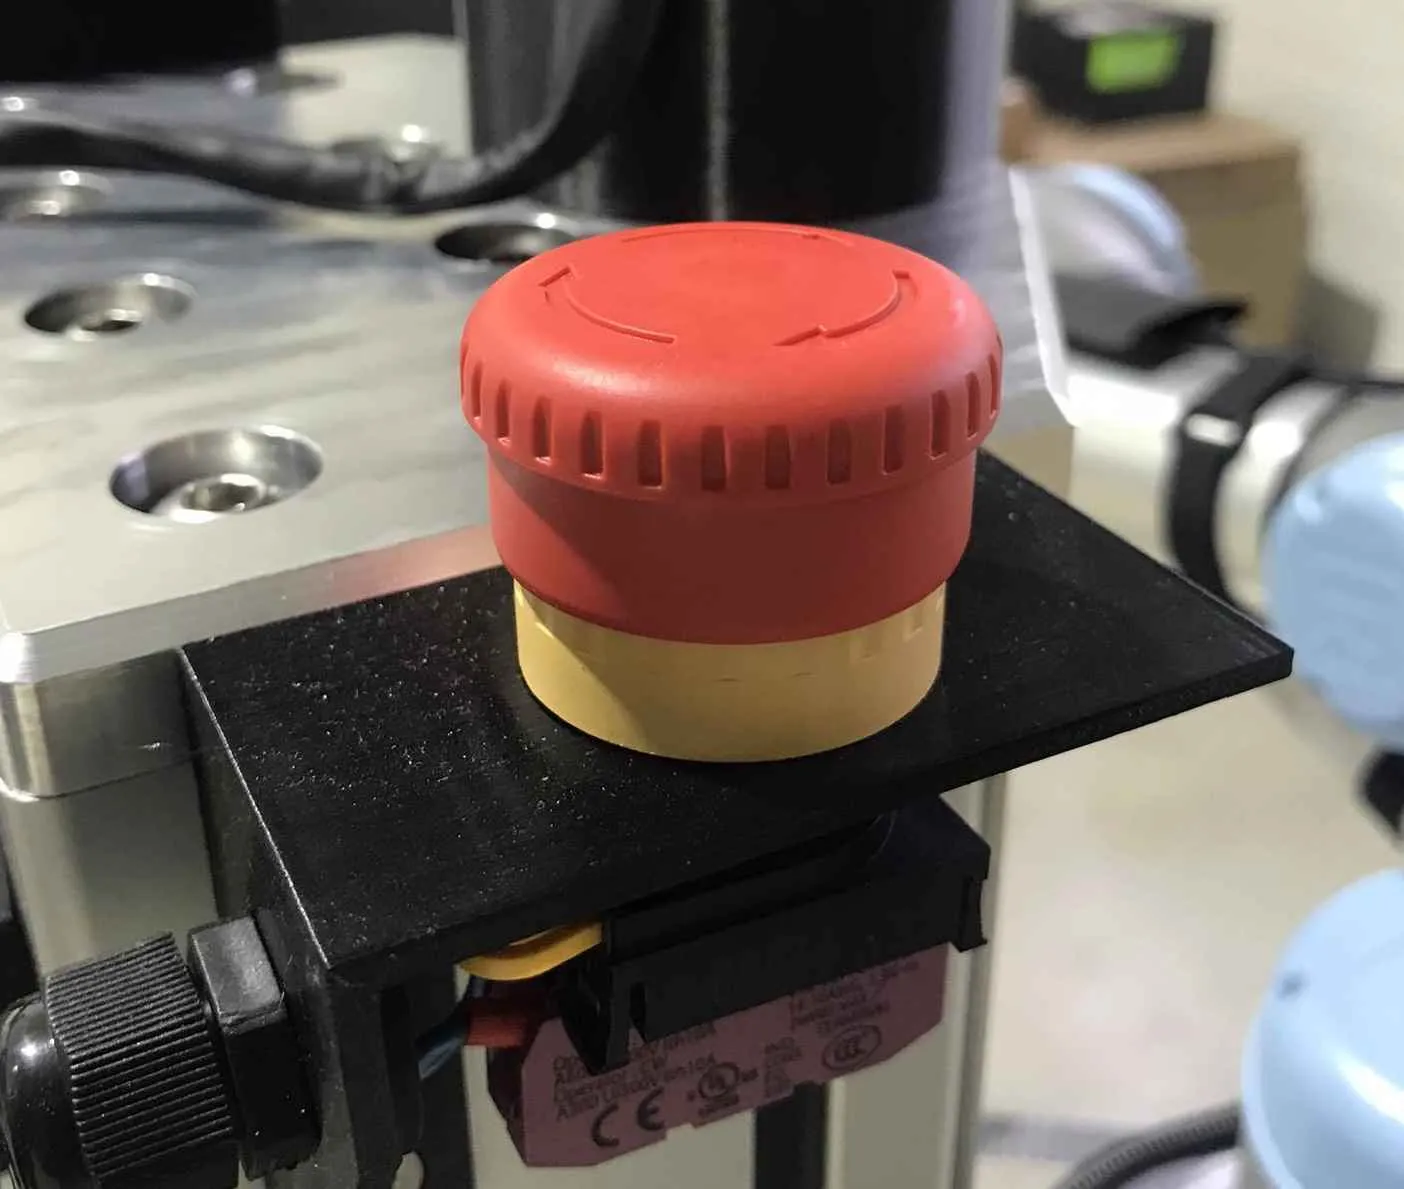
Custom Emergency Switch Released |
Warning
Do not start anything else in the UR5e as this is all done automatically via ROS. Powering on is only required.
Powering Auxiliary Components
On startup the ridgeback launches, the lift drivers, and the Hokuyos. The auxiliary components such as the ouster, dynamixels, realsense cameras, nvidia, etc. are not powered on startup automatically but can be added via the startup launch file if required.
Teleop Control Joystick — PS4 Controller
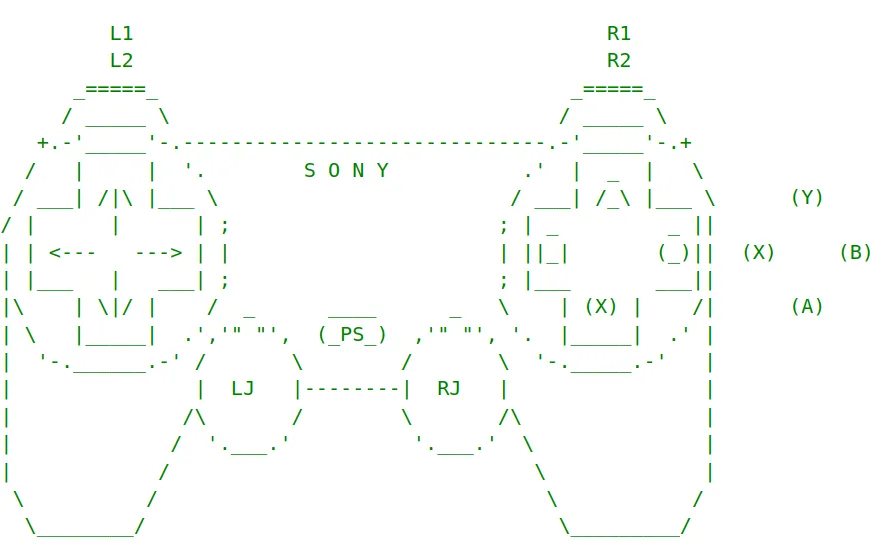
PS4 Controller
PS button is to power on.
X + Up arrow is for moving Lift up. (X is the square icon)
X + Down arrow is for moving Lift down. (X is the square icon)
B button for releasing Lift soft locks. (B is the circle icon)
L1 is the dead man’s switch.
LJ is to move in x and y direction.
RJ is to move in the yaw orientation.
Teleop Control Joystick — Steamdeck Controller
Warning
The Steamdeck usage is in experimental phase. Loss of connection or (laggy connection) may lead to the robot moving and/or not stopping immediately. Caution should be taken when using the Steamdeck for the operation of the robot!
Steamdeck - Basic Controls
Power button is on the top of the Steamdeck with the power symbol.
R2 for mouse left-click
L2 for mouse right-click
Left trackpad for mouse scrolling
Right trackpad for mouse movement
L2+R2 for middle mouse button click
The 3 dashes button is located on the top right of the Steamdeck next to the Y button, Hold for 3 seconds to gamepadmode and hold for 3 seconds again to go to desktop mode(Switching to desktop mode activates the cursor for the trackpad as well).
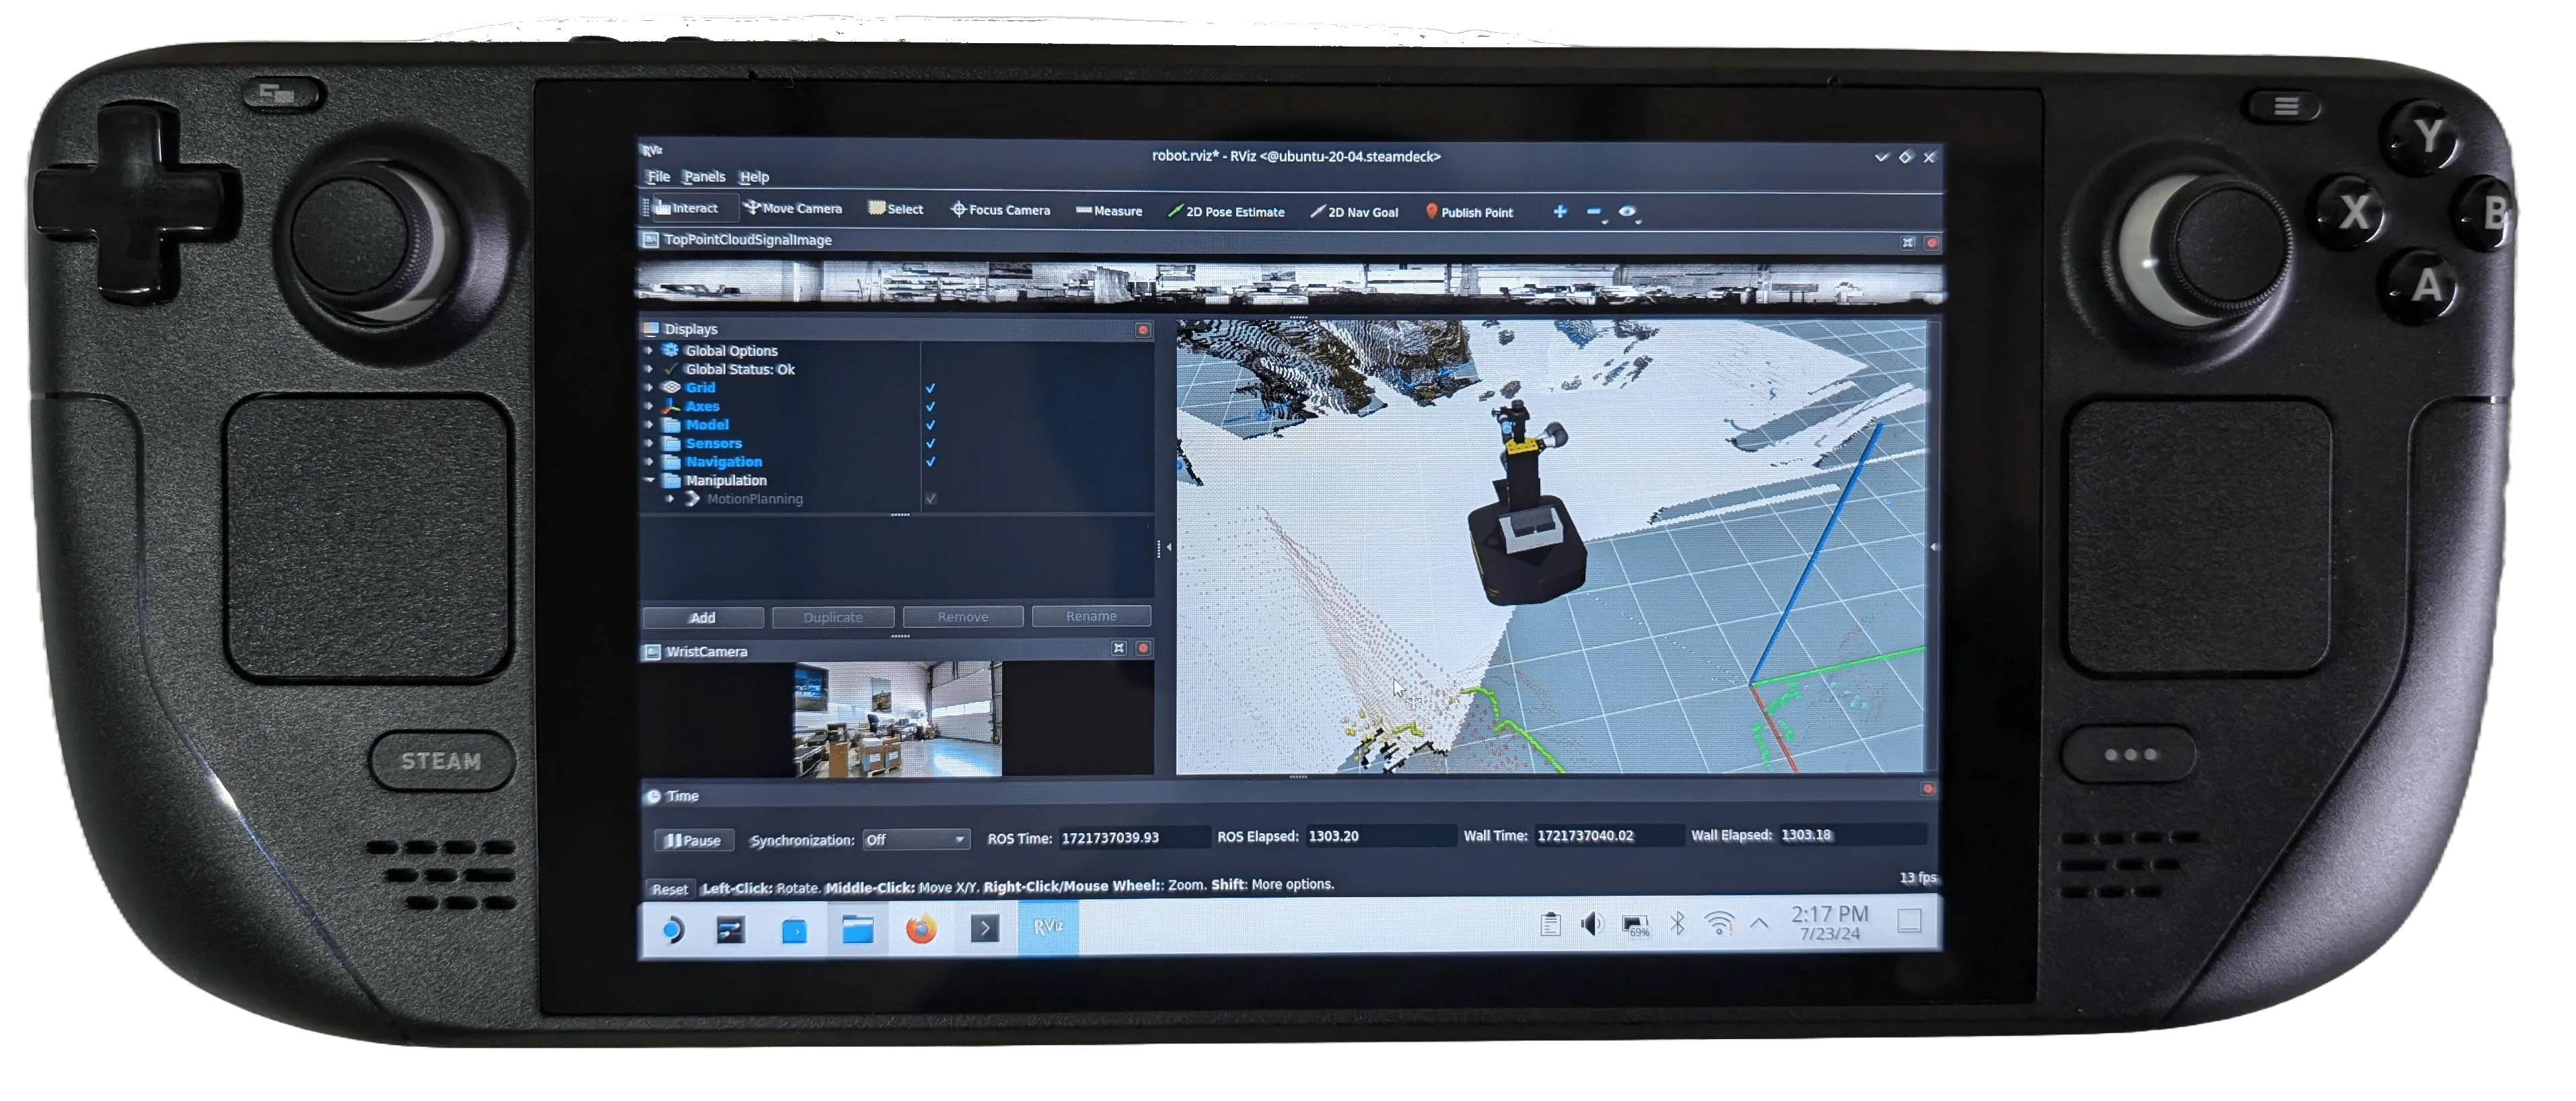
Steamdeck Controller
Steamdeck - Initialization with Robot
Before usage:
Ensure the Steamdeck is connected to the robot’s WiFi access point.
Ensure the robot is powered on and operational.
Single tap the Joystick Launcher on the screen to activate the controller for the robot. (Do not open multiple instances of the joystick launchers, as this can cause zombie nodes).
Single tap the Rviz2 Launcher on the screen to visualize the robot.
Steamdeck - Robot Controls
L1 is the dead man’s switch for slow speed.
R1 is the dead man’s switch for high speed.
LJ is to move in x and y direction.
RJ is to move in yaw direction.
X+Up Arrow is to move lift up.
X+Down Arrow is to move lift down.
B is to release soft switches if the lift reaches maximum height.
Steamdeck - Rviz2 Controls
L2+R2 should be held when wanting to move the orbit in the xy plane.
R2 should be held to orbit around the orbits origin
Left trackpad can be moved up and down to zoom in and zoom out.
Manipulator Activation
Once the UR5e is powered on and its emergency switches are released.
Then check if the UR5e is in remote mode (should be in remote mode by default) — Located in Teach pendant Top right.
Then check if the UR5e is in Power off state with a icon — Located in Teach pendant Bottom left (Important).
Auxiliary ROS Drivers
Once the manipulator is activated, next step is to launch the following driver:
roslaunch mmp_startup accessories.launch
This should turn on all the components including the UR5e, Robotiq 2F-85, Ouster, Realsense Cameras, and pan & tilt.
Digitial Twin (RVIZ)
Visualizing the MMP in Rviz
To visualize the mmp, you can run:
roslaunch mmp_viz view_robot.launch
Ideally, for latency-free streaming, please utilize ROS multimachine setup.
Robot Interface
Note
Instructions for interfacing with the robot using Ubuntu 20.04 and ROS Noetic.
The Ethernet port at the back of the Husky can be utilized for setting up communication via LAN.
Static Network connection
For the first time, one needs to connect through a LAN cable to configure the robot’s WLAN network. To create a static connection in your PC (not the robots), in Ubuntu go to Settings → Network then click on + and create a new connection.
Change the connection to Manual in the IPv4 settings.
Set the Address IP as 192.168.131.51 and the Netmask as 24.
Click save and restart your network.
After a successful connection, check the host’s local IP by typing in the Host PC’s terminal:
ifconfig
Now, ping the robot:
ping 192.168.131.1
Access the robot via SSH:
ssh -X administrator@192.168.131.1
The default password is:
mybotshop
Note
Sometimes other networks can cause disruptions when connecting to the MMP. It is best to have only your connection to the robot active and all others inactive.
Network table
All the devices on the robot are network enabled. Table [robot_network] outlines all the devices and their network addresses.
Device |
Network Address |
Password |
|---|---|---|
Ridgeback |
192.168.131.1 |
mybotshop |
Ridgeback MCU |
192.168.131.2 |
|
Nvidia IP |
192.168.131.4 |
mybotshop |
UR5e IP |
192.168.131.5 |
|
Hokuyo Front |
192.168.131.20 |
|
Hokuyo Rear |
192.168.131.21 |
|
Steamdeck |
192.168.131.150 |
|
Ouster |
192.168.131.22 |
|
Router |
192.168.131.100 |
Screen Connection
An alternative for connecting to the robot is by plugging in an HDMI cable as well as a mouse and keyboard. This allows you to connect the robot from your own local network.
ROS Multimachine
To use Rviz on your pc for faster updates please setup the multimachine. By default, if you connect to the built-in router, you need only to follow the builtin router subsection.
Multimachine - Client - Builtin Router
For all the terminals in your pc, you may export these environment variables. The ros master should correspond to the robots ip where as the ros ip and ros hostname should correspond to your pc’s ip that is connected to the robot in the same network.
export ROS_MASTER_URI = http://192.168.131.1:11311/
export ROS_IP =192.168.131. < your_assigned_ip_from_router >
export ROS_HOSTNAME =192.168.131. < your_assigned_ip_from_router >
Important
Please note that you should ideally have the mmp_description and mmp_viz rospackages built on your pc so that you may view
the robot over the network.
Multi Machine - Host - Custom Router
For all the terminals in the robot 4 — 5 recommended, you can export the following environment variables. The ip should correspond
to the ip address of your robot which has been obtained from sudo nmtui.
export ROS_MASTER_URI =http://192.168.0.219:11311/
export ROS_IP =192.168.0.219
export ROS_HOSTNAME =192.168.0.219
Multimachine - Client - Custom Router
For all the terminals in your pc, you may export these environment variables. The ros master should correspond to the robots ip where as the ros ip and ros hostname should correspond to your pc’s ip that is connected to the robot in the same network.
export ROS_MASTER_URI =http://192.168.0.219:11311/
export ROS_IP =192.168.0.225
export ROS_HOSTNAME =192.168.0.225
Important
Please note that you should ideally have the mmp_description and mmp_viz rospackages built on your pc so that you may view
the robot over the network.
Multimachine Usage
Stop the mmp service via (On the robot).
sudo service mmp stop
On the robot launch.
roslaunch mmp_startup system_startup.launch
On the users pc launch.
roslaunch mmp_viz view_robot.launch
Individual Component Activation
The ros drivers mentioned below are all automatically started when launching the accessories launch file. These drivers further expand on the functionality for interfacing as well as for independent component checking.
ROS Driver — UR5e + Robotiq 2F-85
Please follow this checklist to interact with the UR5e and Gripper via ROS.
Power on teach pendant — In Teach pendant Top Center Right
Release emergency switch — In Teach pendant Top Center
UR5e is in remote mode — In Teach pendant Top right
Launch ROS driver:
roslaunch mmp_arm ur5e_robotiq_driver.launch
To test the gripper run:
rosrun mmp_demo gripper.py
To test the UR5e and gripper use moveit you can use Moveit:
roslaunch mmp_ur_moveit_config mmp_moveit.launch
ROS Driver — Lift
Note
The lift driver is on by default from the startup job.
Start the driver via:
roslaunch mmp_lift base.launch
Move lift up 1 to -600 microsteps
rostopic pub -r 1 /cmd_lift std_msgs/Float32 "data : -600.0"
Move lift down 1 to 600 microsteps
rostopic pub -r 1 /cmd_lift std_msgs /Float32 "data : 600.0"
Activate Lifts softlock, for the lift to move
rosservice call /get_lift_manual_control "{}"
ROS Driver — Ouster + Hokuyo Front + Hokuyo Rear
Note
The Hokuyos are on by default from the startup job.
To launch all three lidars run:
roslaunch mmp_lidars ouster_hokuyos.launch
To launch the hokuyos only (ideal when working with realsense):
roslaunch mmp_lidars hokuyos.launch
ROS Driver — Realsense Camera
Start the wrist camera:
roslaunch mmp_realsense_cameras d405.launch
Start both cameras:
roslaunch mmp_realsense_cameras realsense.launch
Note
When both the Ouster and Realsense cameras work at the same time, the latency of the camera stream increases due large amount of data transfer. Ideally, Ouster should be running or Realsense. Both can work at the same time but then Realsense suffer from latency issues.
Caution
Power off the UR5e correctly via the teach pendant.
Always remain close to the emergency stop buttons.
Sudden jerks to the mobile robot can cause a disconnection, the velocity that is provided should always have be smooth either through the joystick, keyboard, or program.
Known Issues
Ridgeback shuts down sometimes when powered on.
◦ In rare cases the network does not startup in time causing the ridgeback to shut down.Powercycling should resolve the issue.
Realsense cameras lagging
◦ Utilize multi-machine setup.
◦ Ensure ouster is not running concurrently with the realsense as it takes up alot of bandwith which may be causing the lag.
Lift joystick not working
◦ This occasionally occurs if you try to move the lift while releasing the soft limit switches. Restarting the mmp service will correct this.