Husky GE
This specifies the configuration for Husky GE.
Components
Controller - SteamDeck Control
Wireless Router - Telefonika 3G/4G
Access Point - TP-Link AX-800
Computer - NVIDIA Jetson AGX Orin
IMU - Phidgets Spatial 3/3/3 Basic
GPS - Fixposition
GPS - EMLID REACH RS2+
Lidar - Ouster OS1 32
Lidar - RoboSense RS-LiDAR-M1 Plus x2
Depth Camera - Stereolabs ZED 2i Depth Camera
Depth Camera - Intel® RealSense Depth Camera D455 x2
SSD - WD Elements 2TB
Steamdeck Control
Important
Please refer to the Steamdeck Docs - 1100::Husky for all control information.
Getting Started
To start-up the Husky, the instructional video playlist can be used which details the opening and use of the Husky.
Data Sheets
Documentations
Network-Setup
Instructions for interfacing with the robot using Ubuntu 22.04 and ROS2 Humble.
Important
This procedure should be followed after reading the manuals for the Clearpath Husky as well as the sensors. Furthermore, all of the Husky’s functionality can be verified via the tutorials by Clearpath. Instructions for setup can be found at Husky Docs. This guide builds upon the information from the docs.
The Ethernet port at the back of the Husky can be utilized for setting up communication via LAN.
Static Network Connection
For the first time, one needs to connect through a LAN cable to configure the robot’s network.
To create a static connection on your PC (not the robot), in Ubuntu go to Settings → Network then click on + and create a new connection.
Change the connection to Manual in the IPv4 settings.
Set the Address IP as 192.168.131.51 and the Netmask as 24.
Click save and restart your network.
After a successful connection, check the host’s local IP by typing in the Host PC’s terminal:
ifconfig
Now, ping the robot:
ping 192.168.131.1
Access the robot via SSH:
ssh -XC administrator@192.168.131.1
The default password is:
mybotshop
Husky IP Addresses
Robot |
IP Addresses |
Password |
|---|---|---|
Husky MCU |
192.168.131.1 |
mybotshop |
Husky Nvidia |
192.168.131.4 |
mybotshop |
Husky Router |
192.168.131.100 |
mybotshop |
Husky Accesspoint |
192.168.131.200 |
mybotshop |
Steamdeck |
192.168.131.150 |
mybotshop |
Husky Ouster |
192.168.131.20 |
|
Husky Robosense I |
192.168.131.21 |
|
Husky Robosense II |
192.168.131.22 |
|
Husky Fixposition |
192.168.131.25 |
|
Husky Emlid RS2 |
192.168.2.15 |
Note
Sometimes other networks can cause disruptions when connecting to the Husky. It is best to have only your connection to the robot active and all others inactive.
Quick-Start
This section will walk you through the steps to record a ROS2 bag file for all sensors on your robot to reconstruct the environment. Ensure your robot is fully set up and all necessary ROS2 nodes are running by following the below-mentioned steps one by one in order.
Important
When trying to SSH into the robot from your computer please make sure to connect your PC with the husky Wifi network coming up as Husky-A200-1045-5G-AP using password mybotshop. Once connected then you can ssh into the Husky PC.
Powering on the Husky
Power on |
Emergency Switch Release |
Charging Port |
|---|---|---|
|
|
|
Ensure the emergency button is released as well as the key is turned to the unlock position.
To check if the emergency switch is released, twist the switch in the indicated direction on it. If it pops up, then the switch has successfully been released.
If the robot light is yellow, it means that either the emergency switch is not released or the key is not turned or the battery is not correctly plugged in.
Press the power button on the front of the husky. It has the power symbol as displayed.
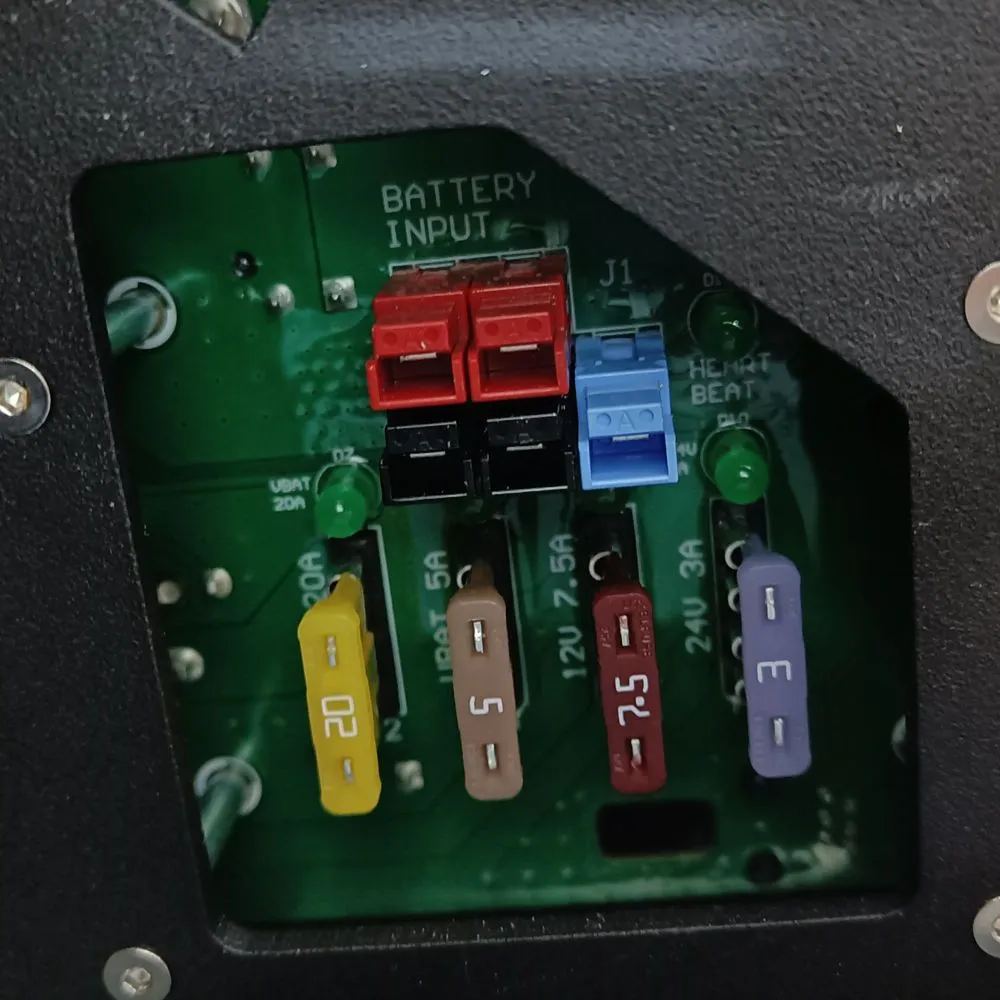
Charging the Husky
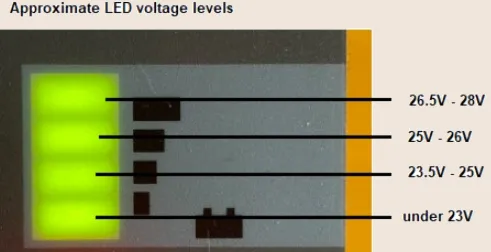
The power port can be used to charge the Husky. The indicator shows the voltage levels of the Husky and does not necessarily indicate the remaining power available.
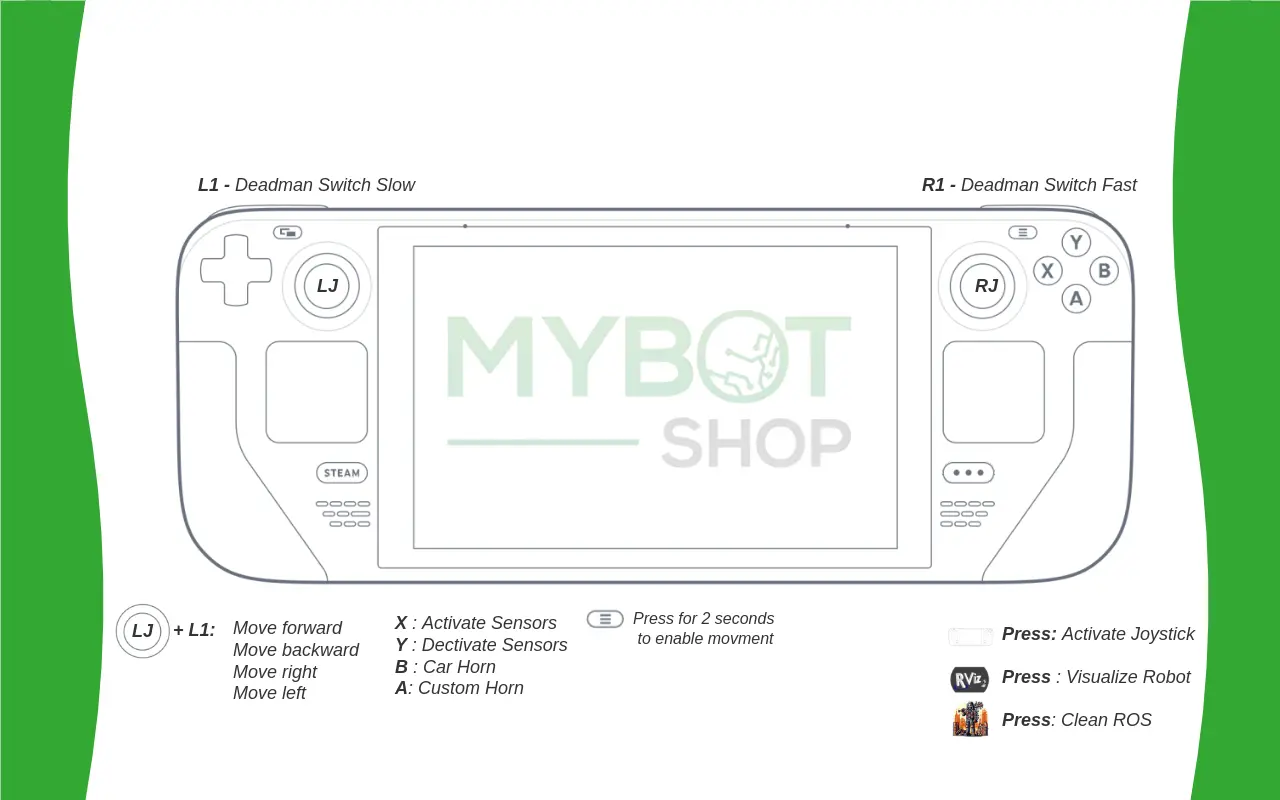
Steamdeck Controller | Teleop Control Joystick | Husky
Important
When launching the Joylauncher, do not touch any of the buttons until the steamdeck displays the robot is connected or not connected and also make sure to wait for 10-15 sec so that the steamdeck is connected with Husky Wifi before launching anything on steamdeck.
Note
The Steamdeck usage is in experimental phase. Loss of connection or (laggy connection) may lead to the robot moving and/or not stopping immediately. Caution should be taken when using the Steamdeck for the operation of the robot!
Digital Twin (RVIZ2)
To visualize the hsky, you can run:
ros2 launch hsky_viz view_robot.launch
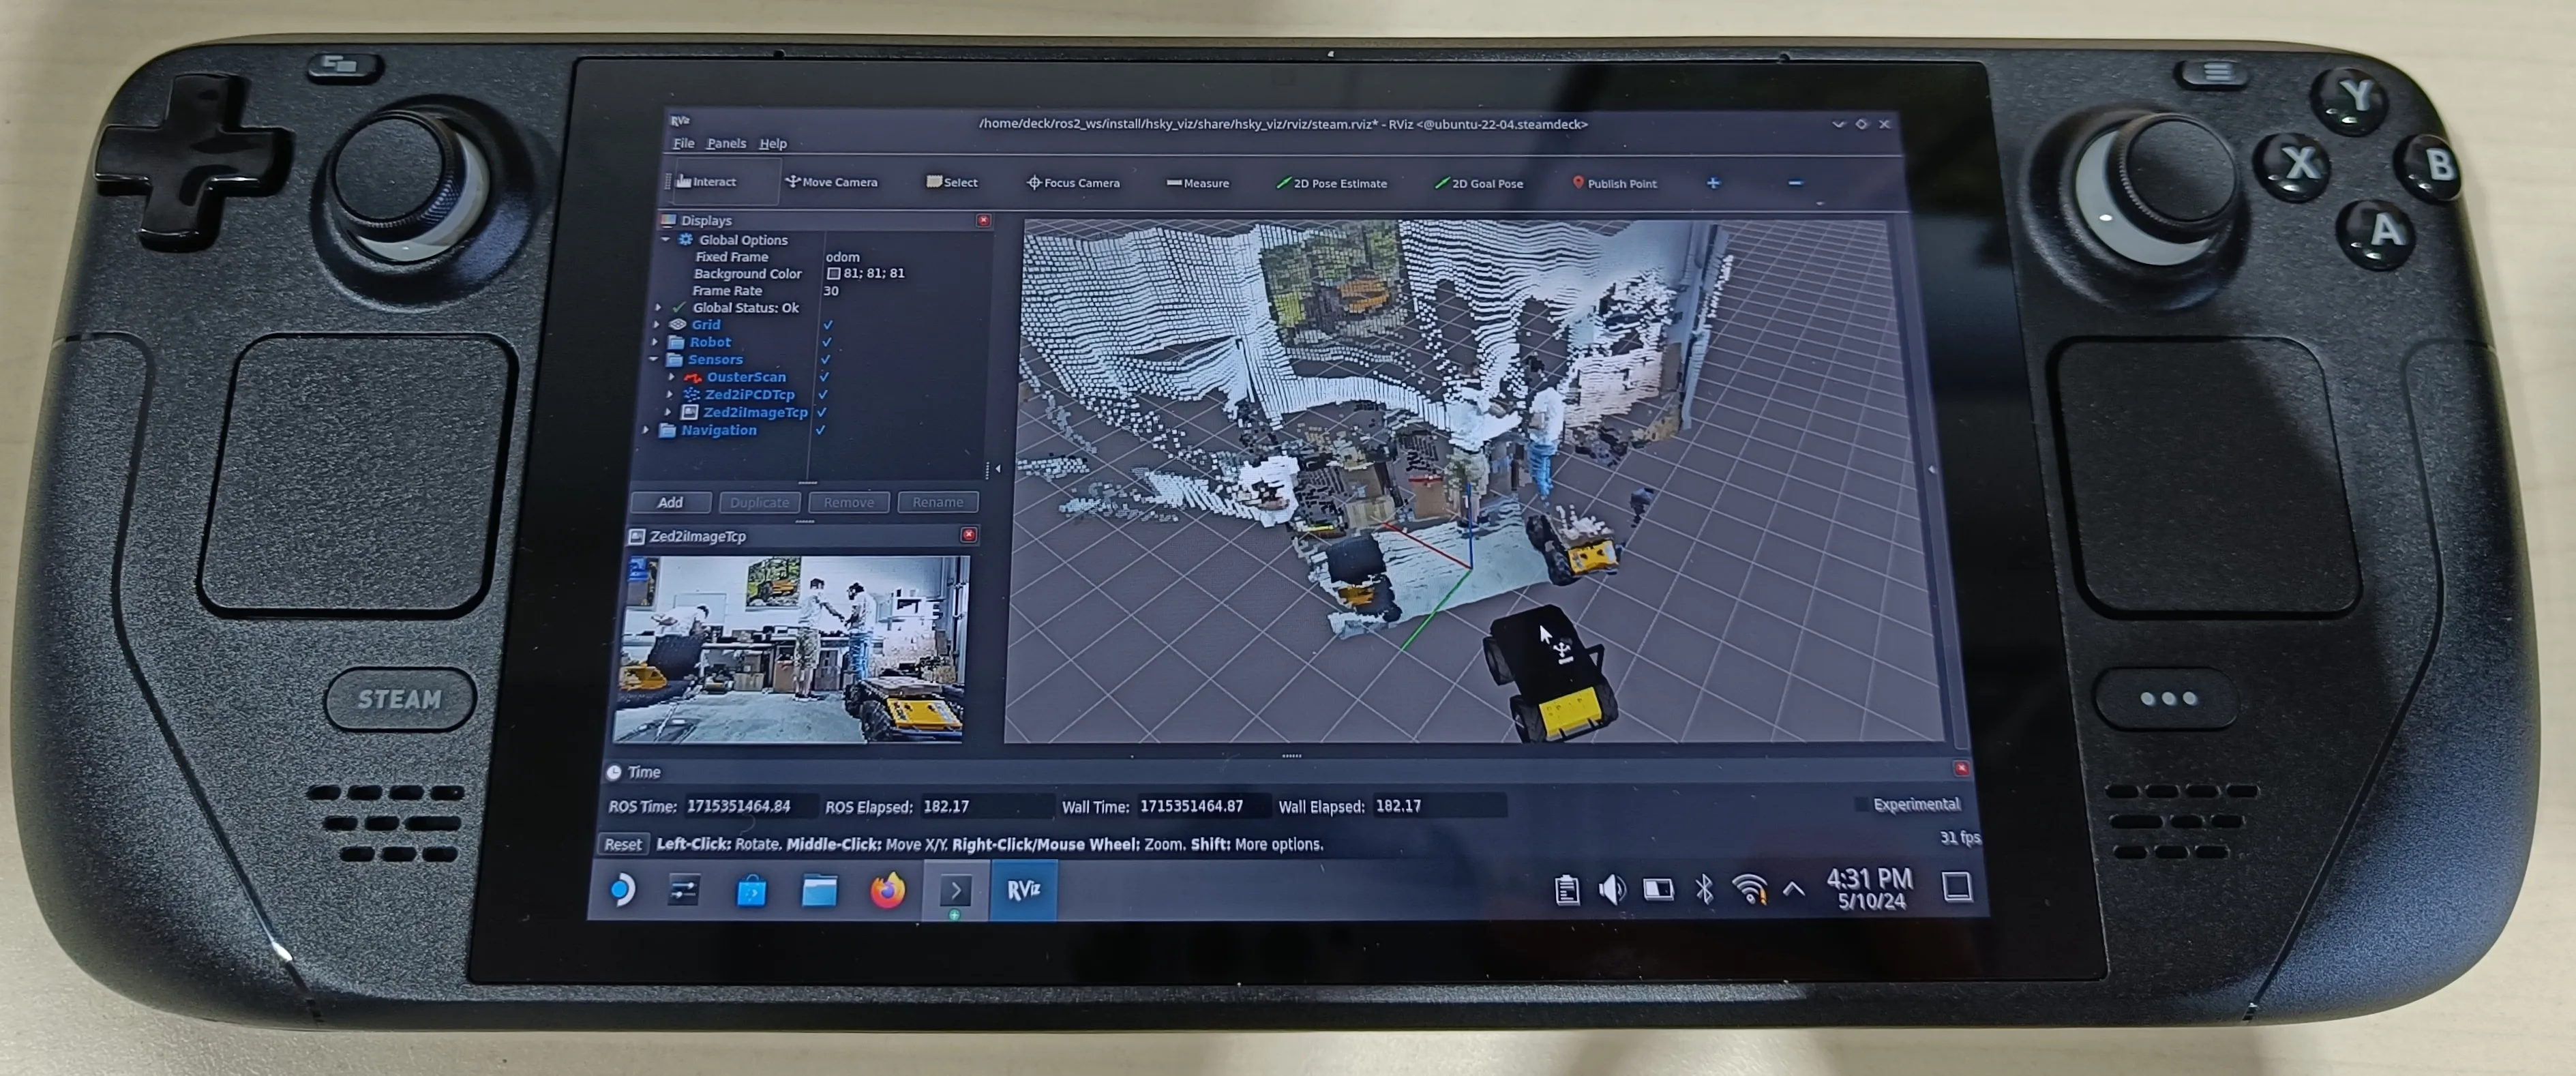
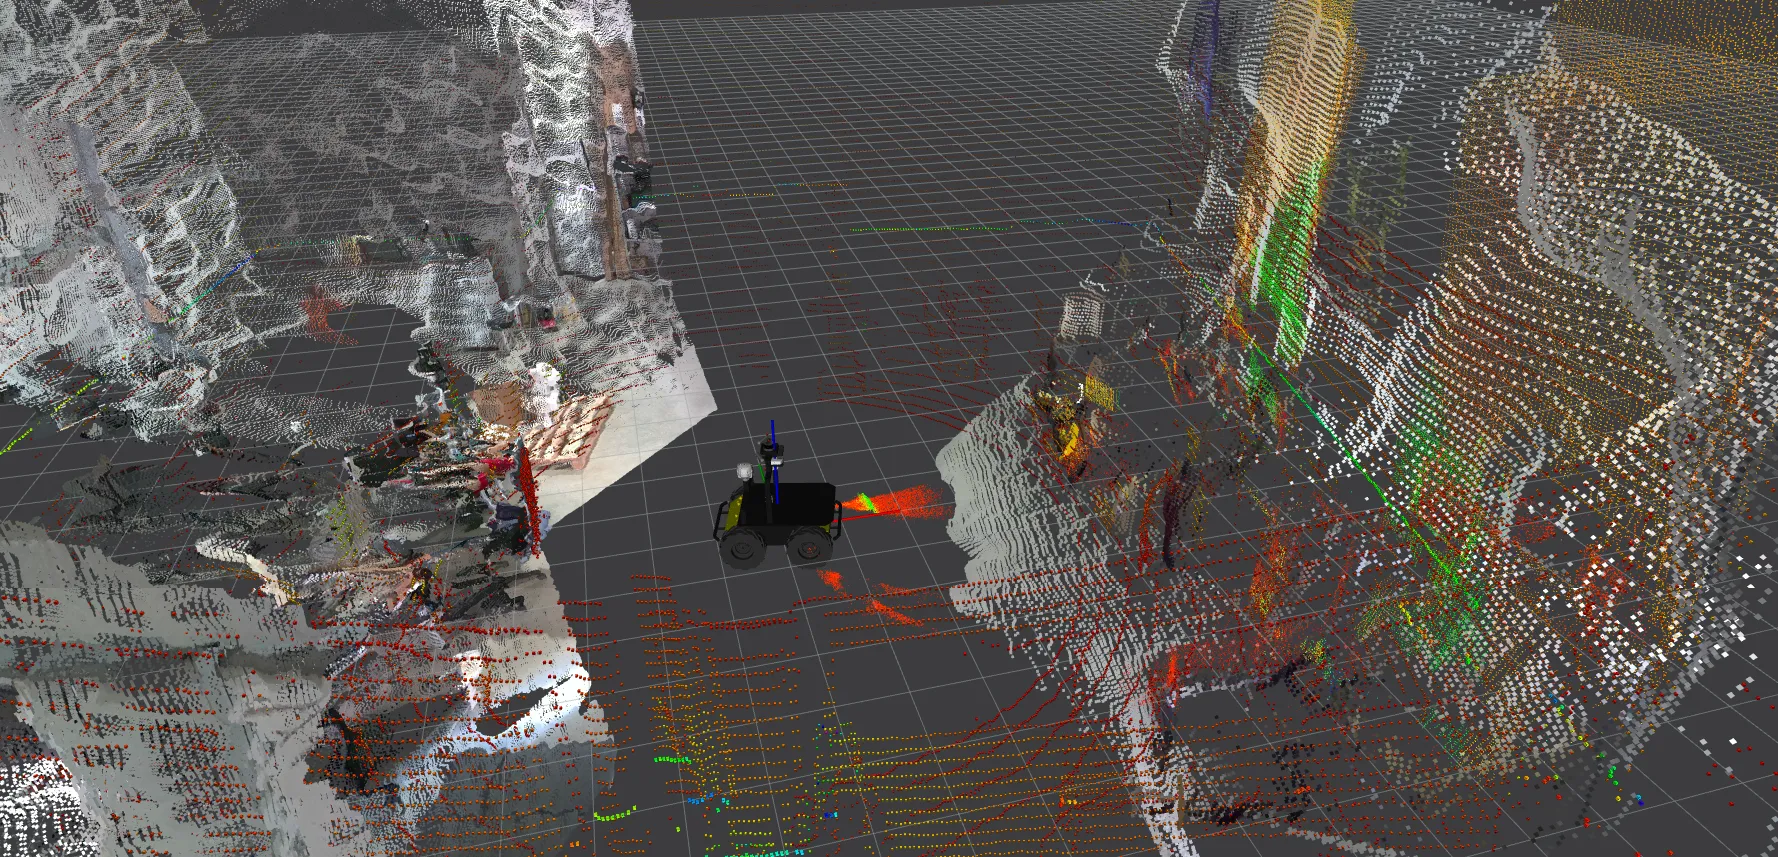
Important
Please Activate TCP tunnel function by pressing B + Up arrow to see the Rviz digital twin as well as the data from all the sensors on steamdeck. If in case the Zed2i camera depth cloud, as well as the image, does not show then please first restart the husky driver reactivate TCP tunnel, and then reopen the visualizer on steamdeck.
ROS2 Drivers
The pertinent ros2 drivers mentioned below are used when launching the system launch file. These drivers further expand on the functionality for interfacing as well as for independent component checking.
ROS2 Driver | Fixposition
The Fixposition is off by default from the startup job. To launch the Fixposition only:
ros2 launch hsky_gps fixposition.launch.py
To check the Fixposition if it is running:
sudo service mbs-fixposition status
To check the Fixposition webserver, connect to Husky’s WiFi and go to the IP 192.168.131.25.
Activation via steamdeck:
L4 + Up arrow Activate Fixposition GPS.
L4 + Down arrow Deactivate Fixposition GPS.
ROS2 Driver | Ouster
The Ouster is off by default from the startup job. To launch the Ouster only:
ros2 launch hsky_lidars ouster.launch.py
To check the Ouster if it is running:
sudo service mbs-ouster status
Activation via steamdeck:
R4 + Up arrow Activate Ouster Lidar.
R4 + Down arrow Deactivate Ouster Lidar.
ROS2 Driver | Robosense
The Robosense LIDARs are off by default from the startup job. To launch the Robosense LIDARs only:
ros2 launch hsky_lidars robosense.launch.py
To check the Robosense if it is running:
sudo service mbs-robosense status
Activation via steamdeck:
R5 + Up arrow Activate Robosense Lidars.
R5 + Down arrow Deactivate Robosense Lidars.
ROS2 Driver | Realsense
The Realsense Depth Cameras are off by default from the startup job. To launch the Realsense Cameras you need to launch them separately:
ros2 launch hsky_dept_cameras realsense_i.launch.py
ros2 launch hsky_dept_cameras realsense_ii.launch.py
To check the Realsense if it is running:
sudo service mbs-realsense_i status
sudo service mbs-realsense_ii status
Activation via steamdeck:
L2 + Up arrow Activate Realsense-i Depth camera.
L2 + Down arrow Deactivate Realsense-i Depth camera.
R2 + Up arrow Activate Realsense-ii Depth camera.
R2 + Down arrow Deactivate Realsense-ii Depth camera.
ROS2 Driver | Emlid RS2 GPS
The Emlid GPS is off by default from the startup job. To launch the Emlid GPS only:
ros2 launch hsky_gps emlid_rs2.launch.py
To check the Emlid if it is running:
sudo service mbs-emlid status
Activation via steamdeck:
L5 + Up arrow Activate Emlid RS2 GPS.
L5 + Down arrow Deactivate Emlid RS2 GPS.
ROS2 Driver | ZED2i
The ZED2i is off by default from the startup job. To launch the ZED2i only in the (in the Nvidia Jetson Orin):
ros2 launch nv_sensors zed2i_humble.launch.py
To check the ZED2i if it is running (in the Nvidia Jetson Orin):
sudo service mbs-depth-cameras status
Activation via steamdeck:
Y + Up arrow Activate Zed2i Depth-Camera.
Y + Down arrow Deactivate Zed2i Depth-Camera.
In nv_sensors config, you can configure the parameters for the camera. If higher resolution of depth cloud is required, change the pub_downscale_factor to a lower value such as 2.0.
ROS2 Driver | 3D SLAM
To activate 3D SLAM for the Husky:
ros2 launch hsky_3d_slam system.launch.py
This will publish the map to odom transform with 3D SLAM.
ROS2 | Recording Bags
The ros2 bag topics that you want to add/remove/configure can be done by editing the topics required for the Husky Steamdeck. For this, in the Steamdeck Computer go to the file:
/home/deck/ros2_ws/src/mybotshop/hsky_steamdeck/config/steamdeck.yaml
Note
The ros2 bag storage size, and max duration can also be configured from this file.
Be sure to restart the Steamdeck driver to ensure the changes have taken place. To change the save file location, in the Husky PC go to:
/home/administrator/ros2_ws/src/mybotshop/hsky_utils/config/hsky_utils.yaml
By default, this is configured to save on the provided external hard drive.
B + A Start Recording ROS2 bags
B + Y Save Recording ROS2 bags in external hard drive.
Important
Once the recording for the ROS2 bag has started please restart the husky drivers once by pressing A + Up arrow. Once you have stopped recording please wait for 2-5 mins depending on the length of the record as it takes time for the on-board PC to save data.
Note
The Ros2 bag files will be saved automatically on the external hard drive with the recording date and time as the file’s name. You can see all the files in the directory /media/…
ROS2 Information
ROS DOMAIN ID: 0
ROS LOCALHOST ONLY: 0
RMW Middleware: rmw_fastrtps_cpp
Robot Information
The Nvidia Jetson Orin has its time synced to the Husky via a chrony job.
Please note that the NTP server for the Husky is turned off as time syncing with the internet causes it to initially jump for around 1 to 2 minutes only on startup. This issue is being investigated and will be eventually solved by the Clearpath team as it stems from their drivers.
Important
It is advised to provide a SIM card to the Husky’s router for the internet and for Fixposition.